# Produit - GitLab

Contient les procédures et documentations liées à GITLAB

# GITLAB - Configuration SSO Oauth avec keycloak

<table id="bkmrk-difficult%C3%A9%2A-%3Cdescrip" style="border-collapse: collapse; width: 100%; height: 46.8px; border-width: 1px; border-style: hidden;"><colgroup><col style="width: 20%;"></col><col style="width: 80%;"></col></colgroup><tbody><tr style="height: 46.8px;"><td style="height: 46.8px; border: 1px groove rgb(52,73,94);">[![image.png](https://docs.labs404.fr/uploads/images/gallery/2026-07/scaled-1680-/Aiuconfirme-png.png)](https://docs.labs404.fr/uploads/images/gallery/2026-07/scaled-1680-/Aiuconfirme-png.png)</td><td style="height: 46.8px; border-width: 1px; background-color: rgb(236,202,250); vertical-align: top;">Difficulté : Confirmé

Notions : Authentification, SSO

</td></tr></tbody></table>

---

### <span style="color: rgb(52, 73, 94);">**<span style="text-decoration: underline;">I. Introduction</span>**</span>

Cette procédure à pour but d'expliquer le paramétrage de l'authentification SSO de Gitlab avec Keycloak.

---

### <span style="color: rgb(52, 73, 94);">**<span style="text-decoration: underline;">II. Côté Keycloak</span>**</span>

#### **<span style="color: rgb(35, 111, 161);">2.1 Créer le client</span>** 

Se connecter au keycloak et choisir le realm sur lequel ajouter le client Gtilab.

[![image.png](https://docs.labs404.fr/uploads/images/gallery/2026-07/scaled-1680-/Bleimage-png.png)](https://docs.labs404.fr/uploads/images/gallery/2026-07/scaled-1680-/Bleimage-png.png)

Cliquer sur '<span style="color: rgb(132,63,161);">***Create client***</span>'

[![image.png](https://docs.labs404.fr/uploads/images/gallery/2026-07/scaled-1680-/G5fimage-png.png)](https://docs.labs404.fr/uploads/images/gallery/2026-07/scaled-1680-/G5fimage-png.png)

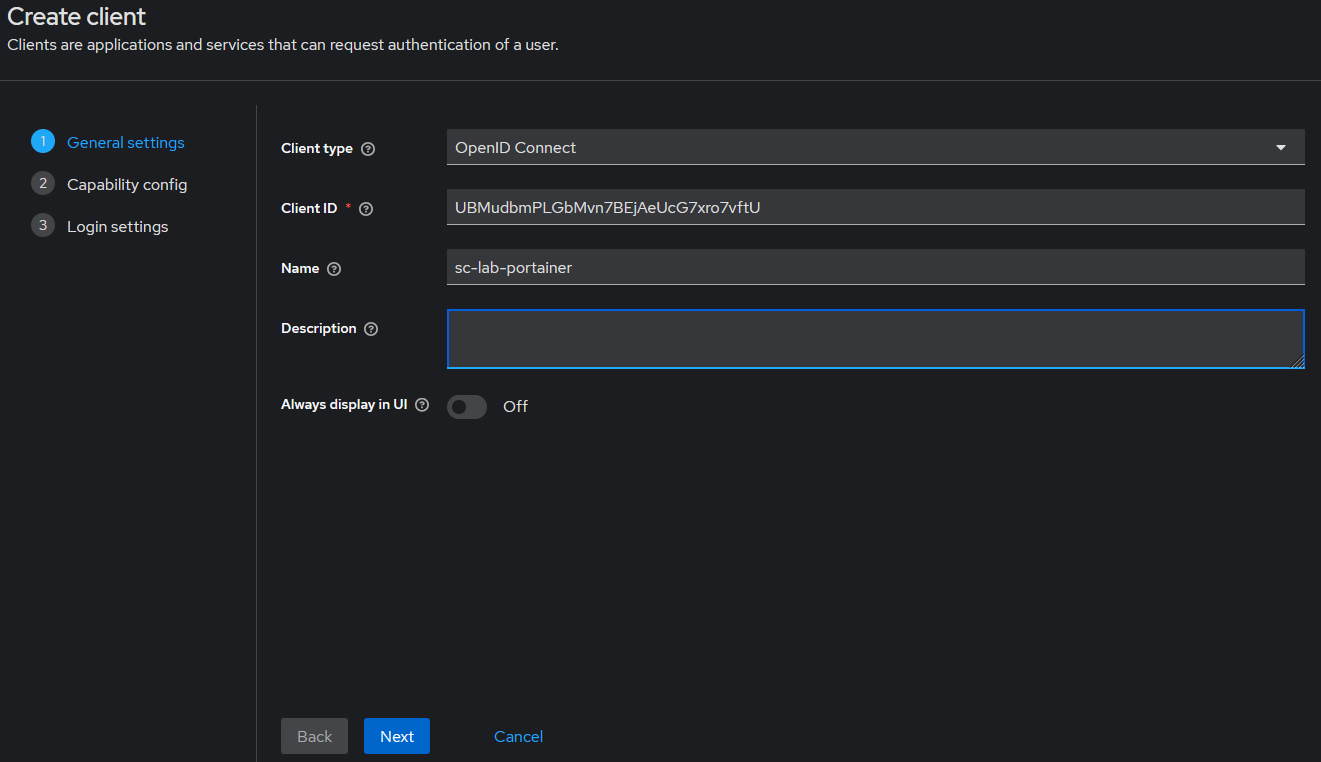
Sélectionner le type '<span style="color: rgb(132,63,161);">***OpenID Connect***</span>'

Générer ou définir un '<span style="color: rgb(132,63,161);">***clientID***</span>'.

<p class="callout info">*Il est possible d'utiliser un générateur afin de générer un e chaîne de 32 caractères. Par exemple : [ici](https://wtools.io/generate-random-password-online).*</p>

<p class="callout success">**Best Practice** *: 32 caractères avec minuscules, majuscules et chiffres.*</p>

Choisir un nom parlant.

Puis faire '<span style="color: rgb(132,63,161);">***Next***</span>'.

[![image.png](https://docs.labs404.fr/uploads/images/gallery/2026-07/scaled-1680-/X1Aimage-png.png)](https://docs.labs404.fr/uploads/images/gallery/2026-07/scaled-1680-/X1Aimage-png.png)

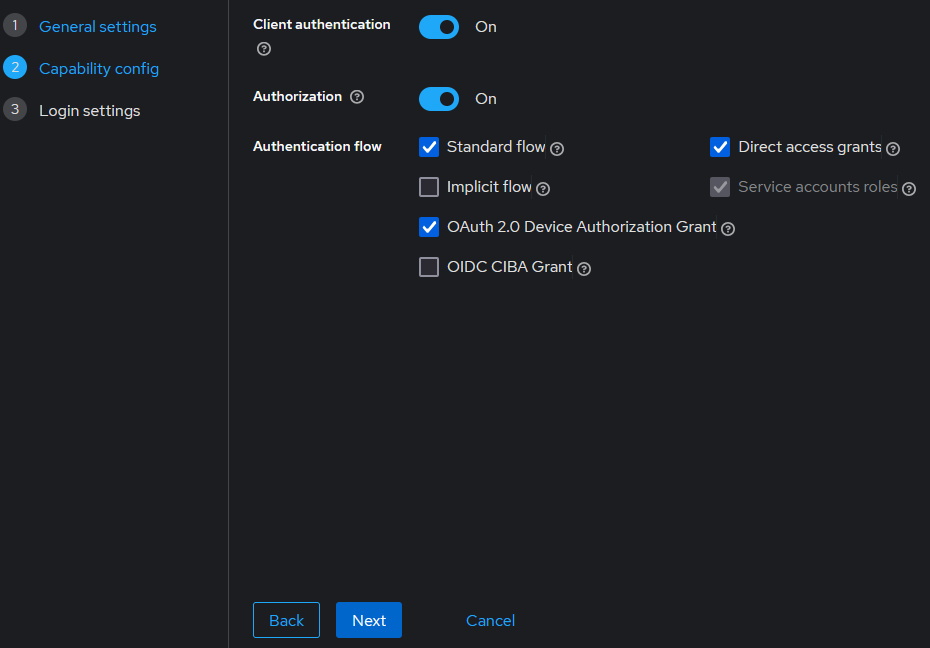
Sur la page suivante, activer '<span style="color: rgb(132,63,161);">***Client authentication***</span>' et '<span style="color: rgb(132,63,161);">***Authorization***</span>'.

Vérifier que les cases suivantes sont cochées.

Puis faire '<span style="color: rgb(132,63,161);">***Next***</span>'.

[![image.png](https://docs.labs404.fr/uploads/images/gallery/2026-07/scaled-1680-/6suimage-png.png)](https://docs.labs404.fr/uploads/images/gallery/2026-07/scaled-1680-/6suimage-png.png)

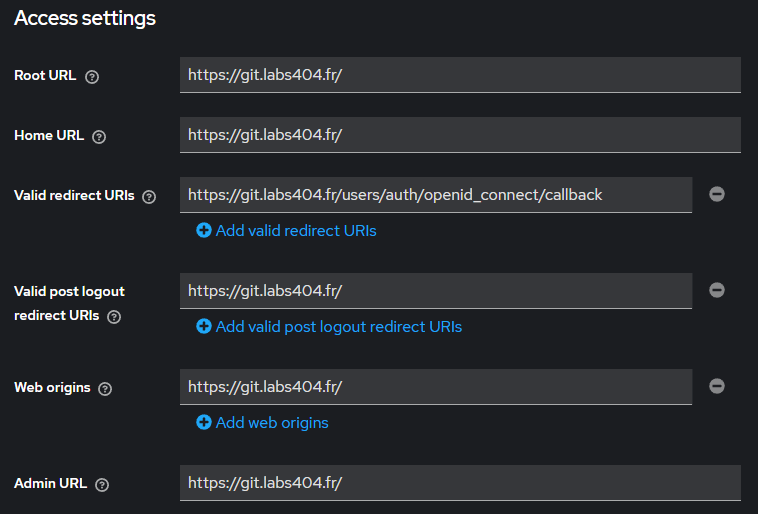
Entrer les URL au format suivant (en modifiant les FQND).

Puis faire '<span style="color: rgb(132,63,161);">***Save***</span>'.

[![image.png](https://docs.labs404.fr/uploads/images/gallery/2026-07/scaled-1680-/FKkimage-png.png)](https://docs.labs404.fr/uploads/images/gallery/2026-07/scaled-1680-/FKkimage-png.png)

#### **<span style="color: rgb(35, 111, 161);">2.2 Préparer la synchro des groupes</span>** 

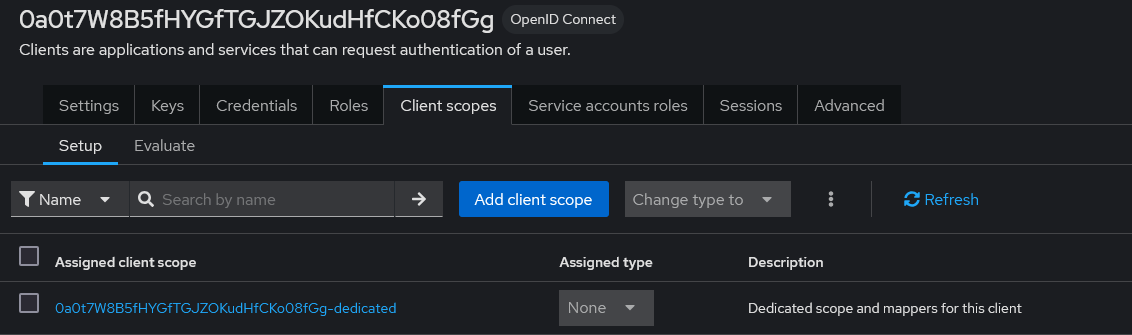
Afin de pouvoir gérer les droits depuis le keycloak et synchroniser les groupes, aller dans l'onglet '<span style="color: rgb(132,63,161);">***Client scope***</span>'.

Choisir le client scope au nom du client suivi de '<span style="color: rgb(132,63,161);">***-dedicated***</span>'.

[![image.png](https://docs.labs404.fr/uploads/images/gallery/2026-07/scaled-1680-/hIoimage-png.png)](https://docs.labs404.fr/uploads/images/gallery/2026-07/scaled-1680-/hIoimage-png.png)

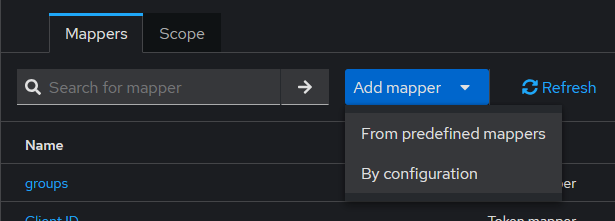
Faire '<span style="color: rgb(132,63,161);">***Add Mapper***</span>' puis '<span style="color: rgb(132,63,161);">***By Configuration***</span>'.

[![image.png](https://docs.labs404.fr/uploads/images/gallery/2026-07/scaled-1680-/Izximage-png.png)](https://docs.labs404.fr/uploads/images/gallery/2026-07/scaled-1680-/Izximage-png.png)

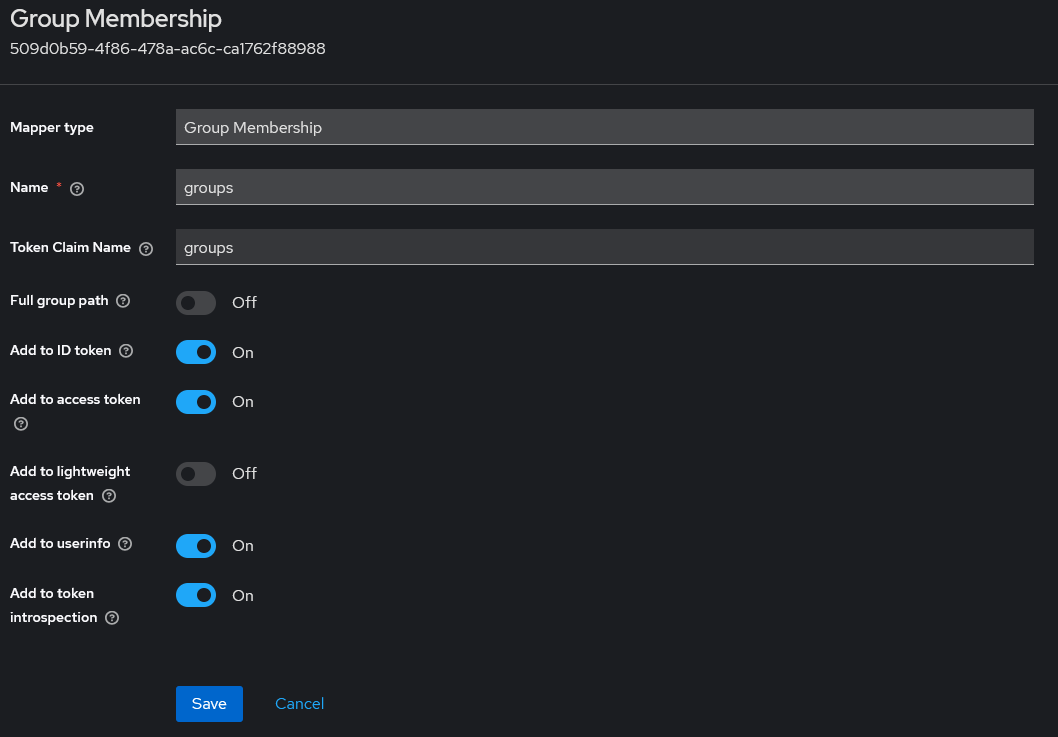
Choisir '<span style="color: rgb(132,63,161);">***Group Membership***</span>'.

[![image.png](https://docs.labs404.fr/uploads/images/gallery/2026-07/scaled-1680-/Wklimage-png.png)](https://docs.labs404.fr/uploads/images/gallery/2026-07/scaled-1680-/Wklimage-png.png)

Définir le nom du <span style="color: rgb(132,63,161);">***mapper***</span> en '<span style="color: rgb(132,63,161);">***groups***</span>'.

Définir le Token <span style="color: rgb(132,63,161);">***claim name***</span> en '<span style="color: rgb(132,63,161);">***groups***</span>'.

Vérifier que les fonctions suivantes soit activées / désactivées.

Puis faire '<span style="color: rgb(132,63,161);">***Save***</span>'.

[![image.png](https://docs.labs404.fr/uploads/images/gallery/2026-07/scaled-1680-/Tjeimage-png.png)](https://docs.labs404.fr/uploads/images/gallery/2026-07/scaled-1680-/Tjeimage-png.png)


#### **<span style="color: rgb(35, 111, 161);">2.3 Récupérer les URL</span>** 

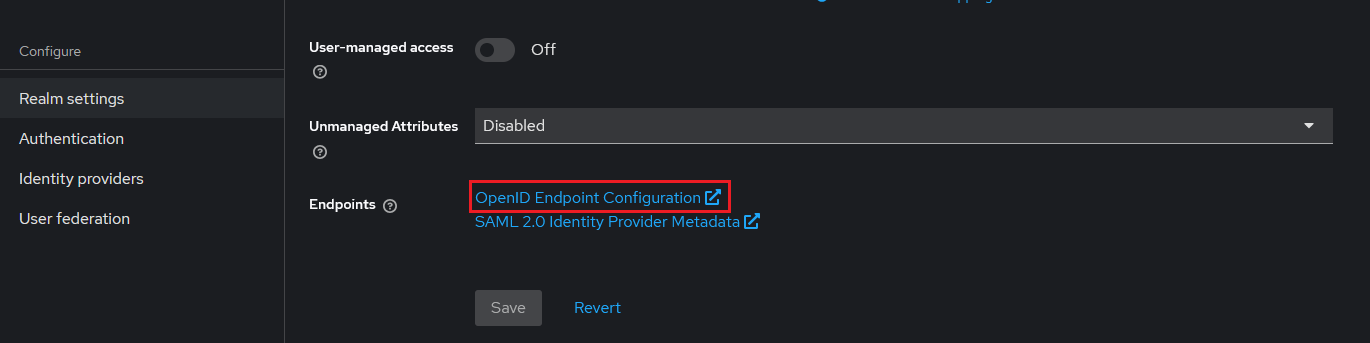
Pour récupérer les URL, sélectionner le realm et faire '<span style="color: rgb(132,63,161);">***Realm settings***</span>' puis cliquer sur '<span style="color: rgb(132,63,161);">***OpenID Endpoint Configuration***</span>'.

[![image.png](https://docs.labs404.fr/uploads/images/gallery/2026-07/scaled-1680-/96Dimage-png.png)](https://docs.labs404.fr/uploads/images/gallery/2026-07/scaled-1680-/96Dimage-png.png)

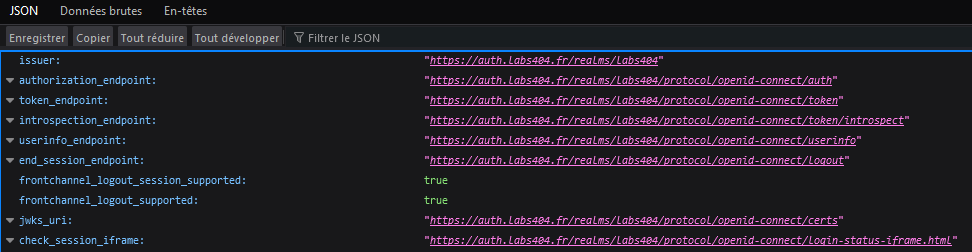
Une page s'affiche et permet de récupérer les URL.

[![image.png](https://docs.labs404.fr/uploads/images/gallery/2026-07/scaled-1680-/8tXimage-png.png)](https://docs.labs404.fr/uploads/images/gallery/2026-07/scaled-1680-/8tXimage-png.png)
---

### <span style="color: rgb(52, 73, 94);">**<span style="text-decoration: underline;">II. Côté Gitlab</span>**</span>

Se connecter en <span style="color: rgb(132,63,161);">***SSH***</span> dans le container ou serveur / instance booksack.

Modifier le fichier '<span style="color: rgb(132,63,161);">***/etc/gitlab/gitlab.rb***</span>'

Ajouter le code suivant en modifiant les données nécessaires :

```
gitlab_rails['omniauth_enabled'] = true                                                                     
gitlab_rails['omniauth_allow_single_sign_on'] = ['openid_connect']

gitlab_rails['omniauth_providers'] = [
  {
    name: "openid_connect",
    label: "Login with OAuth",
    args: {
      name: "openid_connect",
      scope: ["openid","profile","email"],
      response_type: "code",
      issuer: "https://auth.labs404.fr/realms/LABS404",
      discovery: true,
      client_auth_method: "query",
      uid_field: "preferred_username",
      pkce: true,
      client_options: {
        identifier: "<Client ID>",
        secret: "<Client Secret>",
        redirect_uri: "https://git.labs404.fr/users/auth/openid_connect/callback",
        gitlab: {
          groups_attribute: "groups",
          admin_groups: ["Admin"]
        }
      }
    }
  }
]
```

Recharger ensuite la configuration avec la commande :

```
gitlab-ctl reconfigure
```

[![image.png](https://docs.labs404.fr/uploads/images/gallery/2026-07/scaled-1680-/n2jimage-png.png)](https://docs.labs404.fr/uploads/images/gallery/2026-07/scaled-1680-/n2jimage-png.png)