# Bookstack - Configuration SSO Oauth avec keycloak

<table id="bkmrk-difficult%C3%A9%2A-%3Cdescrip" style="border-collapse: collapse; width: 100%; height: 46.8px; border-width: 1px; border-style: hidden;"><colgroup><col style="width: 20%;"></col><col style="width: 80%;"></col></colgroup><tbody><tr style="height: 46.8px;"><td style="height: 46.8px; border: 1px groove rgb(52,73,94);">[![image.png](https://docs.labs404.fr/uploads/images/gallery/2026-07/scaled-1680-/Aiuconfirme-png.png)](https://docs.labs404.fr/uploads/images/gallery/2026-07/scaled-1680-/Aiuconfirme-png.png)</td><td style="height: 46.8px; border-width: 1px; background-color: rgb(236,202,250); vertical-align: top;">Difficulté : Confirmé

Notions : Authentification, SSO

</td></tr></tbody></table>

---

### <span style="color: rgb(52, 73, 94);">**<span style="text-decoration: underline;">I. Introduction</span>**</span>

Cette procédure à pour but d'expliquer le paramétrage de l'authentification SSO de Bookstack avec Keycloak.

---

### <span style="color: rgb(52, 73, 94);">**<span style="text-decoration: underline;">II. Côté Keycloak</span>**</span>

#### **<span style="color: rgb(35, 111, 161);">2.1 Créer le client</span>** 

Se connecter au keycloak et choisir le realm sur lequel ajouter le client portainer.

[![image.png](https://docs.labs404.fr/uploads/images/gallery/2026-07/scaled-1680-/Bleimage-png.png)](https://docs.labs404.fr/uploads/images/gallery/2026-07/scaled-1680-/Bleimage-png.png)

Cliquer sur '<span style="color: rgb(132,63,161);">***Create client***</span>'

[![image.png](https://docs.labs404.fr/uploads/images/gallery/2026-07/scaled-1680-/G5fimage-png.png)](https://docs.labs404.fr/uploads/images/gallery/2026-07/scaled-1680-/G5fimage-png.png)

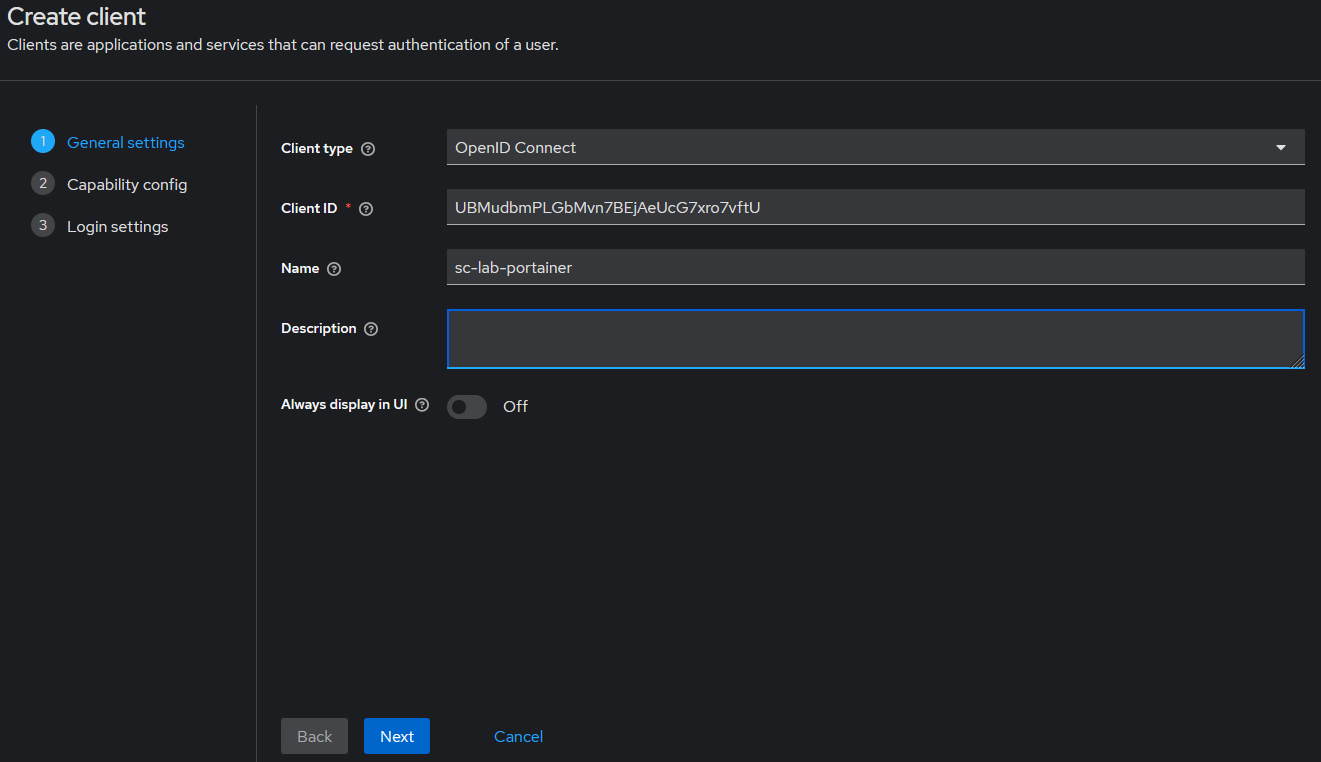
Sélectionner le type '<span style="color: rgb(132,63,161);">***OpenID Connect***</span>'

Générer ou définir un '<span style="color: rgb(132,63,161);">***clientID***</span>'.

<p class="callout info">*Il est possible d'utiliser un générateur afin de générer un e chaîne de 32 caractères. Par exemple : [ici](https://wtools.io/generate-random-password-online).*</p>

<p class="callout success">**Best Practice** *: 32 caractères avec minuscules, majuscules et chiffres.*</p>

Choisir un nom parlant.

Puis faire '<span style="color: rgb(132,63,161);">***Next***</span>'.

[![image.png](https://docs.labs404.fr/uploads/images/gallery/2026-07/scaled-1680-/X1Aimage-png.png)](https://docs.labs404.fr/uploads/images/gallery/2026-07/scaled-1680-/X1Aimage-png.png)

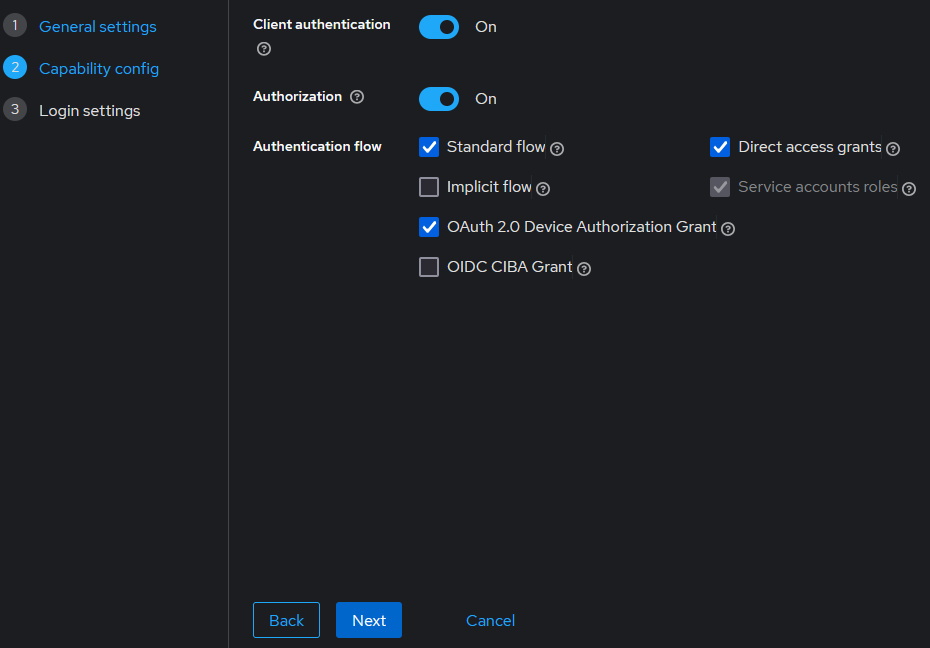
Sur la page suivante, activer '<span style="color: rgb(132,63,161);">***Client authentication***</span>' et '<span style="color: rgb(132,63,161);">***Authorization***</span>'.

Vérifier que les cases suivantes sont cochées.

Puis faire '<span style="color: rgb(132,63,161);">***Next***</span>'.

[![image.png](https://docs.labs404.fr/uploads/images/gallery/2026-07/scaled-1680-/6suimage-png.png)](https://docs.labs404.fr/uploads/images/gallery/2026-07/scaled-1680-/6suimage-png.png)

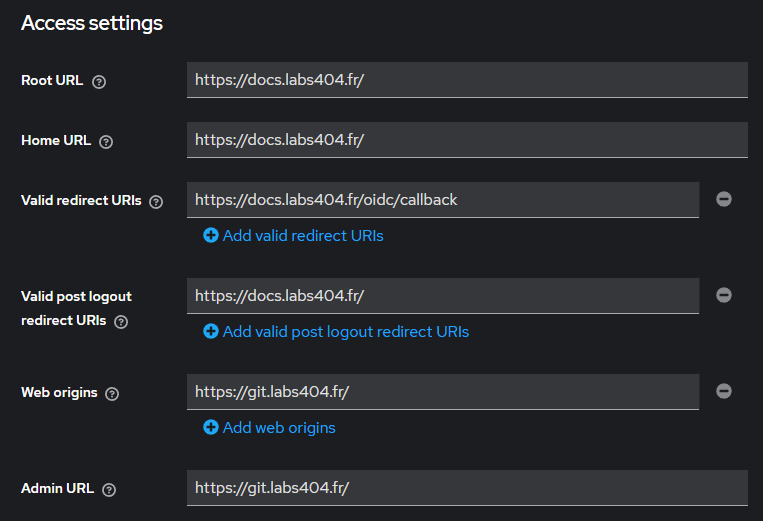
Entrer les URL au format suivant (en modifiant les FQND).

Puis faire '<span style="color: rgb(132,63,161);">***Save***</span>'.

[![image.png](https://docs.labs404.fr/uploads/images/gallery/2026-07/scaled-1680-/CPAimage-png.png)](https://docs.labs404.fr/uploads/images/gallery/2026-07/scaled-1680-/CPAimage-png.png)

#### **<span style="color: rgb(35, 111, 161);">2.2 Préparer la synchro des groupes</span>** 

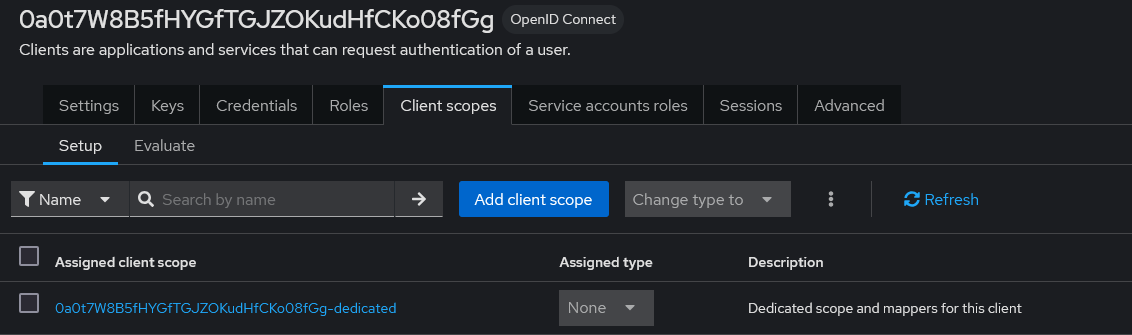
Afin de pouvoir gérer les droits depuis le keycloak et synchroniser les groupes, aller dans l'onglet '<span style="color: rgb(132,63,161);">***Client scope***</span>'.

Choisir le client scope au nom du client suivi de '<span style="color: rgb(132,63,161);">***-dedicated***</span>'.

[![image.png](https://docs.labs404.fr/uploads/images/gallery/2026-07/scaled-1680-/hIoimage-png.png)](https://docs.labs404.fr/uploads/images/gallery/2026-07/scaled-1680-/hIoimage-png.png)

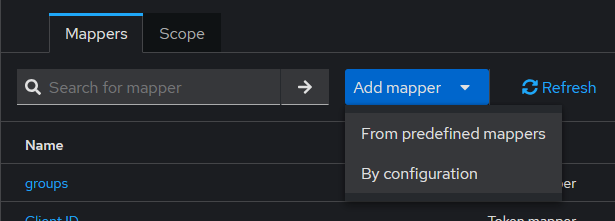
Faire '<span style="color: rgb(132,63,161);">***Add Mapper***</span>' puis '<span style="color: rgb(132,63,161);">***By Configuration***</span>'.

[![image.png](https://docs.labs404.fr/uploads/images/gallery/2026-07/scaled-1680-/Izximage-png.png)](https://docs.labs404.fr/uploads/images/gallery/2026-07/scaled-1680-/Izximage-png.png)

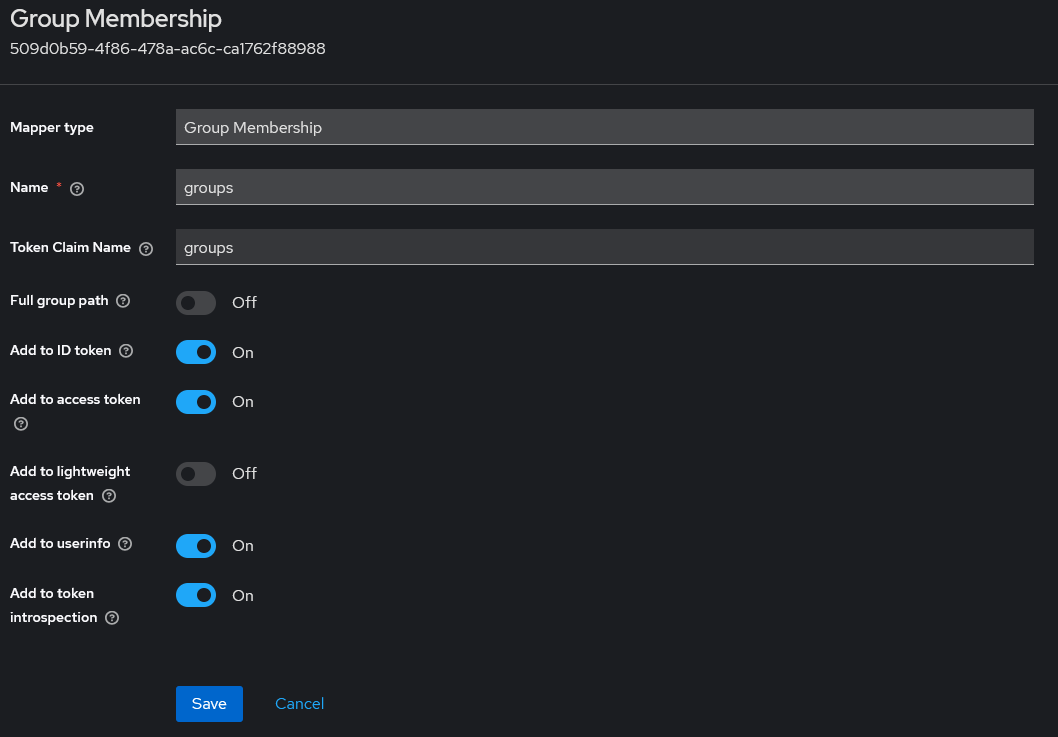
Choisir '<span style="color: rgb(132,63,161);">***Group Membership***</span>'.

[![image.png](https://docs.labs404.fr/uploads/images/gallery/2026-07/scaled-1680-/Wklimage-png.png)](https://docs.labs404.fr/uploads/images/gallery/2026-07/scaled-1680-/Wklimage-png.png)

Définir le nom du <span style="color: rgb(132,63,161);">***mapper***</span> en '<span style="color: rgb(132,63,161);">***groups***</span>'.

Définir le Token <span style="color: rgb(132,63,161);">***claim name***</span> en '<span style="color: rgb(132,63,161);">***groups***</span>'.

Vérifier que les fonctions suivantes soit activées / désactivées.

Puis faire '<span style="color: rgb(132,63,161);">***Save***</span>'.

[![image.png](https://docs.labs404.fr/uploads/images/gallery/2026-07/scaled-1680-/Tjeimage-png.png)](https://docs.labs404.fr/uploads/images/gallery/2026-07/scaled-1680-/Tjeimage-png.png)


#### **<span style="color: rgb(35, 111, 161);">2.3 Récupérer les URL</span>** 

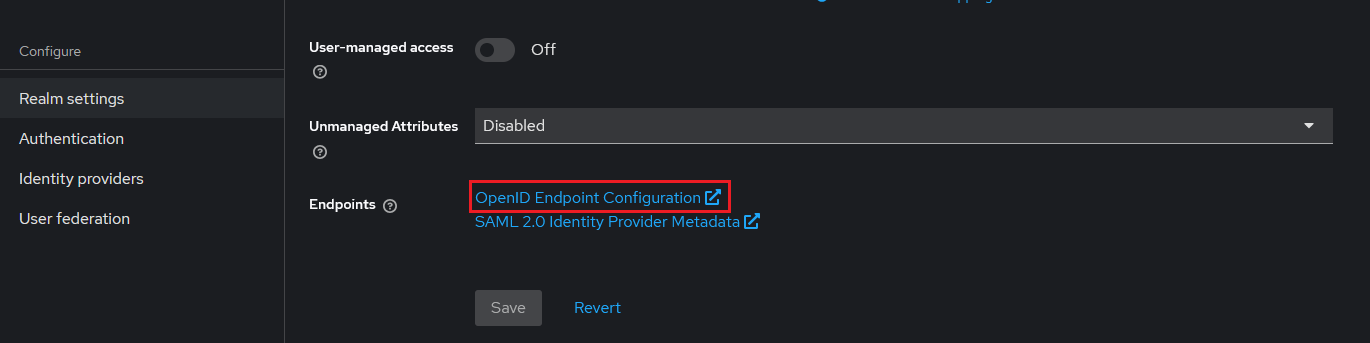
Pour récupérer les URL, sélectionner le realm et faire '<span style="color: rgb(132,63,161);">***Realm settings***</span>' puis cliquer sur '<span style="color: rgb(132,63,161);">***OpenID Endpoint Configuration***</span>'.

[![image.png](https://docs.labs404.fr/uploads/images/gallery/2026-07/scaled-1680-/96Dimage-png.png)](https://docs.labs404.fr/uploads/images/gallery/2026-07/scaled-1680-/96Dimage-png.png)

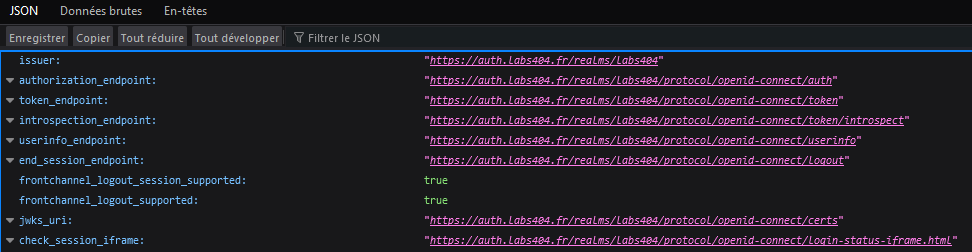
Une page s'affiche et permet de récupérer les URL.

[![image.png](https://docs.labs404.fr/uploads/images/gallery/2026-07/scaled-1680-/8tXimage-png.png)](https://docs.labs404.fr/uploads/images/gallery/2026-07/scaled-1680-/8tXimage-png.png)
---

### <span style="color: rgb(52, 73, 94);">**<span style="text-decoration: underline;">II. Côté Bookstack</span>**</span>

Se connecter en <span style="color: rgb(132,63,161);">***SSH***</span> dans le container ou serveur / instance booksack.

Modifier le fichier '<span style="color: rgb(132,63,161);">***/var/www/Bookstack.env***</span>'

Ajouter le code suivant en modifiant les données nécessaires :

```
# Set OIDC to be the authentication method
#AUTH_METHOD=standard
AUTH_METHOD=oidc

# Control if BookStack automatically initiates login via your OIDC system
# if it's the only authentication method. Prevents the need for the
# user to click the "Login with x" button on the login page.
# Setting this to true enables auto-initiation.
AUTH_AUTO_INITIATE=false

# Set the display name to be shown on the login button.
# (Login with <name>)
OIDC_NAME="Oauth"

# Name of the claims(s) to use for the user's display name.
# Can have multiple attributes listed, separated with a '|' in which
# case those values will be joined with a space.
# Example: OIDC_DISPLAY_NAME_CLAIMS=given_name|family_name
OIDC_DISPLAY_NAME_CLAIMS=name

# OAuth Client ID to access the identity provider
OIDC_CLIENT_ID=<id client>

# OAuth Client Secret to access the identity provider
OIDC_CLIENT_SECRET=<secret client>

# Issuer URL
# Must start with 'https://'
OIDC_ISSUER=https://<external FQDN>/realms/<nom du realm>

# The "end session" (RP-initiated logout) URL to call during BookStack logout.
# By default this is false which disables RP-initiated logout.
# Setting to "true" will enable logout if found as supported by auto-discovery.
# Otherwise, this can be set as a specific URL endpoint.
OIDC_END_SESSION_ENDPOINT=true

# Enable auto-discovery of endpoints and token keys.
# As per the standard, expects the service to serve a
# `<issuer>/.well-known/openid-configuration` endpoint.
OIDC_ISSUER_DISCOVER=https://<external FQDN>/realms/<nom du realm>/.well-known/openid-configuration

# Enable OIDC group sync.
OIDC_USER_TO_GROUPS=true

# Set the attribute from which BookStack will read groups names from.
OIDC_GROUPS_CLAIM=groups

# Additional scopes to send with the authentication request.
# By default BookStack only sends the 'openid', 'profile' & 'email' scopes.
# Many platforms require specific scopes to be requested for group data.
# Multiple scopes can be added via comma separation.
#OIDC_ADDITIONAL_SCOPES=groups

# Remove the user from roles that don't match OIDC groups upon login.
# Note: While this is enabled the "Default Registration Role", editable within the 
# BookStack settings view, will be considered a matched role and assigned to the user.
OIDC_REMOVE_FROM_GROUPS=true
```

<p class="callout info">**Note** : Après la mise en place du SSO, il ne sera plus possible de se connecter avec un utilisateur local. Cependant, il sera possible dans le fichier **.env** de rechanger la méthode d'authentification de 'oidc' à 'standard' pour que cela soit de nouveau possible.</p>