# Logiciels

Procédures liées à des logiciels spécifiques.

# Logiciel - Microsoft office

Suive d'outils bureautique éditée par Microsoft.

# Office - Installer le pack office avec ODT

<table id="bkmrk-difficult%C3%A9%2A-%3Cdescrip" style="border-collapse: collapse; width: 100%; height: 46.8px; border-width: 1px; border-style: hidden;"><colgroup><col style="width: 20%;"></col><col style="width: 80%;"></col></colgroup><tbody><tr style="height: 46.8px;"><td style="height: 46.8px; border: 1px groove rgb(52,73,94);">[![intermédiaire.png](https://docs.labs404.fr/uploads/images/gallery/2026-07/scaled-1680-/G0Vintermediaire-png.png)](https://docs.labs404.fr/uploads/images/gallery/2026-07/scaled-1680-/G0Vintermediaire-png.png)</td><td style="height: 46.8px; border-width: 1px; background-color: rgb(236,202,250); vertical-align: top;">Difficulté : Intermédiaire

Notions : CLI, Installation de logiciel.

</td></tr></tbody></table>

---

### <span style="color: rgb(52, 73, 94);">**<span style="text-decoration: underline;">I. Introduction</span>**</span>

<p class="callout info">S'applique à : Microsoft office 2019, 2021, 365 + viso, project</p>

Il faut installer les applications office via un processus non standard. Par exemple :

- Installation offline
- Installation en volume
- déploiement automatisé

---

### <span style="text-decoration: underline; color: rgb(52, 73, 94);">**II. Préparer le paquet d'installation**</span>

#### <span style="color: rgb(35, 111, 161);">**2.1 Installer le toolkit**</span>

<p class="callout info">Télécharger le toolkit : [Office Deployement Toolkit](https://www.microsoft.com/en-us/download/details.aspx?id=49117)  
</p>

Créer un répertoire “*<span class="fabric-text-color-mark">ODT</span>*”.

[![image.png](https://docs.labs404.fr/uploads/images/gallery/2026-07/scaled-1680-/tHoimage-png.png)](https://docs.labs404.fr/uploads/images/gallery/2026-07/scaled-1680-/tHoimage-png.png)

Placer l’exécutable téléchargé dans ce répertoire.

[![image.png](https://docs.labs404.fr/uploads/images/gallery/2026-07/scaled-1680-/JNsimage-png.png)](https://docs.labs404.fr/uploads/images/gallery/2026-07/scaled-1680-/JNsimage-png.png)

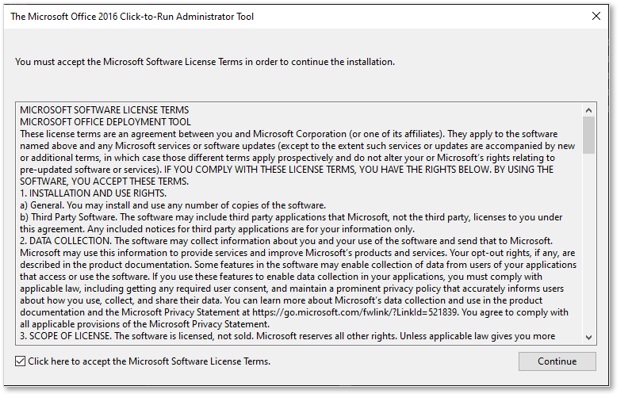
Lancer l’exécutable.

Cocher la case “***<span class="fabric-text-color-mark"><span style="color: rgb(132,63,161);">Click here to accept the Microsoft Software Licence Terms.</span></span>***” et cliquer sur “<span style="color: rgb(132,63,161);">***<span class="fabric-text-color-mark">Continue</span>***</span>”.

[![image.png](https://docs.labs404.fr/uploads/images/gallery/2026-07/scaled-1680-/Fy7image-png.png)](https://docs.labs404.fr/uploads/images/gallery/2026-07/scaled-1680-/Fy7image-png.png)

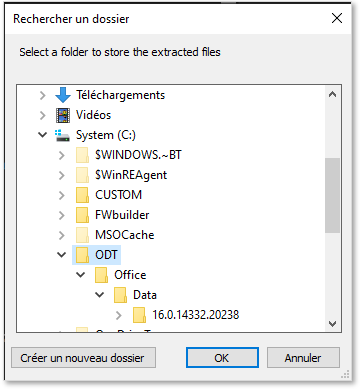
Choisir d’extraire les fichiers dans le répertoire “<span style="color: rgb(132,63,161);">***<span class="fabric-text-color-mark">ODT</span>***</span>” créé auparavant.

[![image.png](https://docs.labs404.fr/uploads/images/gallery/2026-07/scaled-1680-/Kzsimage-png.png)](https://docs.labs404.fr/uploads/images/gallery/2026-07/scaled-1680-/Kzsimage-png.png)

Les fichiers sont extraits.

[![image.png](https://docs.labs404.fr/uploads/images/gallery/2026-07/scaled-1680-/Uodimage-png.png)](https://docs.labs404.fr/uploads/images/gallery/2026-07/scaled-1680-/Uodimage-png.png)
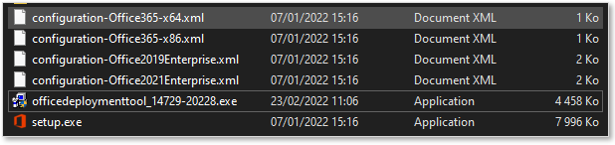
#### <span style="color: rgb(35, 111, 161);">**2.2 Préparer le fichier XML**</span>

Avant de générer le paquet d’installation, il faut préparer un fichier unattend.

Celui-ci est un fichier XML contenant les paramètres de l’installation.

<details id="bkmrk-deployementpropertie"><summary>DeployementProperties.xml</summary>

```xml
<Configuration>
  <Add OfficeClientEdition="64" Channel="PerpetualVL2021">
      <Product ID="ProPlus2021Volume"  PIDKEY="#####-#####-#####-#####-#####" >
         <Language ID="en-us" />
         <ExcludeApp ID="Lync" />
      </Product>     
      <Product ID="VisioPro2021Volume">
         <Language ID="en-us" />
      </Product>
      <Product ID="ProjectPro2021Volume">
         <Language ID="en-us" />
      </Product>      
  </Add>
  <RemoveMSI />
  <Display Level="None" AcceptEULA="TRUE" />  
</Configuration>
```

</details><p class="callout info">La liste des options est disponibles : [Créer le fichier configuration.xml](https://learn.microsoft.com/fr-fr/deployoffice/ltsc2021/deploy#create-the-configurationxml-file)  
</p>

Une fois ce fichier créé et rempli correctement. Les packages peuvent être téléchargés.

<p class="callout success">Un générateur de fichier xml est disponible : [https://config.office.com/deploymentsettings](https://config.office.com/deploymentsettings)</p>

#### <span style="color: rgb(35, 111, 161);">**2.3 Générer le package d'installation**</span>

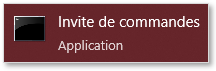
Pour générer les paquets d’installations, lancer un invite de commande

[![image.png](https://docs.labs404.fr/uploads/images/gallery/2026-07/scaled-1680-/YxUimage-png.png)](https://docs.labs404.fr/uploads/images/gallery/2026-07/scaled-1680-/YxUimage-png.png)
Se déplacer dans le dossier “<span style="color: rgb(132,63,161);">***<span class="fabric-text-color-mark">ODT</span>***</span>”.

Générer le paquet d’installation en téléchargeant les sources avec la commande :

```
setup.exe /download <fichier de configuration.xml>
```

Attendre la fin du téléchargement (la réapparition du prompt indiquant que la commande est terminée).

---

### <span style="text-decoration: underline; color: rgb(52, 73, 94);">**III. Installer office**</span>

Pour installer office, il faut placer le dossier “*<span class="fabric-text-color-mark">ODT</span>*” sur la machine ou, dans le cadre d’un déploiement, sur un partage réseau.

<p class="callout danger">L'installation nécessite de lancer la cmd en tant qu'administrateur.</p>

<p class="callout warning">Dans le cadre d’un déploiement par le réseau, ajouter le path dans le fichier de configuration xml.</p>

<details id="bkmrk-deployementpropertie-0"><summary>DeployementProperties.xml</summary>

```
<Configuration> 
  <Add SourcePath="\\serverb\share" OfficeClientEdition="32" Version="16.0.6741.2056" DownloadPath="\\servera\share"> 
    <Product ID="O365ProPlusRetail" > 
      <Language ID="en-us" />      
    </Product> 
  </Add> 
</Configuration>

```

</details>Lancer la commande :

```
setup.exe /configure <fichier de configuration.xml>
```

# Logiciel - VMware Workstation

Contient les procédures liées aux systèmes VMware workstation.

# VMware Workstation - Installation sur windows

<table id="bkmrk-difficult%C3%A9%2A-%3Cdescrip" style="border-collapse: collapse; width: 100%; height: 46.8px; border-width: 1px; border-style: hidden;"><colgroup><col style="width: 20%;"></col><col style="width: 80%;"></col></colgroup><tbody><tr style="height: 46.8px;"><td style="height: 46.8px; border: 1px groove rgb(52,73,94);">[![image.png](https://docs.labs404.fr/uploads/images/gallery/2026-07/scaled-1680-/msVdebutant-png.png)](https://docs.labs404.fr/uploads/images/gallery/2026-07/scaled-1680-/msVdebutant-png.png)  
</td><td style="height: 46.8px; border-width: 1px; background-color: rgb(236,202,250); vertical-align: top;">Difficulté : Débutant

Notions : installation de logiciel, windows.

</td></tr></tbody></table>

---

### <span style="color: rgb(52, 73, 94);">**<span style="text-decoration: underline;">I. Introduction</span>**</span>

**<span style="color: rgb(23,43,77); font-family: '-apple-system', BlinkMacSystemFont, 'Segoe UI', Roboto, Oxygen, Ubuntu, 'Fira Sans', 'Droid Sans', 'Helvetica Neue', sans-serif; font-size: 16px; font-style: normal; font-weight: 400; letter-spacing: -0.08px; text-indent: 0px; text-transform: none; white-space: pre-wrap; word-spacing: 0px; text-decoration-thickness: initial; text-decoration-style: initial; text-decoration-color: initial; display: inline; float: none;">Cette procédure à pour but d’apprendre l’installation de VMware Workstation. Testé avec la version 16.</span>**

<p class="callout danger">**<span style="color: rgb(23,43,77); font-family: '-apple-system', BlinkMacSystemFont, 'Segoe UI', Roboto, Oxygen, Ubuntu, 'Fira Sans', 'Droid Sans', 'Helvetica Neue', sans-serif; font-size: 16px; font-style: normal; font-weight: 400; letter-spacing: -0.08px; text-indent: 0px; text-transform: none; white-space: pre-wrap; word-spacing: 0px; text-decoration-thickness: initial; text-decoration-style: initial; text-decoration-color: initial; display: inline; float: none;">**Prérequis matériels** :</span>**</p>

- **<span style="color: rgb(23,43,77); font-family: '-apple-system', BlinkMacSystemFont, 'Segoe UI', Roboto, Oxygen, Ubuntu, 'Fira Sans', 'Droid Sans', 'Helvetica Neue', sans-serif; font-size: 16px; font-style: normal; font-weight: 400; letter-spacing: -0.08px; text-indent: 0px; text-transform: none; white-space: pre-wrap; word-spacing: 0px; text-decoration-thickness: initial; text-decoration-style: initial; text-decoration-color: initial; display: inline; float: none;">Windows 10 ou 11</span>**
- **<span style="color: rgb(23,43,77); font-family: '-apple-system', BlinkMacSystemFont, 'Segoe UI', Roboto, Oxygen, Ubuntu, 'Fira Sans', 'Droid Sans', 'Helvetica Neue', sans-serif; font-size: 16px; font-style: normal; font-weight: 400; letter-spacing: -0.08px; text-indent: 0px; text-transform: none; white-space: pre-wrap; word-spacing: 0px; text-decoration-thickness: initial; text-decoration-style: initial; text-decoration-color: initial; display: inline; float: none;">CPU 4 cœurs</span>**
- **<span style="color: rgb(23,43,77); font-family: '-apple-system', BlinkMacSystemFont, 'Segoe UI', Roboto, Oxygen, Ubuntu, 'Fira Sans', 'Droid Sans', 'Helvetica Neue', sans-serif; font-size: 16px; font-style: normal; font-weight: 400; letter-spacing: -0.08px; text-indent: 0px; text-transform: none; white-space: pre-wrap; word-spacing: 0px; text-decoration-thickness: initial; text-decoration-style: initial; text-decoration-color: initial; display: inline; float: none;">16Go RAM</span>**
- **<span style="color: rgb(23,43,77); font-family: '-apple-system', BlinkMacSystemFont, 'Segoe UI', Roboto, Oxygen, Ubuntu, 'Fira Sans', 'Droid Sans', 'Helvetica Neue', sans-serif; font-size: 16px; font-style: normal; font-weight: 400; letter-spacing: -0.08px; text-indent: 0px; text-transform: none; white-space: pre-wrap; word-spacing: 0px; text-decoration-thickness: initial; text-decoration-style: initial; text-decoration-color: initial; display: inline; float: none;">30Go de disque</span>**

<p class="callout success">**<span style="color: rgb(23,43,77); font-family: '-apple-system', BlinkMacSystemFont, 'Segoe UI', Roboto, Oxygen, Ubuntu, 'Fira Sans', 'Droid Sans', 'Helvetica Neue', sans-serif; font-size: 16px; font-style: normal; letter-spacing: -0.08px; text-indent: 0px; text-transform: none; white-space: pre-wrap; word-spacing: 0px; text-decoration-thickness: initial; text-decoration-style: initial; text-decoration-color: initial; display: inline; float: none;">Astuce</span><span style="color: rgb(23,43,77); font-family: '-apple-system', BlinkMacSystemFont, 'Segoe UI', Roboto, Oxygen, Ubuntu, 'Fira Sans', 'Droid Sans', 'Helvetica Neue', sans-serif; font-size: 16px; font-style: normal; font-weight: 400; letter-spacing: -0.08px; text-indent: 0px; text-transform: none; white-space: pre-wrap; word-spacing: 0px; text-decoration-thickness: initial; text-decoration-style: initial; text-decoration-color: initial; display: inline; float: none;"> : Pour de meilleures performances, il est conseillé d'activer les options de virtualisation dans le bios. Voir : [https://lecrabeinfo.net/tutoriels/activer-la-virtualisation-intel-vt-x-amd-v-dans-le-bios-uefi/](https://lecrabeinfo.net/tutoriels/activer-la-virtualisation-intel-vt-x-amd-v-dans-le-bios-uefi/)</span>**</p>

<p class="callout info">**<span style="color: rgb(23,43,77); font-family: '-apple-system', BlinkMacSystemFont, 'Segoe UI', Roboto, Oxygen, Ubuntu, 'Fira Sans', 'Droid Sans', 'Helvetica Neue', sans-serif; font-size: 16px; font-style: normal; font-weight: 400; letter-spacing: -0.08px; text-indent: 0px; text-transform: none; white-space: pre-wrap; word-spacing: 0px; text-decoration-thickness: initial; text-decoration-style: initial; text-decoration-color: initial; display: inline; float: none;">Télécharger VMware workstation : [Download VMware Workstation Pro](https://support.broadcom.com/group/ecx/productdownloads?subfamily=VMware+Workstation+Pro)</span>**</p>

<p class="callout warning">**<span style="color: rgb(23,43,77); font-family: '-apple-system', BlinkMacSystemFont, 'Segoe UI', Roboto, Oxygen, Ubuntu, 'Fira Sans', 'Droid Sans', 'Helvetica Neue', sans-serif; font-size: 16px; font-style: normal; font-weight: 400; letter-spacing: -0.08px; text-indent: 0px; text-transform: none; white-space: pre-wrap; word-spacing: 0px; text-decoration-thickness: initial; text-decoration-style: initial; text-decoration-color: initial; display: inline; float: none;">**Attention** : Depuis le rachat de VMware par Broadcom en 2024, VMware Workstation Pro est désormais gratuit, mais nécessite la création d'un compte Broadcom pour accéder au téléchargements.</span>**</p>

---

### <span style="color: rgb(52, 73, 94);">**<span style="text-decoration: underline;">II. Installation</span>**</span>


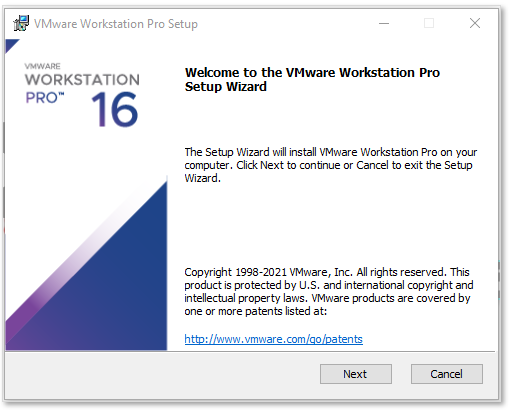
Lancer l’exécutable d’installation.

Cliquer sur “***<span class="fabric-text-color-mark">Next</span>***”.

[![image.png](https://docs.labs404.fr/uploads/images/gallery/2026-07/scaled-1680-/oOqimage-png.png)](https://docs.labs404.fr/uploads/images/gallery/2026-07/scaled-1680-/oOqimage-png.png)

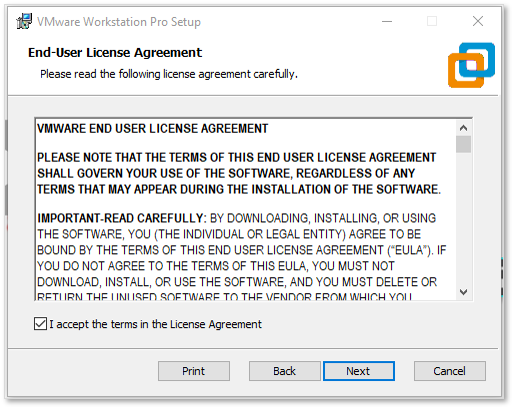
<span style="color: rgb(23,43,77); font-family: '-apple-system', BlinkMacSystemFont, 'Segoe UI', Roboto, Oxygen, Ubuntu, 'Fira Sans', 'Droid Sans', 'Helvetica Neue', sans-serif; font-size: 16px; font-style: normal; font-weight: 400; letter-spacing: -0.08px; text-indent: 0px; text-transform: none; white-space: pre-wrap; word-spacing: 0px; background-color: rgb(255,255,255); text-decoration-thickness: initial; text-decoration-style: initial; text-decoration-color: initial; display: inline; float: none;">Cocher “</span>***<span class="fabric-text-color-mark">I accept the terms in the licence Agreement</span>***<span style="color: rgb(23,43,77); font-family: '-apple-system', BlinkMacSystemFont, 'Segoe UI', Roboto, Oxygen, Ubuntu, 'Fira Sans', 'Droid Sans', 'Helvetica Neue', sans-serif; font-size: 16px; font-style: normal; font-weight: 400; letter-spacing: -0.08px; text-indent: 0px; text-transform: none; white-space: pre-wrap; word-spacing: 0px; background-color: rgb(255,255,255); text-decoration-thickness: initial; text-decoration-style: initial; text-decoration-color: initial; display: inline; float: none;">” et cliquer sur “</span>***<span class="fabric-text-color-mark">next</span>***<span style="color: rgb(23,43,77); font-family: '-apple-system', BlinkMacSystemFont, 'Segoe UI', Roboto, Oxygen, Ubuntu, 'Fira Sans', 'Droid Sans', 'Helvetica Neue', sans-serif; font-size: 16px; font-style: normal; font-weight: 400; letter-spacing: -0.08px; text-indent: 0px; text-transform: none; white-space: pre-wrap; word-spacing: 0px; background-color: rgb(255,255,255); text-decoration-thickness: initial; text-decoration-style: initial; text-decoration-color: initial; display: inline; float: none;">”.</span>

[![image.png](https://docs.labs404.fr/uploads/images/gallery/2026-07/scaled-1680-/Musimage-png.png)](https://docs.labs404.fr/uploads/images/gallery/2026-07/scaled-1680-/Musimage-png.png)

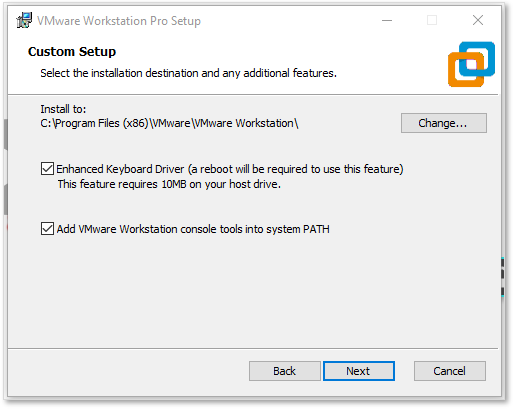
<span style="color: rgb(23,43,77); font-family: '-apple-system', BlinkMacSystemFont, 'Segoe UI', Roboto, Oxygen, Ubuntu, 'Fira Sans', 'Droid Sans', 'Helvetica Neue', sans-serif; font-size: 16px; font-style: normal; font-weight: 400; letter-spacing: -0.08px; text-indent: 0px; text-transform: none; white-space: pre-wrap; word-spacing: 0px; background-color: rgb(255,255,255); text-decoration-thickness: initial; text-decoration-style: initial; text-decoration-color: initial; display: inline; float: none;">Cocher les deux cases et faire “</span>***<span class="fabric-text-color-mark">next</span>***<span style="color: rgb(23,43,77); font-family: '-apple-system', BlinkMacSystemFont, 'Segoe UI', Roboto, Oxygen, Ubuntu, 'Fira Sans', 'Droid Sans', 'Helvetica Neue', sans-serif; font-size: 16px; font-style: normal; font-weight: 400; letter-spacing: -0.08px; text-indent: 0px; text-transform: none; white-space: pre-wrap; word-spacing: 0px; background-color: rgb(255,255,255); text-decoration-thickness: initial; text-decoration-style: initial; text-decoration-color: initial; display: inline; float: none;">”.</span>

[![image.png](https://docs.labs404.fr/uploads/images/gallery/2026-07/scaled-1680-/DAWimage-png.png)](https://docs.labs404.fr/uploads/images/gallery/2026-07/scaled-1680-/DAWimage-png.png)

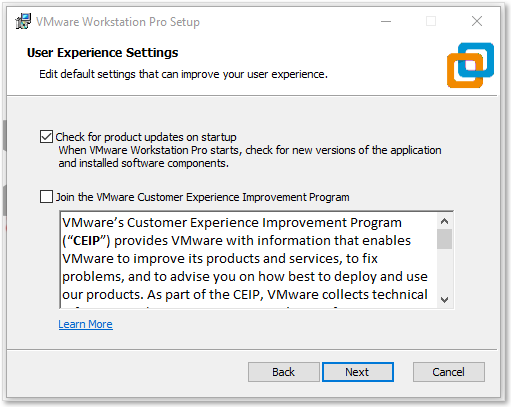
Décocher la case “***<span class="fabric-text-color-mark">Join the VMware Customer Experience Improvement Program</span>***” et faire “***<span class="fabric-text-color-mark">Next</span>***”.

[![image.png](https://docs.labs404.fr/uploads/images/gallery/2026-07/scaled-1680-/sFXimage-png.png)](https://docs.labs404.fr/uploads/images/gallery/2026-07/scaled-1680-/sFXimage-png.png)

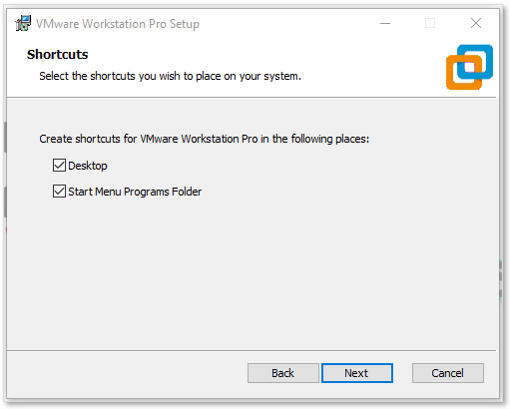
<span style="color: rgb(23,43,77); font-family: '-apple-system', BlinkMacSystemFont, 'Segoe UI', Roboto, Oxygen, Ubuntu, 'Fira Sans', 'Droid Sans', 'Helvetica Neue', sans-serif; font-size: 16px; font-style: normal; font-weight: 400; letter-spacing: -0.08px; text-indent: 0px; text-transform: none; white-space: pre-wrap; word-spacing: 0px; background-color: rgb(255,255,255); text-decoration-thickness: initial; text-decoration-style: initial; text-decoration-color: initial; display: inline; float: none;">Cocher les deux cases et faire “</span>***<span class="fabric-text-color-mark">Next</span>***<span style="color: rgb(23,43,77); font-family: '-apple-system', BlinkMacSystemFont, 'Segoe UI', Roboto, Oxygen, Ubuntu, 'Fira Sans', 'Droid Sans', 'Helvetica Neue', sans-serif; font-size: 16px; font-style: normal; font-weight: 400; letter-spacing: -0.08px; text-indent: 0px; text-transform: none; white-space: pre-wrap; word-spacing: 0px; background-color: rgb(255,255,255); text-decoration-thickness: initial; text-decoration-style: initial; text-decoration-color: initial; display: inline; float: none;">”.</span>

[![image.png](https://docs.labs404.fr/uploads/images/gallery/2026-07/scaled-1680-/9fWimage-png.png)](https://docs.labs404.fr/uploads/images/gallery/2026-07/scaled-1680-/9fWimage-png.png)

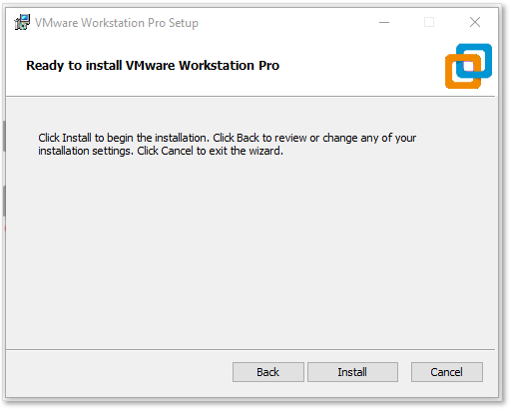
<span style="color: rgb(23,43,77); font-family: '-apple-system', BlinkMacSystemFont, 'Segoe UI', Roboto, Oxygen, Ubuntu, 'Fira Sans', 'Droid Sans', 'Helvetica Neue', sans-serif; font-size: 16px; font-style: normal; font-weight: 400; letter-spacing: -0.08px; text-indent: 0px; text-transform: none; white-space: pre-wrap; word-spacing: 0px; background-color: rgb(255,255,255); text-decoration-thickness: initial; text-decoration-style: initial; text-decoration-color: initial; display: inline; float: none;">Puis cliquer sur “</span>***<span class="fabric-text-color-mark">Install</span>***<span style="color: rgb(23,43,77); font-family: '-apple-system', BlinkMacSystemFont, 'Segoe UI', Roboto, Oxygen, Ubuntu, 'Fira Sans', 'Droid Sans', 'Helvetica Neue', sans-serif; font-size: 16px; font-style: normal; font-weight: 400; letter-spacing: -0.08px; text-indent: 0px; text-transform: none; white-space: pre-wrap; word-spacing: 0px; background-color: rgb(255,255,255); text-decoration-thickness: initial; text-decoration-style: initial; text-decoration-color: initial; display: inline; float: none;">”.</span>

[![image.png](https://docs.labs404.fr/uploads/images/gallery/2026-07/scaled-1680-/FUFimage-png.png)](https://docs.labs404.fr/uploads/images/gallery/2026-07/scaled-1680-/FUFimage-png.png)

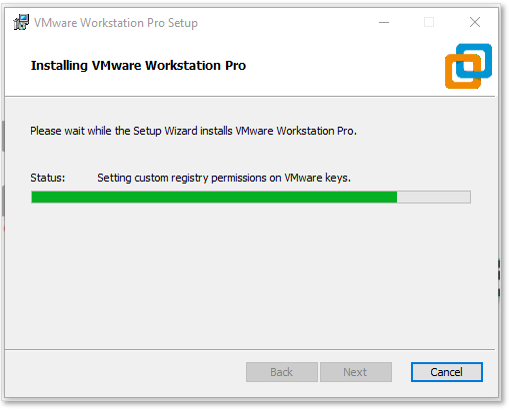
<span style="color: rgb(23,43,77); font-family: '-apple-system', BlinkMacSystemFont, 'Segoe UI', Roboto, Oxygen, Ubuntu, 'Fira Sans', 'Droid Sans', 'Helvetica Neue', sans-serif; font-size: 16px; font-style: normal; font-weight: 400; letter-spacing: -0.08px; text-indent: 0px; text-transform: none; white-space: pre-wrap; word-spacing: 0px; background-color: rgb(255,255,255); text-decoration-thickness: initial; text-decoration-style: initial; text-decoration-color: initial; display: inline; float: none;">Attendre la fin de l’installation.</span>

[![image.png](https://docs.labs404.fr/uploads/images/gallery/2026-07/scaled-1680-/Cpeimage-png.png)](https://docs.labs404.fr/uploads/images/gallery/2026-07/scaled-1680-/Cpeimage-png.png)

Puis faire l'un ou l'autre :

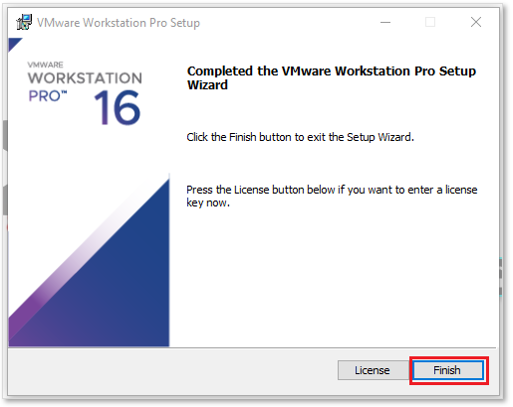
<table id="bkmrk-faire-%E2%80%9Cfinish%E2%80%9D-pour-" style="border-collapse: collapse; width: 100%;"><colgroup><col style="width: 50%;"></col><col style="width: 50%;"></col></colgroup><tbody><tr><td>1. <div class="css-a91bax" style="margin: 8px 0px 0px; padding: 8px 8px 8px 12px;"><div class="css-da82gr" style="margin: 0px; padding: 0px; min-width: 0px;">Faire “***<span class="fabric-text-color-mark">finish</span>***” pour terminer l’installation.</div></div>

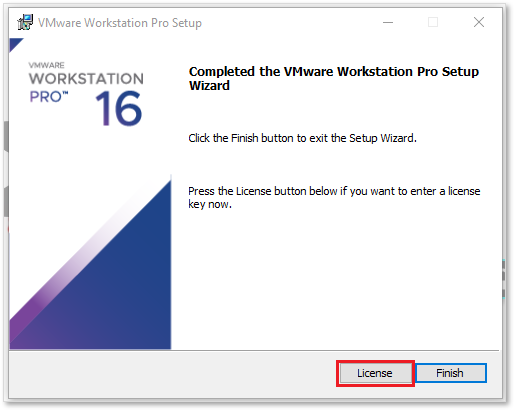
</td><td>1. <div class="css-a91bax" style="margin: 8px 0px 0px; padding: 8px 8px 8px 12px;"><div class="css-da82gr" style="margin: 0px; padding: 0px; min-width: 0px;">Faire “***<span class="fabric-text-color-mark">licence</span>***” pour entrer la clé de licence (si disponible).</div></div>

</td></tr><tr><td>[![image.png](https://docs.labs404.fr/uploads/images/gallery/2026-07/scaled-1680-/q3Limage-png.png)](https://docs.labs404.fr/uploads/images/gallery/2026-07/scaled-1680-/q3Limage-png.png)

</td><td>[![image.png](https://docs.labs404.fr/uploads/images/gallery/2026-07/scaled-1680-/yEpimage-png.png)](https://docs.labs404.fr/uploads/images/gallery/2026-07/scaled-1680-/yEpimage-png.png)

</td></tr></tbody></table>

Si l'on choisis d'entrer la licence :

<span style="color: rgb(23,43,77); font-family: '-apple-system', BlinkMacSystemFont, 'Segoe UI', Roboto, Oxygen, Ubuntu, 'Fira Sans', 'Droid Sans', 'Helvetica Neue', sans-serif; font-size: 16px; font-style: normal; font-weight: 400; letter-spacing: -0.08px; text-indent: 0px; text-transform: none; white-space: pre-wrap; word-spacing: 0px; background-color: rgb(255,255,255); text-decoration-thickness: initial; text-decoration-style: initial; text-decoration-color: initial; display: inline; float: none;">Entrer la clé de licence et faire “</span>***<span class="fabric-text-color-mark">Enter</span>***<span style="color: rgb(23,43,77); font-family: '-apple-system', BlinkMacSystemFont, 'Segoe UI', Roboto, Oxygen, Ubuntu, 'Fira Sans', 'Droid Sans', 'Helvetica Neue', sans-serif; font-size: 16px; font-style: normal; font-weight: 400; letter-spacing: -0.08px; text-indent: 0px; text-transform: none; white-space: pre-wrap; word-spacing: 0px; background-color: rgb(255,255,255); text-decoration-thickness: initial; text-decoration-style: initial; text-decoration-color: initial; display: inline; float: none;">”.</span>

[![image.png](https://docs.labs404.fr/uploads/images/gallery/2026-07/scaled-1680-/wAKimage-png.png)](https://docs.labs404.fr/uploads/images/gallery/2026-07/scaled-1680-/wAKimage-png.png)

<span style="color: rgb(23,43,77); font-family: '-apple-system', BlinkMacSystemFont, 'Segoe UI', Roboto, Oxygen, Ubuntu, 'Fira Sans', 'Droid Sans', 'Helvetica Neue', sans-serif; font-size: 16px; font-style: normal; font-weight: 400; letter-spacing: -0.08px; text-indent: 0px; text-transform: none; white-space: pre-wrap; word-spacing: 0px; background-color: rgb(255,255,255); text-decoration-thickness: initial; text-decoration-style: initial; text-decoration-color: initial; display: inline; float: none;">L’installation est terminée. Cliquer sur “</span>***<span class="fabric-text-color-mark">Finish</span>***<span style="color: rgb(23,43,77); font-family: '-apple-system', BlinkMacSystemFont, 'Segoe UI', Roboto, Oxygen, Ubuntu, 'Fira Sans', 'Droid Sans', 'Helvetica Neue', sans-serif; font-size: 16px; font-style: normal; font-weight: 400; letter-spacing: -0.08px; text-indent: 0px; text-transform: none; white-space: pre-wrap; word-spacing: 0px; background-color: rgb(255,255,255); text-decoration-thickness: initial; text-decoration-style: initial; text-decoration-color: initial; display: inline; float: none;">”.</span>

[![image.png](https://docs.labs404.fr/uploads/images/gallery/2026-07/scaled-1680-/I79image-png.png)](https://docs.labs404.fr/uploads/images/gallery/2026-07/scaled-1680-/I79image-png.png)

<div class="rich-media-item mediaSingleView-content-wrap image-center css-t3ande" id="bkmrk--12" style="margin: 24px auto; padding: 0px; width: 511px; max-width: 100%; float: none; clear: both; color: rgb(23,43,77); font-family: '-apple-system', BlinkMacSystemFont, 'Segoe UI', Roboto, Oxygen, Ubuntu, 'Fira Sans', 'Droid Sans', 'Helvetica Neue', sans-serif; font-size: 16px; font-style: normal; font-weight: 400; letter-spacing: normal; text-indent: 0px; text-transform: none; white-space: pre-wrap; word-spacing: 0px; background-color: rgb(255,255,255); text-decoration-thickness: initial; text-decoration-style: initial; text-decoration-color: initial;"><div class="css-13hoxgi" style="margin: 0px; padding: 0px;"><div style="margin: 0px; padding: 0px; height: 0px; width: 511px;"><div class="new-file-experience-wrapper css-1c3wka4" id="bkmrk--13" style="margin: 0px; padding: 0px; font-family: '-apple-system', BlinkMacSystemFont, 'Segoe UI', Roboto, Oxygen, Ubuntu, 'Fira Sans', 'Droid Sans', 'Helvetica Neue', sans-serif; width: 2837px; max-width: 100%; height: 407px; max-height: 100%; font-size: 14px; line-height: 22px;"><div class="media-file-card-view css-1yn77bd" style="margin: 0px; padding: 0px; max-width: 100%; width: 511px; height: 407px; max-height: 100%; overflow: hidden;">  
</div></div></div></div></div>

# VMware workstation Pro - Téléchargement

<table id="bkmrk-difficult%C3%A9%2A-%3Cdescrip" style="border-collapse: collapse; width: 100%; height: 46.8px; border-width: 1px; border-style: hidden;"><colgroup><col style="width: 20%;"></col><col style="width: 80%;"></col></colgroup><tbody><tr style="height: 46.8px;"><td style="height: 46.8px; border: 1px groove rgb(52,73,94);">[![image.png](https://docs.labs404.fr/uploads/images/gallery/2026-07/scaled-1680-/msVdebutant-png.png)](https://docs.labs404.fr/uploads/images/gallery/2026-07/scaled-1680-/msVdebutant-png.png)</td><td style="height: 46.8px; border-width: 1px; background-color: rgb(236,202,250); vertical-align: top;">Difficulté : Débutant

Notions : Téléchargement de logiciels

</td></tr></tbody></table>

---

### <span style="color: rgb(52, 73, 94);">**<span style="text-decoration: underline;">I. Introduction</span>**</span>

Cette procédure à pour d'expliquer le téléchargement de VMware workstation Pro depuis le site de Broadcom.

En effet depuis le rachat en 2024, la procédure à légèrement changée.

<p class="callout danger">**Prérequis** : Disposer d'un compte Broadcom.</p>

---

### <span style="color: rgb(52, 73, 94);">**<span style="text-decoration: underline;">II. Télécharger VMware Workstation</span>**</span>


#### <span style="color: rgb(35, 111, 161);">**2.1 Accéder au téléchargement**</span>


Aller sur le lien suivant : [https://support.broadcom.com/group/ecx/productdownloads?subfamily=VMware+Workstation+Pro](https://support.broadcom.com/group/ecx/productdownloads?subfamily=VMware+Workstation+Pro)

Se connecter sur le site de Broadcom.

[![image.png](https://docs.labs404.fr/uploads/images/gallery/2026-07/scaled-1680-/KKFimage-png.png)](https://docs.labs404.fr/uploads/images/gallery/2026-07/scaled-1680-/KKFimage-png.png)
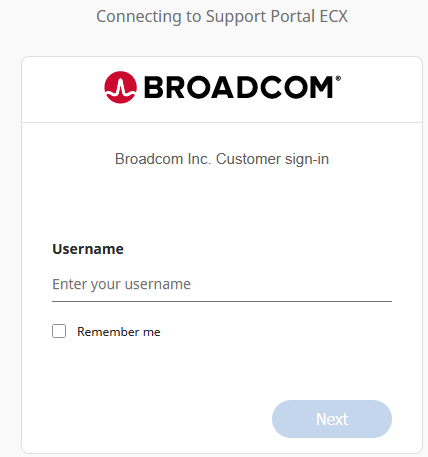
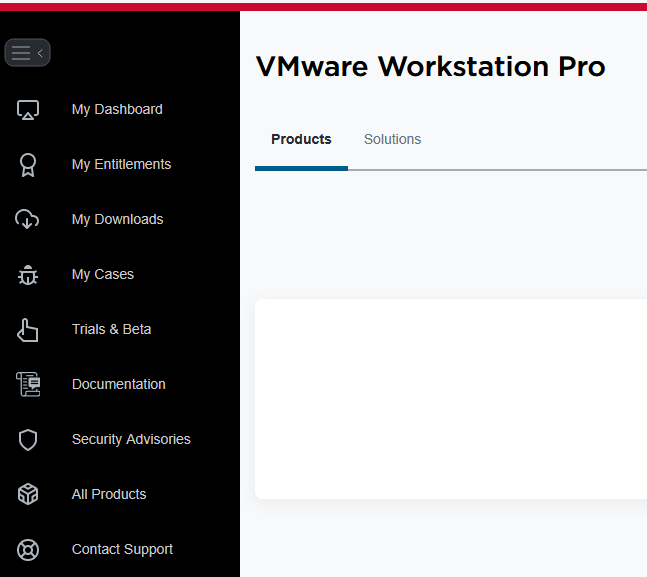
Sur la page suivante, Dans le menu, cliquer sur '<span style="color: rgb(132,63,161);">***My Downloads***</span>'

[![image.png](https://docs.labs404.fr/uploads/images/gallery/2026-07/scaled-1680-/Rm6image-png.png)](https://docs.labs404.fr/uploads/images/gallery/2026-07/scaled-1680-/Rm6image-png.png)

Puis cliquer sur :

[![image.png](https://docs.labs404.fr/uploads/images/gallery/2026-07/scaled-1680-/rcBimage-png.png)](https://docs.labs404.fr/uploads/images/gallery/2026-07/scaled-1680-/rcBimage-png.png)

Chercher dans la liste VMware workstation PRO :

[![image.png](https://docs.labs404.fr/uploads/images/gallery/2026-07/scaled-1680-/Wu6image-png.png)](https://docs.labs404.fr/uploads/images/gallery/2026-07/scaled-1680-/Wu6image-png.png)
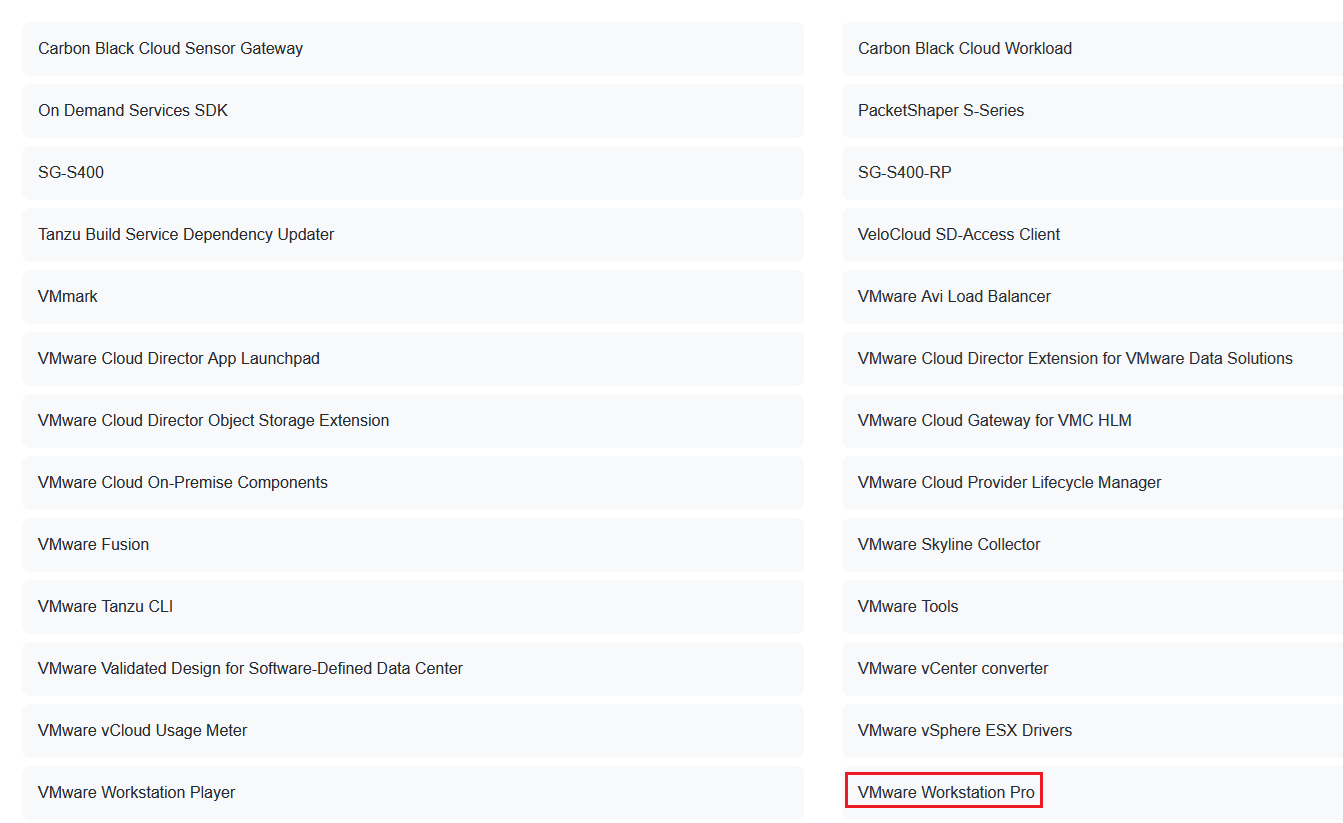
Choisir la version voulue.

[![image.png](https://docs.labs404.fr/uploads/images/gallery/2026-07/scaled-1680-/jHqimage-png.png)](https://docs.labs404.fr/uploads/images/gallery/2026-07/scaled-1680-/jHqimage-png.png)
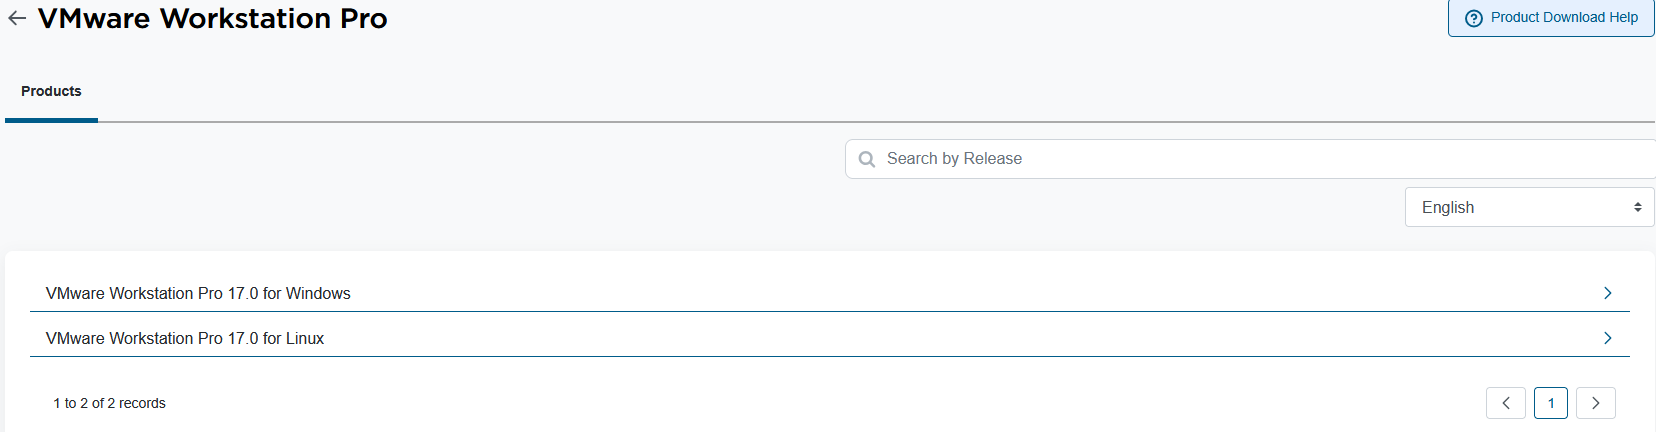
Cliquer ensuite sur la version voulue.

[![image.png](https://docs.labs404.fr/uploads/images/gallery/2026-07/scaled-1680-/fIDimage-png.png)](https://docs.labs404.fr/uploads/images/gallery/2026-07/scaled-1680-/fIDimage-png.png)
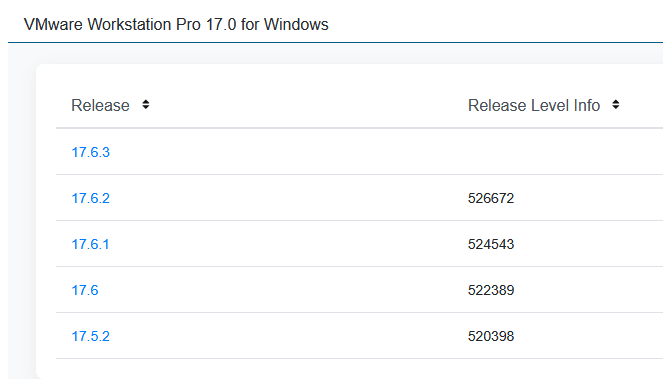
Cliquer enfin sur l'icône de téléchargement.

<p class="callout info">**Note** : Pour que celui-ci soit accessible, il faudra accepter les conditions générales si cela est votre premier téléchargement sur le site.</p>

<p class="callout warning">**Attention** : Depuis les modifications des accords commerciaux sur l'exportation des produits et licences logicielles, Il sera nécessaire d'entrer ses informations personnelles pour continuer.</p>

Une fois le téléchargement terminé, l'installation peut commencer.

<p class="callout info">**Voir** : [VMware Workstation - Installation sur windows](https://docs.labs404.fr/books/logiciels/page/vmware-workstation-installation-sur-windows "VMware Workstation - Installation sur windows") **OU** [VMware Workstation - Installation sur Linux (Ubuntu)](https://docs.labs404.fr/books/logiciels "VMware Workstation - Installation sur Linux (Ubuntu)")  
</p>

# Logiciel - RoyalTS

Logiciel de centralisation de l'administration de l'infrastructure.

# Logiciels - VLC

Logiciel de lecteur et boite à outil multimédia.

# Outil - Rufus

Outil de création de supports d'installation.

# Rufus - Création d'un média d'installation

<table id="bkmrk-difficult%C3%A9%2A-%3Cdescrip" style="border-collapse: collapse; width: 100%; height: 46.8px; border-width: 1px; border-style: hidden;"><colgroup><col style="width: 20%;"></col><col style="width: 80%;"></col></colgroup><tbody><tr style="height: 46.8px;"><td style="height: 46.8px; border: 1px groove rgb(52,73,94);">[![Novice.png](https://docs.labs404.fr/uploads/images/gallery/2026-07/scaled-1680-/9qVnovice-png.png)](https://docs.labs404.fr/uploads/images/gallery/2026-07/scaled-1680-/9qVnovice-png.png)

</td><td style="height: 46.8px; border-width: 1px; background-color: rgb(236,202,250); vertical-align: top;">Difficulté : Novice

Notions : image système, systèmes de fichier, boot, bios.

</td></tr></tbody></table>

---

### <span style="color: rgb(52, 73, 94);">**<span style="text-decoration: underline;">I.Introduction</span>**</span>

Ce document a pour but de vous apprendre à créer des médias d’installation à l’aide du logiciel RUFUS.

<p class="callout info">Rufus peut être téléchargé ici : [Créez facilement des clés USB démarrables](https://rufus.ie/fr/)</p>

<p class="callout danger">**Prérequis** : Un poste sous Windows XP minimum, une clé usb ou une carte SD / Micro-SD, un fichier image du média à créer.</p>

---

### **<span style="text-decoration: underline;"><span style="color: rgb(52, 73, 94); text-decoration: underline;">II. Création d'un média</span>  
</span>**

Insérer le média.

Télécharger le fichier image (.img ou .iso) du média à créer.

Lancer RUFUS.

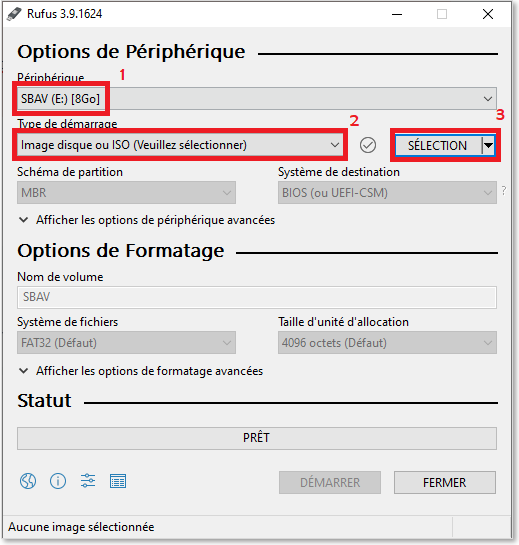
[![image.png](https://docs.labs404.fr/uploads/images/gallery/2026-07/scaled-1680-/TYTimage-png.png)](https://docs.labs404.fr/uploads/images/gallery/2026-07/scaled-1680-/TYTimage-png.png)
1. Sélectionner le périphérique qui va servir de média d’installation
2. Sélectionner <span style="color: rgb(132,63,161);">***<span class="fabric-text-color-mark">image disque ou ISO</span>***</span>.
3. Cliquer sur <span style="color: rgb(132,63,161);">***<span class="fabric-text-color-mark">Sélection</span>***</span>.

[![image.png](https://docs.labs404.fr/uploads/images/gallery/2026-07/scaled-1680-/pDhimage-png.png)](https://docs.labs404.fr/uploads/images/gallery/2026-07/scaled-1680-/pDhimage-png.png)

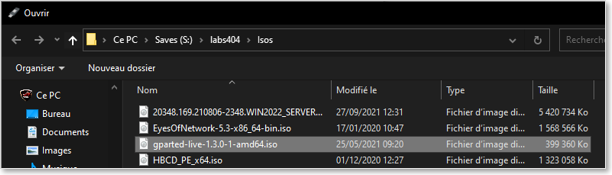
Choisir l’iso à Utiliser pour la création de média.

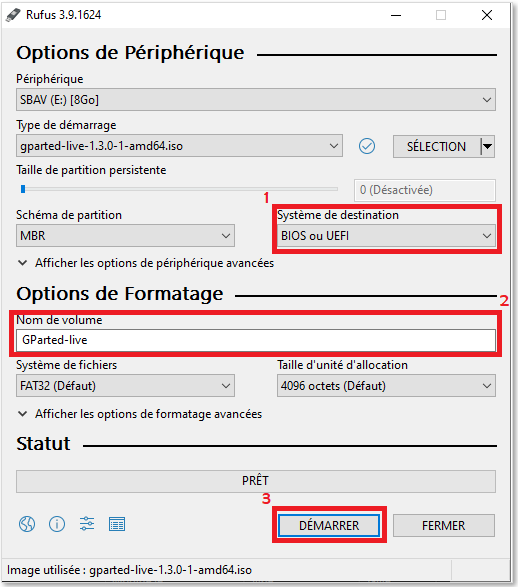
[![image.png](https://docs.labs404.fr/uploads/images/gallery/2026-07/scaled-1680-/eP4image-png.png)](https://docs.labs404.fr/uploads/images/gallery/2026-07/scaled-1680-/eP4image-png.png)
1. Penser à bien sélectionner le système de destination. Cela se fait en fonction de la compatibilité du système de destination. La plupart du temps, l’option par défaut correspondra.
2. La plupart du temps, les options de formatages seront correctement détectées.
3. Si ce n'était pas le cas, ajuster pour correspondre à ce qui est demandé par le système.
4. Cliquer sur <span style="color: rgb(132,63,161);">***<span class="fabric-text-color-mark">Démarrer</span>***</span>.

[![image.png](https://docs.labs404.fr/uploads/images/gallery/2026-07/scaled-1680-/NVKimage-png.png)](https://docs.labs404.fr/uploads/images/gallery/2026-07/scaled-1680-/NVKimage-png.png)

Les fenêtres suivantes peuvent apparaître.

Dans le cas de la première, cliquer sur oui et continuer.

Dans le cas de la seconde, Choisir le type le mieux adapté au besoin de l’image.

<table id="bkmrk--7" style="border-collapse: collapse; width: 100%;"><colgroup><col style="width: 50%;"></col><col style="width: 50%;"></col></colgroup><tbody><tr><td style="border-style: hidden;">[![image.png](https://docs.labs404.fr/uploads/images/gallery/2026-07/scaled-1680-/29Iimage-png.png)](https://docs.labs404.fr/uploads/images/gallery/2026-07/scaled-1680-/29Iimage-png.png)

</td><td style="border-style: hidden;">[![image.png](https://docs.labs404.fr/uploads/images/gallery/2026-07/scaled-1680-/4S2image-png.png)](https://docs.labs404.fr/uploads/images/gallery/2026-07/scaled-1680-/4S2image-png.png)

</td></tr></tbody></table>

Valider le formatage.

[![image.png](https://docs.labs404.fr/uploads/images/gallery/2026-07/scaled-1680-/Jg3image-png.png)](https://docs.labs404.fr/uploads/images/gallery/2026-07/scaled-1680-/Jg3image-png.png)

Laisser la création du volume se dérouler.

[![image.png](https://docs.labs404.fr/uploads/images/gallery/2026-07/scaled-1680-/tTOimage-png.png)](https://docs.labs404.fr/uploads/images/gallery/2026-07/scaled-1680-/tTOimage-png.png)

A la fin du processus, Le média est terminé et la fenêtre affiche :

[![image.png](https://docs.labs404.fr/uploads/images/gallery/2026-07/scaled-1680-/F2eimage-png.png)](https://docs.labs404.fr/uploads/images/gallery/2026-07/scaled-1680-/F2eimage-png.png)

Fermer RUFUS et retirer le média. Celui-ci est prêt à être utilisé.

<p class="callout info">Continuer avec la procédure d’installation du système.</p>

# Outil - Wireshark

Outil de sniffing du réseau et d’analyse de trame.

# Wireshark - Installation et utilisation

<table id="bkmrk-difficult%C3%A9%2A-%3Cdescrip" style="border-collapse: collapse; width: 100%; height: 46.8px; border-width: 1px; border-style: hidden;"><colgroup><col style="width: 20%;"></col><col style="width: 80%;"></col></colgroup><tbody><tr style="height: 46.8px;"><td style="height: 46.8px; border: 1px groove rgb(52,73,94);">[![Confirmé.png](https://docs.labs404.fr/uploads/images/gallery/2026-07/scaled-1680-/Cfnconfirme-png.png)](https://docs.labs404.fr/uploads/images/gallery/2026-07/scaled-1680-/Cfnconfirme-png.png)</td><td style="height: 46.8px; border-width: 1px; background-color: rgb(236,202,250); vertical-align: top;">Difficulté : Confirmé

Notions : Réseaux, protocoles, analyse de trame.

</td></tr></tbody></table>

---

### <span style="color: rgb(52,73,94);">**<span style="text-decoration: underline;">I.Introduction</span>**</span>

Ce document a pour but de vous apprendre à utiliser les fonctions basiques de wireshark. Ce qui peut être utile pour annalyser la cause d’un problème réseau ou tester le bon fonctionnement d’un protocole.

<p class="callout info">Wireshark peut être téléchargé ici : [Download Wireshark](https://www.wireshark.org/download.html)  
</p>

<p class="callout danger">Prérequis : Un poste sous Windows 7 minimum, Une carte réseau RJ45 ou une carte wifi.  
</p>

---

### <span style="color: rgb(52,73,94);">**<span style="text-decoration: underline;">II. Installation</span>**</span>

#### <span style="color: rgb(35,111,161);">**2.1 Lancement de l'installation**</span>  


*Lancer l’installer.*

[![image.png](https://docs.labs404.fr/uploads/images/gallery/2026-07/scaled-1680-/WPdimage-png.png)](https://docs.labs404.fr/uploads/images/gallery/2026-07/scaled-1680-/WPdimage-png.png)

L’installation est basique. Il suffit de suivre l’assistant d’installation.

<table id="bkmrk--4" style="border-collapse: collapse; width: 100%; height: 1213.8px;"><colgroup><col style="width: 50%;"></col><col style="width: 50%;"></col></colgroup><tbody><tr style="height: 303.7px;"><td style="border-style: hidden; height: 303.7px;">[![image.png](https://docs.labs404.fr/uploads/images/gallery/2026-07/scaled-1680-/abNimage-png.png)](https://docs.labs404.fr/uploads/images/gallery/2026-07/scaled-1680-/abNimage-png.png)

</td><td style="border-style: hidden; height: 303.7px;">[![image.png](https://docs.labs404.fr/uploads/images/gallery/2026-07/scaled-1680-/Q7Iimage-png.png)](https://docs.labs404.fr/uploads/images/gallery/2026-07/scaled-1680-/Q7Iimage-png.png)

</td></tr><tr style="height: 303.7px;"><td style="border-style: hidden; height: 303.7px;">[![image.png](https://docs.labs404.fr/uploads/images/gallery/2026-07/scaled-1680-/bNximage-png.png)](https://docs.labs404.fr/uploads/images/gallery/2026-07/scaled-1680-/bNximage-png.png)

</td><td style="border-style: hidden; height: 303.7px;">[![image.png](https://docs.labs404.fr/uploads/images/gallery/2026-07/scaled-1680-/rdeimage-png.png)](https://docs.labs404.fr/uploads/images/gallery/2026-07/scaled-1680-/rdeimage-png.png)

</td></tr><tr style="height: 301.7px;"><td style="border-style: hidden; height: 301.7px;">[![image.png](https://docs.labs404.fr/uploads/images/gallery/2026-07/scaled-1680-/NjFimage-png.png)](https://docs.labs404.fr/uploads/images/gallery/2026-07/scaled-1680-/NjFimage-png.png)

</td><td style="border-style: hidden; height: 301.7px;">[![image.png](https://docs.labs404.fr/uploads/images/gallery/2026-07/scaled-1680-/4ikimage-png.png)](https://docs.labs404.fr/uploads/images/gallery/2026-07/scaled-1680-/4ikimage-png.png)

</td></tr><tr style="height: 304.7px;"><td style="border-style: hidden; height: 304.7px;">[![image.png](https://docs.labs404.fr/uploads/images/gallery/2026-07/scaled-1680-/ckgimage-png.png)](https://docs.labs404.fr/uploads/images/gallery/2026-07/scaled-1680-/ckgimage-png.png)

</td><td style="border-style: hidden; height: 304.7px;">[![image.png](https://docs.labs404.fr/uploads/images/gallery/2026-07/scaled-1680-/eSiimage-png.png)](https://docs.labs404.fr/uploads/images/gallery/2026-07/scaled-1680-/eSiimage-png.png)

</td></tr></tbody></table>

#### **<span style="color: rgb(35,111,161);">2.2 Installation de Npcap</span>** 

Lors de l’installation de Npcap, Valider en Cliquant sur ‘<span style="color: rgb(132,63,161);">***<span class="fabric-text-color-mark">I Agree</span>***</span>’

[![image.png](https://docs.labs404.fr/uploads/images/gallery/2026-07/scaled-1680-/1Y3image-png.png)](https://docs.labs404.fr/uploads/images/gallery/2026-07/scaled-1680-/1Y3image-png.png)

Cocher les cases suivantes :

[![image.png](https://docs.labs404.fr/uploads/images/gallery/2026-07/scaled-1680-/7y8image-png.png)](https://docs.labs404.fr/uploads/images/gallery/2026-07/scaled-1680-/7y8image-png.png)

<table id="bkmrk--8" style="border-collapse: collapse; width: 100%;"><colgroup><col style="width: 50%;"></col><col style="width: 50%;"></col></colgroup><tbody><tr><td style="border-style: hidden;">[![image.png](https://docs.labs404.fr/uploads/images/gallery/2026-07/scaled-1680-/ZaJimage-png.png)](https://docs.labs404.fr/uploads/images/gallery/2026-07/scaled-1680-/ZaJimage-png.png)

</td><td style="border-style: hidden;">[![image.png](https://docs.labs404.fr/uploads/images/gallery/2026-07/scaled-1680-/TF9image-png.png)](https://docs.labs404.fr/uploads/images/gallery/2026-07/scaled-1680-/TF9image-png.png)

</td></tr></tbody></table>

#### <span style="color: rgb(35,111,161);">**2.3 Installation de USBpcap**</span>

Puis, Installer USB Pcap. Cocher les deux cases et cliquer sur suivant.

<table id="bkmrk--11" style="border-collapse: collapse; width: 100%;"><colgroup><col style="width: 50%;"></col><col style="width: 50%;"></col></colgroup><tbody><tr><td style="border-style: hidden;">[![image.png](https://docs.labs404.fr/uploads/images/gallery/2026-07/scaled-1680-/ulZimage-png.png)](https://docs.labs404.fr/uploads/images/gallery/2026-07/scaled-1680-/ulZimage-png.png)

</td><td style="border-style: hidden;">[![image.png](https://docs.labs404.fr/uploads/images/gallery/2026-07/scaled-1680-/PRQimage-png.png)](https://docs.labs404.fr/uploads/images/gallery/2026-07/scaled-1680-/PRQimage-png.png)

</td></tr></tbody></table>

Laisser les cases cochées et terminer l’installation.

<table id="bkmrk--12" style="border-collapse: collapse; width: 100%;"><colgroup><col style="width: 50%;"></col><col style="width: 50%;"></col></colgroup><tbody><tr><td style="border-style: hidden;">[![image.png](https://docs.labs404.fr/uploads/images/gallery/2026-07/scaled-1680-/paYimage-png.png)](https://docs.labs404.fr/uploads/images/gallery/2026-07/scaled-1680-/paYimage-png.png)

</td><td style="border-style: hidden;">[![image.png](https://docs.labs404.fr/uploads/images/gallery/2026-07/scaled-1680-/HGCimage-png.png)](https://docs.labs404.fr/uploads/images/gallery/2026-07/scaled-1680-/HGCimage-png.png)

</td></tr><tr><td style="border-style: hidden;">[![image.png](https://docs.labs404.fr/uploads/images/gallery/2026-07/scaled-1680-/WTVimage-png.png)](https://docs.labs404.fr/uploads/images/gallery/2026-07/scaled-1680-/WTVimage-png.png)

</td><td style="border-style: hidden;">  
</td></tr></tbody></table>

#### <span style="color: rgb(35,111,161);">**2.4 Fin de l'installation**</span>

Terminer l’installation.

<table id="bkmrk--13" style="border-collapse: collapse; width: 100%;"><colgroup><col style="width: 50%;"></col><col style="width: 50%;"></col></colgroup><tbody><tr><td style="border-style: hidden;">[![image.png](https://docs.labs404.fr/uploads/images/gallery/2026-07/scaled-1680-/T33image-png.png)](https://docs.labs404.fr/uploads/images/gallery/2026-07/scaled-1680-/T33image-png.png)

</td><td style="border-style: hidden;">[![image.png](https://docs.labs404.fr/uploads/images/gallery/2026-07/scaled-1680-/k9himage-png.png)](https://docs.labs404.fr/uploads/images/gallery/2026-07/scaled-1680-/k9himage-png.png)

</td></tr></tbody></table>

---

### <span style="text-decoration: underline; color: rgb(52,73,94);">**III. Démarrer une capture**</span>

Lancer le programme.

[![image.png](https://docs.labs404.fr/uploads/images/gallery/2026-07/scaled-1680-/hAWimage-png.png)](https://docs.labs404.fr/uploads/images/gallery/2026-07/scaled-1680-/hAWimage-png.png)

Sélectionner l’interface réseau à utiliser.

(ici : Ethernet0)

[![image.png](https://docs.labs404.fr/uploads/images/gallery/2026-07/scaled-1680-/w89image-png.png)](https://docs.labs404.fr/uploads/images/gallery/2026-07/scaled-1680-/w89image-png.png)

La capture se lance et les paquet capturés apparaissent.

[![image.png](https://docs.labs404.fr/uploads/images/gallery/2026-07/scaled-1680-/BUpimage-png.png)](https://docs.labs404.fr/uploads/images/gallery/2026-07/scaled-1680-/BUpimage-png.png)

La fenêtre est composée de Trois espaces :

[![image.png](https://docs.labs404.fr/uploads/images/gallery/2026-07/scaled-1680-/ql7image-png.png)](https://docs.labs404.fr/uploads/images/gallery/2026-07/scaled-1680-/ql7image-png.png)

1. Liste des paquets capturés. Par défaut, cela défile en temps réel et ne trie pas les paquets.
2. Contenu de la trame découpée par blocs.
3. Contenu du paquet affiché en hexadécimal et texte.

---

### <span style="text-decoration: underline; color: rgb(52,73,94);">**IV. Utiliser les filtres**</span>

Afin de rendre la capture plus facile et lisible, il est possible de filtrer sur une IP ou un protocole particulier.

[![image.png](https://docs.labs404.fr/uploads/images/gallery/2026-07/scaled-1680-/rsdimage-png.png)](https://docs.labs404.fr/uploads/images/gallery/2026-07/scaled-1680-/rsdimage-png.png)

Par exemple :

<table id="bkmrk-ip.src%3D%3D192.168.1.10" style="border-collapse: collapse; width: 100%;"><colgroup><col style="width: 99.8765%;"></col></colgroup><tbody><tr><td class="align-center" style="border-style: hidden;">[![image.png](https://docs.labs404.fr/uploads/images/gallery/2026-07/scaled-1680-/NXJimage-png.png)](https://docs.labs404.fr/uploads/images/gallery/2026-07/scaled-1680-/NXJimage-png.png)

</td></tr><tr><td class="align-center" style="border-style: hidden;">*ip.src==192.168.1.100 permet d’afficher tous les paquets provenant de l’hôte avec l’ip 192.168.1.100*</td></tr></tbody></table>

<table id="bkmrk-tcp.port%3D%3D443-permet" style="border-collapse: collapse; width: 100%; height: 157.667px;"><colgroup><col style="width: 99.8765%;"></col></colgroup><tbody><tr style="height: 128.867px;"><td class="align-center" style="border-style: hidden; height: 128.867px;">[![image.png](https://docs.labs404.fr/uploads/images/gallery/2026-07/scaled-1680-/jqlimage-png.png)](https://docs.labs404.fr/uploads/images/gallery/2026-07/scaled-1680-/jqlimage-png.png)

</td></tr><tr style="height: 28.8px;"><td class="align-center" style="border-style: hidden; height: 28.8px;">*tcp.port==443 Permet d’afficher tout les paquets utilisant le port HTTPS.*</td></tr></tbody></table>

Il est également possible de combiner des filtres avec des opérateurs.

- &amp;&amp; : et
- || : ou
- != : non égal à

Par exemple :

<table id="bkmrk-ip.src%3D%3D192.168.1.10-0" style="border-collapse: collapse; width: 100%; height: 157.667px;"><colgroup><col style="width: 99.8765%;"></col></colgroup><tbody><tr style="height: 128.867px;"><td class="align-center" style="border-style: hidden; height: 128.867px;">[![image.png](https://docs.labs404.fr/uploads/images/gallery/2026-07/scaled-1680-/HvVimage-png.png)](https://docs.labs404.fr/uploads/images/gallery/2026-07/scaled-1680-/HvVimage-png.png)

</td></tr><tr style="height: 28.8px;"><td class="align-center" style="border-style: hidden; height: 28.8px;">*ip.src==192.168.1.100 &amp;&amp; tcp.port==80 Permet d’afficher tout les paquets provenant de 192.168.1.100 sur le port 80.*</td></tr></tbody></table>

<table id="bkmrk-ip.src%3D%3D192.168.1.10-1" style="border-collapse: collapse; width: 100%; height: 157.667px;"><colgroup><col style="width: 99.8765%;"></col></colgroup><tbody><tr style="height: 128.867px;"><td class="align-center" style="border-style: hidden; height: 128.867px;">[![image.png](https://docs.labs404.fr/uploads/images/gallery/2026-07/scaled-1680-/sDFimage-png.png)](https://docs.labs404.fr/uploads/images/gallery/2026-07/scaled-1680-/sDFimage-png.png)

</td></tr><tr style="height: 28.8px;"><td class="align-center" style="border-style: hidden; height: 28.8px;">*ip.src==192.168.1.100 || ip.dst== 8.8.8.8 Permet d’afficher tout le trafic en provenance de 102.168.1.100 OU à destination de 8.8.8.8*</td></tr></tbody></table>

<p class="callout info">Pour plus de filtres : [DisplayFilters](https://wiki.wireshark.org/DisplayFilters)</p>

# Wireshark - Notions avancées

<table id="bkmrk-difficult%C3%A9%2A-%3Cdescrip" style="border-collapse: collapse; width: 100%; height: 46.8px; border-width: 1px; border-style: hidden;"><colgroup><col style="width: 20%;"></col><col style="width: 80%;"></col></colgroup><tbody><tr style="height: 46.8px;"><td style="height: 46.8px; border: 1px groove rgb(52,73,94);">[![Confirmé.png](https://docs.labs404.fr/uploads/images/gallery/2026-07/scaled-1680-/Cfnconfirme-png.png)](https://docs.labs404.fr/uploads/images/gallery/2026-07/scaled-1680-/Cfnconfirme-png.png)</td><td style="height: 46.8px; border-width: 1px; background-color: rgb(236,202,250); vertical-align: top;">Difficulté : Confirmé

Notions : Réseaux, protocoles, analyse de trame.

</td></tr></tbody></table>

---


### <span style="color: rgb(52,73,94);">**<span style="text-decoration: underline;">I.Introduction</span>**</span>

Ce document a pour but de vous apprendre à utiliser les fonctions avancées de wireshark

<p class="callout info">Wireshark peut être téléchargé ici : [Download Wireshark](https://www.wireshark.org/download.html)  
</p>

<p class="callout info">Cette documentation fait suite à : [Wireshark - Installation et utilisation](https://docs.labs404.fr/books/logiciels/page/wireshark-installation-et-utilisation "Wireshark - Installation et utilisation")</p>

<p class="callout danger">Prérequis : Un poste sous Windows 7 minimum, Une carte réseau RJ45 ou une carte wifi.  
</p>

---

### <span style="color: rgb(52,73,94);">**<span style="text-decoration: underline;">II. Informations de capture</span>**</span>

#### <span style="color: rgb(35,111,161);">**2.1 Voir les détails de la capture**</span>  


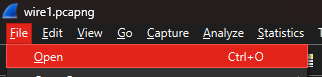
Pour voir les détails d'une capture, ouvrir la capture avec '<span style="color: rgb(132,63,161);">***Fichier --&gt; Ouvrir***</span>'.

[![image.png](https://docs.labs404.fr/uploads/images/gallery/2026-07/scaled-1680-/cKRimage-png.png)](https://docs.labs404.fr/uploads/images/gallery/2026-07/scaled-1680-/cKRimage-png.png)

En bas à gauche, cliquer sur l'icône du fichier de capture.

[![image.png](https://docs.labs404.fr/uploads/images/gallery/2026-07/scaled-1680-/7rlimage-png.png)](https://docs.labs404.fr/uploads/images/gallery/2026-07/scaled-1680-/7rlimage-png.png)
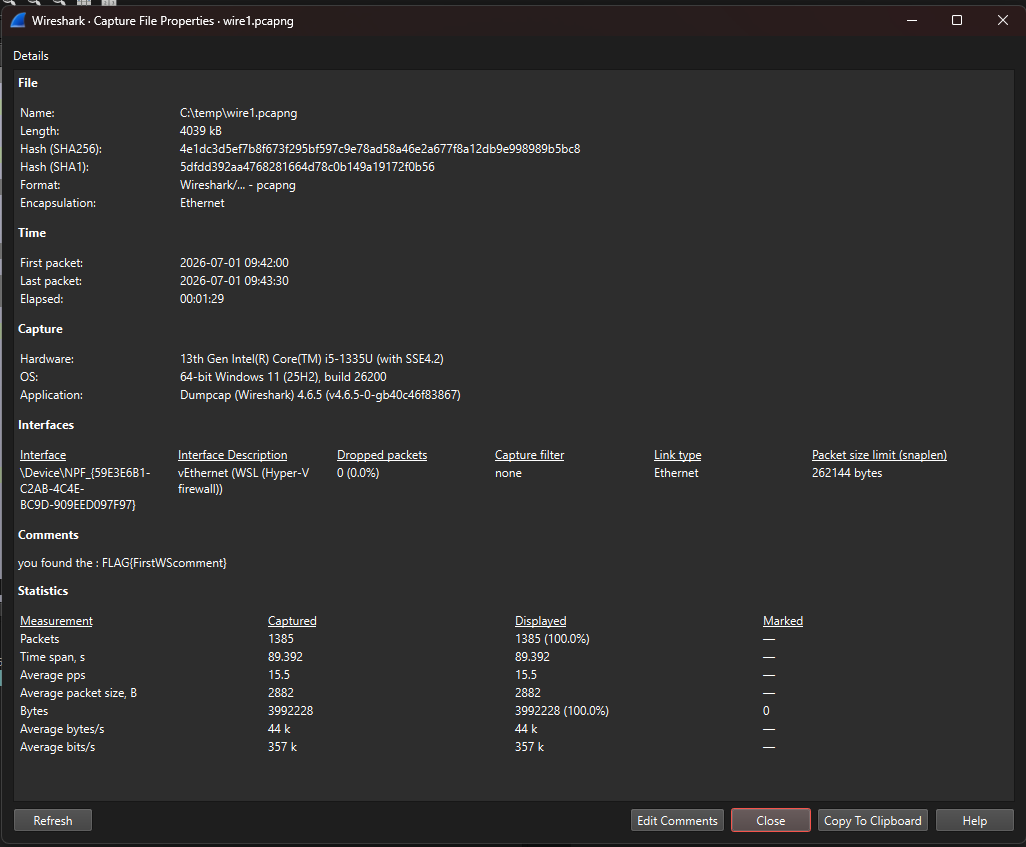
Il est possible d'y trouver les informations de la capture.

[![image.png](https://docs.labs404.fr/uploads/images/gallery/2026-07/scaled-1680-/aTIimage-png.png)](https://docs.labs404.fr/uploads/images/gallery/2026-07/scaled-1680-/aTIimage-png.png)
#### **<span style="color: rgb(35,111,161);">2.2 Voir les résultats de capture</span>**

En bas à gauche, cliquer sur l'icône du rond vert.

[![image.png](https://docs.labs404.fr/uploads/images/gallery/2026-07/scaled-1680-/7rlimage-png.png)](https://docs.labs404.fr/uploads/images/gallery/2026-07/scaled-1680-/7rlimage-png.png)

Il est possible de voir les résultats et statistiques de la capture.

[![image.png](https://docs.labs404.fr/uploads/images/gallery/2026-07/scaled-1680-/ssUimage-png.png)](https://docs.labs404.fr/uploads/images/gallery/2026-07/scaled-1680-/ssUimage-png.png)
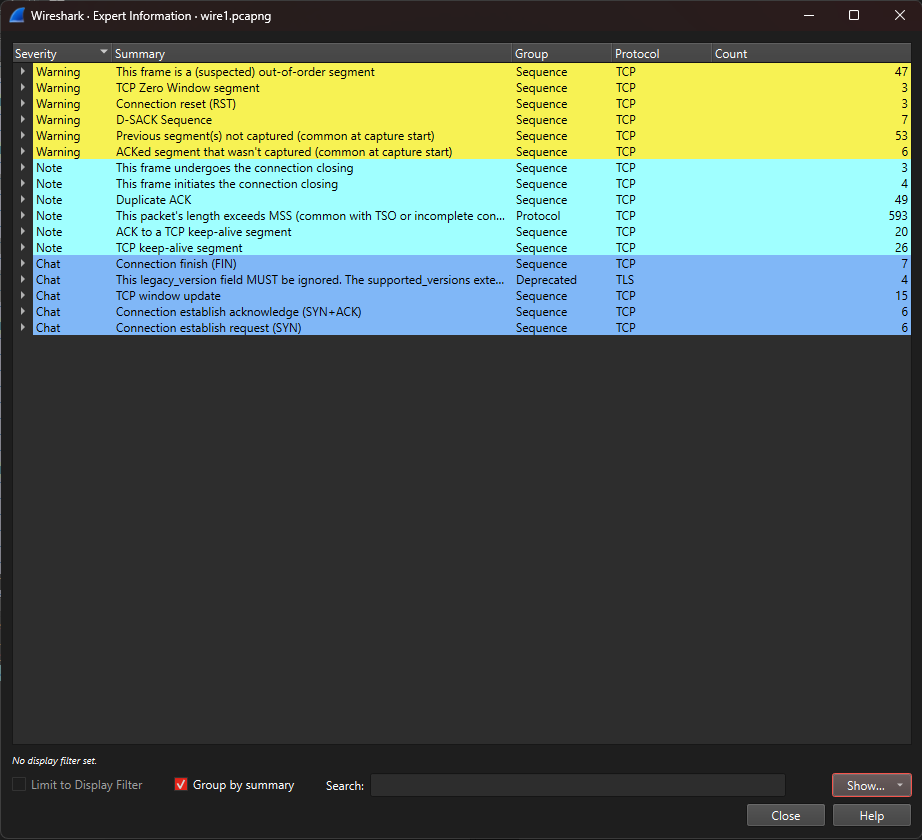
---

### <span style="color: rgb(52,73,94);">**<span style="text-decoration: underline;">III. Suivre un stream</span>**</span>

#### <span style="color: rgb(35,111,161);">**3.1 Suivre un stream TCP**</span>  


Pour filtrer la vue sur un échange en particulier, clic droit sur l'un des paquets du stream.

[![image.png](https://docs.labs404.fr/uploads/images/gallery/2026-07/scaled-1680-/6MIimage-png.png)](https://docs.labs404.fr/uploads/images/gallery/2026-07/scaled-1680-/6MIimage-png.png)

*ici, par exemple, un flux SSHv2*

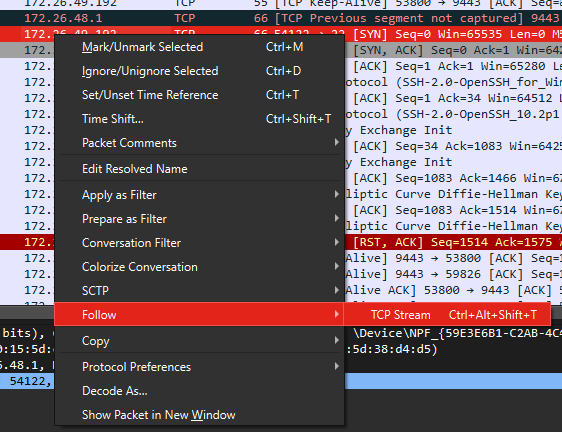
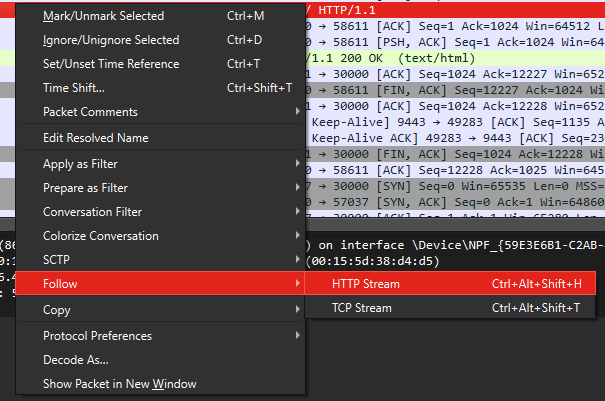
*faire un '*<span style="color: rgb(132,63,161);">**clic droit --&gt; Follow --&gt; TCP Stream**</span>*'.*

[![image.png](https://docs.labs404.fr/uploads/images/gallery/2026-07/scaled-1680-/kGUimage-png.png)](https://docs.labs404.fr/uploads/images/gallery/2026-07/scaled-1680-/kGUimage-png.png)

Cela va filtrer uniquement les trames liées à cet échange :

[![image.png](https://docs.labs404.fr/uploads/images/gallery/2026-07/scaled-1680-/QTUimage-png.png)](https://docs.labs404.fr/uploads/images/gallery/2026-07/scaled-1680-/QTUimage-png.png)
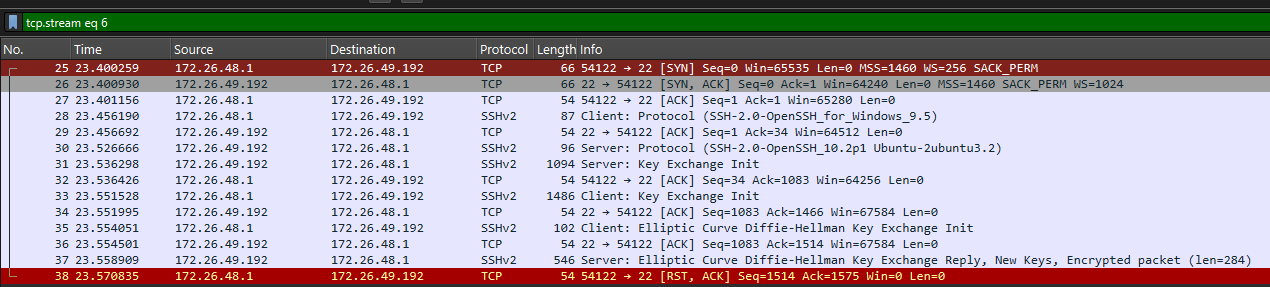
Et également afficher une nouvelle fenêtre dans laquelle sera affiché le détail des échanges.

[![image.png](https://docs.labs404.fr/uploads/images/gallery/2026-07/scaled-1680-/Zusimage-png.png)](https://docs.labs404.fr/uploads/images/gallery/2026-07/scaled-1680-/Zusimage-png.png)
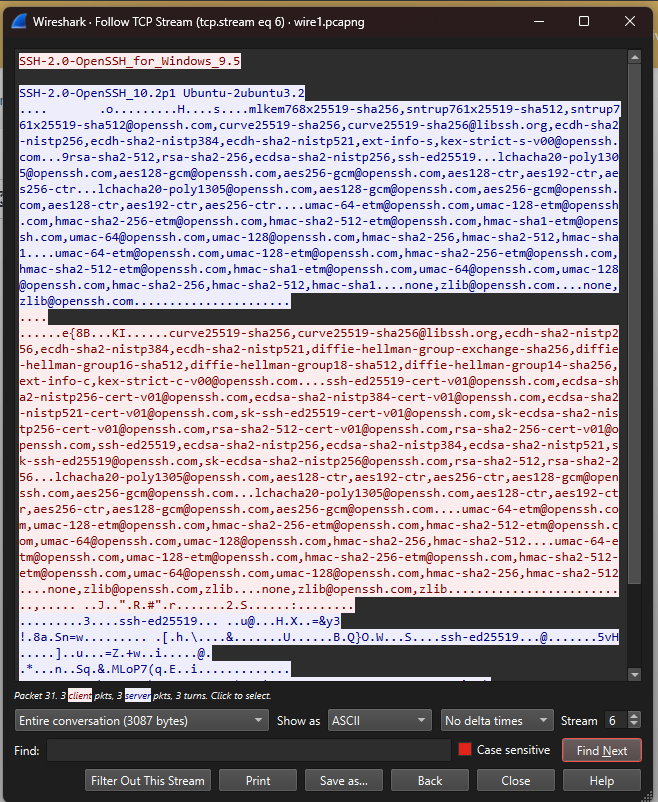
#### <span style="color: rgb(35,111,161);">**3.2 Suivre un stream HTTP(s)**</span>

De la même manière il est possible de suivre un stream HTTP ou HTTPS :

*faire un '*<span style="color: rgb(132,63,161);">**clic droit --&gt; Follow --&gt; HTTP Stream**</span>*'.*

[![image.png](https://docs.labs404.fr/uploads/images/gallery/2026-07/scaled-1680-/5rcimage-png.png)](https://docs.labs404.fr/uploads/images/gallery/2026-07/scaled-1680-/5rcimage-png.png)

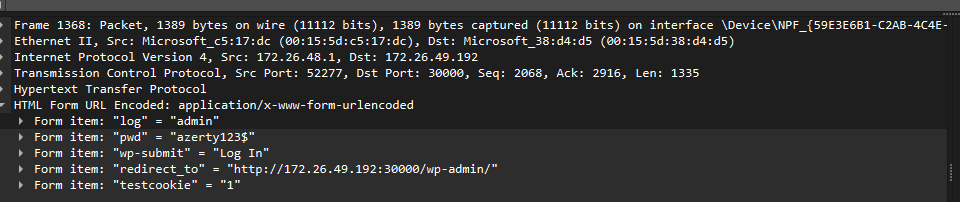
Cela permettra d'afficher la page récapitulative :

[![image.png](https://docs.labs404.fr/uploads/images/gallery/2026-07/scaled-1680-/OCJimage-png.png)](https://docs.labs404.fr/uploads/images/gallery/2026-07/scaled-1680-/OCJimage-png.png)
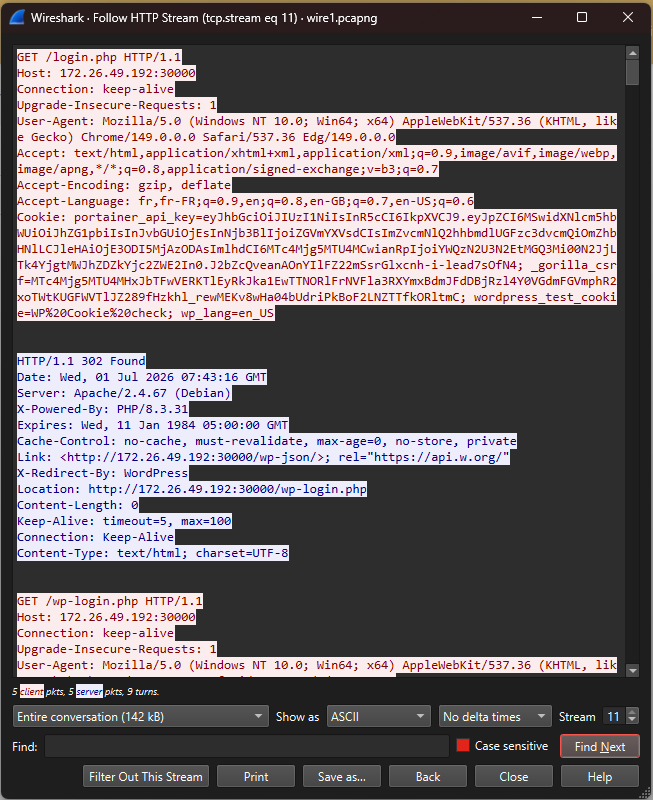
#### <span style="color: rgb(35,111,161);">**3.3 Trouver une information dans le stream**</span>

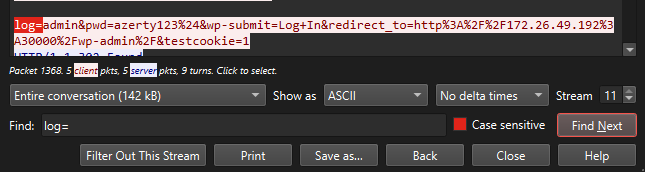
Il est ensuite possible grâce à la barre de recherche en bas de rechercher une information particulière dans le stream.

[![image.png](https://docs.labs404.fr/uploads/images/gallery/2026-07/scaled-1680-/PZpimage-png.png)](https://docs.labs404.fr/uploads/images/gallery/2026-07/scaled-1680-/PZpimage-png.png)
---

### <span style="color: rgb(52,73,94);">**<span style="text-decoration: underline;">IV. Actions sur la liste</span>**</span>

#### <span style="color: rgb(35,111,161);">**4.1 Rechercher une information**</span>

Faire '<span style="color: rgb(132,63,161);">***ctrl+F***</span>' pour activer la barre de recherche :

[![image.png](https://docs.labs404.fr/uploads/images/gallery/2026-07/scaled-1680-/yrdimage-png.png)](https://docs.labs404.fr/uploads/images/gallery/2026-07/scaled-1680-/yrdimage-png.png)

Cette barre permet de rechercher des données dans la liste ou dans le contenu des trames.

Par exemple avec les critères '<span style="color: rgb(132,63,161);">***Packet Details***</span>' et '<span style="color: rgb(132,63,161);">***String***</span>' puis la valeur '<span style="color: rgb(132,63,161);">***admin***</span>' :

[![image.png](https://docs.labs404.fr/uploads/images/gallery/2026-07/scaled-1680-/V04image-png.png)](https://docs.labs404.fr/uploads/images/gallery/2026-07/scaled-1680-/V04image-png.png)

#### <span style="color: rgb(35,111,161);">**4.2 Appliquer un filtre dynamique**</span>

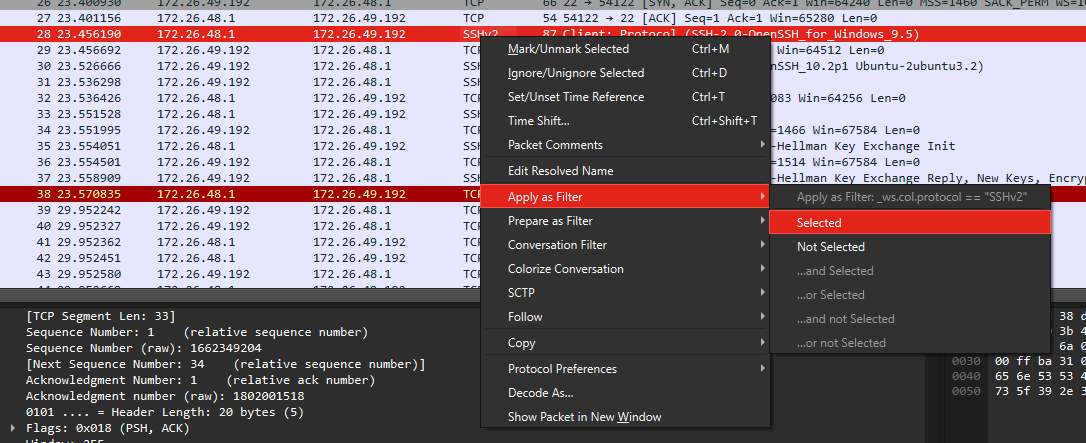
Pour appliquer un filtre dynamique, il est possible de faire un clic droit sur l'une des informations disponible ( ip, port, protocole, etc... ) et de faire un '<span style="color: rgb(132,63,161);">***clic droit --&gt; Apply as Filter --&gt; Selected***</span>' pour appliquer ce filtre.

[![image.png](https://docs.labs404.fr/uploads/images/gallery/2026-07/scaled-1680-/mu2image-png.png)](https://docs.labs404.fr/uploads/images/gallery/2026-07/scaled-1680-/mu2image-png.png)

#### <span style="color: rgb(35,111,161);">**4.3 Afficher / Exporter des données**</span>

Cliquer sur une trame, puis sur un morceau de trame, il est possible d'afficher ou d'exporter la donnée contenue.

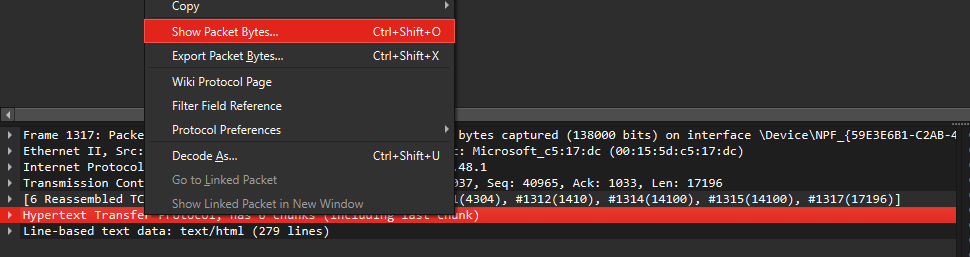
Faire un '<span style="color: rgb(132,63,161);">***clic droit --&gt; Show Packet Bytes***</span>' pour afficher le contenu.

Si il s'agit d'un contenu spécifique (page web, image, email, fichier), faire un '<span style="color: rgb(132,63,161);">***clic droit --&gt; Export Packet Bytes***</span>' Pour le sauvegarder au bon format.

[![image.png](https://docs.labs404.fr/uploads/images/gallery/2026-07/scaled-1680-/3S3image-png.png)](https://docs.labs404.fr/uploads/images/gallery/2026-07/scaled-1680-/3S3image-png.png)

# Wireshark - Déchiffrer trafic https

<table id="bkmrk-difficult%C3%A9%2A-%3Cdescrip" style="border-collapse: collapse; width: 100%; height: 46.8px; border-width: 1px; border-style: hidden;"><colgroup><col style="width: 20%;"></col><col style="width: 80%;"></col></colgroup><tbody><tr style="height: 46.8px;"><td style="height: 46.8px; border: 1px groove rgb(52,73,94);">[![image.png](https://docs.labs404.fr/uploads/images/gallery/2026-07/scaled-1680-/Cfnconfirme-png.png)](https://docs.labs404.fr/uploads/images/gallery/2026-07/scaled-1680-/Cfnconfirme-png.png)  
</td><td style="height: 46.8px; border-width: 1px; background-color: rgb(236,202,250); vertical-align: top;">Difficulté : Confirmé

Notions : TLS, chiffrement, capture de paquet.

</td></tr></tbody></table>

---

### <span style="color: rgb(52,73,94);">**<span style="text-decoration: underline;">I. Introduction</span>**</span>

Cette procédure vise à expliquer comment déchiffrer du traffic https capturé avec wireshark.

---

### <span style="color: rgb(52,73,94);">**<span style="text-decoration: underline;">II. Préparation</span>**</span>

Afin de déchiffrer le trafic HTTPS, il faudra au préalable disposer des clés qui ont été négociées lors du handshake.

Les navigateurs basés sur Chrome / Chromium et firefox peuvent utiliser une variable d’environnement afin de logguer les clés qui ont été générée lors des Handshakes.

<details id="bkmrk-sur-windows-%28gui%29-ou"><summary>Sur windows (GUI)</summary>

Ouvrir le menu démarrer et rechercher '<span style="color: rgb(132,63,161);">***ENV***</span>'.

[![image.png](https://docs.labs404.fr/uploads/images/gallery/2026-07/scaled-1680-/5eWimage-png.png)](https://docs.labs404.fr/uploads/images/gallery/2026-07/scaled-1680-/5eWimage-png.png)

Cliquer sur '<span style="color: rgb(132,63,161);">***Environment variables...***</span>'

[![image.png](https://docs.labs404.fr/uploads/images/gallery/2026-07/scaled-1680-/i2cimage-png.png)](https://docs.labs404.fr/uploads/images/gallery/2026-07/scaled-1680-/i2cimage-png.png)

Ajouter une nouvelle variable d’environnement **utilisateur** en cliquant sur '<span style="color: rgb(132,63,161);">***New***</span>'.

[![image.png](https://docs.labs404.fr/uploads/images/gallery/2026-07/scaled-1680-/wa6image-png.png)](https://docs.labs404.fr/uploads/images/gallery/2026-07/scaled-1680-/wa6image-png.png)

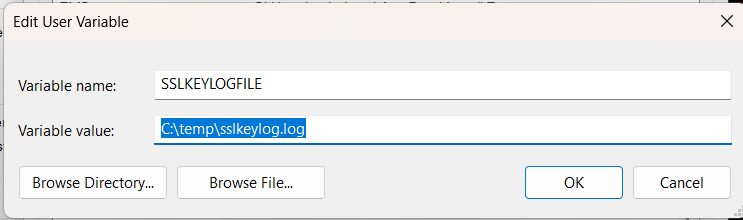
Créer la variable suivante et valider en cliquant sur '<span style="color: rgb(132,63,161);">***OK***</span>'.

<p class="callout warning">**Attention** : Le fichier spécifié doit exister.</p>

[![image.png](https://docs.labs404.fr/uploads/images/gallery/2026-07/scaled-1680-/gYVimage-png.png)](https://docs.labs404.fr/uploads/images/gallery/2026-07/scaled-1680-/gYVimage-png.png)

La variable sera prise en compte à la prochaine ouverture de session.

</details><details id="bkmrk-sur-linux-%28cli%29-atte"><summary>Sur linux (CLI)</summary>

<p class="callout warning">**Attention** : Le fichier spécifié doit exister.</p>

Pour ajouter la variable temporairement :

```bash
export SSLKEYLOGFILE=/chemin/vers/le/fichier
```

Pour l'ajouter de façon permanente, il faut la déclarer dans le fichier <span style="color: rgb(132,63,161);">***~/.bashrc***</span> de l'utilisateur.

```
echo 'export SSLKEYLOGFILE=/chemin/vers/le/fichier' >> ~/.bashrc
```

Elle prendra effet à la prochaine ouverture de session.

</details>Après réouverture de session, il suffira de lancer la capture wireshark et de lancer le navigateur.

A la fin de la capture, l'enregistrer.

---

### <span style="color: rgb(52,73,94);">***III. Déchiffrement des trames***</span>

Ouvrir le fichier de capture. Celui-ci est pour lors chiffré.

[![image.png](https://docs.labs404.fr/uploads/images/gallery/2026-07/scaled-1680-/fPbimage-png.png)](https://docs.labs404.fr/uploads/images/gallery/2026-07/scaled-1680-/fPbimage-png.png)

[![image.png](https://docs.labs404.fr/uploads/images/gallery/2026-07/scaled-1680-/4ITimage-png.png)](https://docs.labs404.fr/uploads/images/gallery/2026-07/scaled-1680-/4ITimage-png.png)

Pour le déchiffrer, il faut appliquer le fichier de clés récupérées lors des handshakes.

Pour cela, faire : '<span style="color: rgb(132,63,161);">***Edit --&gt; Preferences...***</span>'.

[![image.png](https://docs.labs404.fr/uploads/images/gallery/2026-07/scaled-1680-/6mMimage-png.png)](https://docs.labs404.fr/uploads/images/gallery/2026-07/scaled-1680-/6mMimage-png.png)

Dans la nouvelle fenêtre, se déplacer dans '<span style="color: rgb(132,63,161);">***protocoles --&gt; TLS***</span>' puis entrer le chemin vers le fichier de capture dans le champ '<span style="color: rgb(132,63,161);">***(Pre)-Master-Secret log filename***</span>'.

[![image.png](https://docs.labs404.fr/uploads/images/gallery/2026-07/scaled-1680-/2Biimage-png.png)](https://docs.labs404.fr/uploads/images/gallery/2026-07/scaled-1680-/2Biimage-png.png)

Valider en cliquant sur '<span style="color: rgb(132,63,161);">***Apply***</span>'.

Cela aura pour effet de déchiffrer et d'ajouter tout le trafic qui était auparavant encapsulé dans la couche de présentation.

[![image.png](https://docs.labs404.fr/uploads/images/gallery/2026-07/scaled-1680-/sBNimage-png.png)](https://docs.labs404.fr/uploads/images/gallery/2026-07/scaled-1680-/sBNimage-png.png)

<p class="callout success">**Astuce** : Cette méthode peut également servir sur d'autres protocoles comme ssh par exemple mais peut nécessiter des variantes.</p>

# Logiciel - tftpd64

# tftpd64 - Utilisation

<table id="bkmrk-difficult%C3%A9%2A-%3Cdescrip" style="border-collapse: collapse; width: 100%; height: 46.8px; border-width: 1px; border-style: hidden;"><colgroup><col style="width: 20%;"></col><col style="width: 80%;"></col></colgroup><tbody><tr style="height: 46.8px;"><td style="height: 46.8px; border: 1px groove rgb(52,73,94);">[![image.png](https://docs.labs404.fr/uploads/images/gallery/2026-07/scaled-1680-/9qVnovice-png.png)](https://docs.labs404.fr/uploads/images/gallery/2026-07/scaled-1680-/9qVnovice-png.png)</td><td style="height: 46.8px; border-width: 1px; background-color: rgb(236,202,250); vertical-align: top;">Difficulté : Novice

Notions : réseau, tftp, boot

</td></tr></tbody></table>

---

### <span style="color: rgb(52, 73, 94);">**<span style="text-decoration: underline;">I. Introduction</span>**</span>

<p class="callout info">Télécharger tftpd64 : [https://bitbucket.org/phjounin/tftpd64/downloads/](https://bitbucket.org/phjounin/tftpd64/downloads/)</p>

Cette procédure à pour but d'expliquer comment utiliser tftpd64 pour créer à la volée un serveur tftpd éphémère permettant par exemple de charger des firmwares à travers le réseau.

---

### <span style="color: rgb(52, 73, 94);">**<span style="text-decoration: underline;">II. Utilisation</span>**</span>

Lancer <span style="color: rgb(132,63,161);">***tftpd.exe***</span>

[![image.png](https://docs.labs404.fr/uploads/images/gallery/2026-07/scaled-1680-/gvmimage-png.png)](https://docs.labs404.fr/uploads/images/gallery/2026-07/scaled-1680-/gvmimage-png.png)

<p class="callout warning">Si pas de serveur DHCP disponible sur le réseau, il est possible de le lancer également avec le logiciel.</p>

<details id="bkmrk-utilisation-du-dhcp-"><summary>Utilisation du DHCP tftpd64 (si pas de DHCP)</summary>

Cliquer sur '<span style="color: rgb(132,63,161);">***settings***</span>' dans la fenêtre principale.

[![image.png](https://docs.labs404.fr/uploads/images/gallery/2026-07/scaled-1680-/AzHimage-png.png)](https://docs.labs404.fr/uploads/images/gallery/2026-07/scaled-1680-/AzHimage-png.png)

Dans l'onglet '<span style="color: rgb(132,63,161);">***GLOBAL***</span>', cocher la case <span style="color: rgb(132,63,161);">***DHCP***</span>.

[![image.png](https://docs.labs404.fr/uploads/images/gallery/2026-07/scaled-1680-/tU4image-png.png)](https://docs.labs404.fr/uploads/images/gallery/2026-07/scaled-1680-/tU4image-png.png)

Puis dans l'onglet DHCP, paramétrer les options du serveur.

[![image.png](https://docs.labs404.fr/uploads/images/gallery/2026-07/scaled-1680-/meGimage-png.png)](https://docs.labs404.fr/uploads/images/gallery/2026-07/scaled-1680-/meGimage-png.png)

valider avec <span style="color: rgb(132,63,161);">***OK***</span>.

[![image.png](https://docs.labs404.fr/uploads/images/gallery/2026-07/scaled-1680-/HqMimage-png.png)](https://docs.labs404.fr/uploads/images/gallery/2026-07/scaled-1680-/HqMimage-png.png)

Relancer tftpd64.

</details>Sélectionner l'interface réseau sur laquelle le service va écouter.

[![image.png](https://docs.labs404.fr/uploads/images/gallery/2026-07/scaled-1680-/bSBimage-png.png)](https://docs.labs404.fr/uploads/images/gallery/2026-07/scaled-1680-/bSBimage-png.png)

Choisir le répertoire source en cliquant sur :

[![image.png](https://docs.labs404.fr/uploads/images/gallery/2026-07/scaled-1680-/bsYimage-png.png)](https://docs.labs404.fr/uploads/images/gallery/2026-07/scaled-1680-/bsYimage-png.png)

# Locigiel - Cisco Packet Tracer

Contient toutes les procédures liées au logiciel cisco packet tracer.

# CicoPacketTracer - Installation (Ubuntu)

<table id="bkmrk-difficult%C3%A9%2A-%3Cdescrip" style="border-collapse: collapse; width: 100%; height: 46.8px; border-width: 1px; border-style: hidden;"><colgroup><col style="width: 20%;"></col><col style="width: 80%;"></col></colgroup><tbody><tr style="height: 46.8px;"><td style="height: 46.8px; border: 1px groove rgb(52,73,94);">[![image.png](https://docs.labs404.fr/uploads/images/gallery/2026-07/scaled-1680-/9qVnovice-png.png)](https://docs.labs404.fr/uploads/images/gallery/2026-07/scaled-1680-/9qVnovice-png.png)</td><td style="height: 46.8px; border-width: 1px; background-color: rgb(236,202,250); vertical-align: top;">Difficulté : Novice

Notions : installation de package, linux

</td></tr></tbody></table>

---

### <span style="color: rgb(52,73,94);">**<span style="text-decoration: underline;">I. Introduction</span>**</span>

Cette procédure vise à expliquer l'installation du logiciel Cisco Packet Tracer sur un système debian.

Elle s'applique aussi à ubuntu.

<p class="callout danger">**Prérequis** : Disposer d'un compte cisco netacad ou Cisco Skill For All. Pour le créer : <span style="color: rgb(53,152,219);">[Cisco Skill for All](https://www.netacad.com/learning-collections/cisco-packet-tracer?utm_source=packet-tracer&utm_medium=app&utm_campaign=packet-tracer-app-link&courseLang=en-US)</span></p>

---

### <span style="color: rgb(52,73,94);">**<span style="text-decoration: underline;">II. Installation</span>**</span>

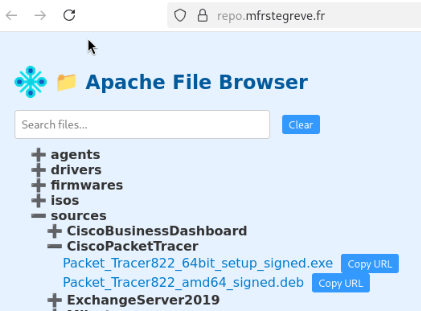
Télécharger le packet '<span style="color: rgb(132,63,161);">***.deb***</span>' qui corresponds à un paquet d'installation pour les systèmes Debian et associés.

[![image.png](https://docs.labs404.fr/uploads/images/gallery/2026-07/scaled-1680-/Pmmimage-png.png)](https://docs.labs404.fr/uploads/images/gallery/2026-07/scaled-1680-/Pmmimage-png.png)
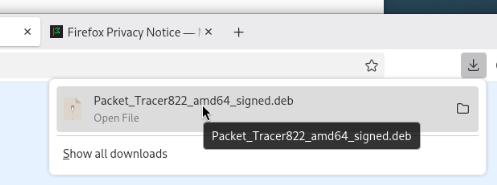
Double-cliquer sur le fichier téléchargé.

[![image.png](https://docs.labs404.fr/uploads/images/gallery/2026-07/scaled-1680-/4Tlimage-png.png)](https://docs.labs404.fr/uploads/images/gallery/2026-07/scaled-1680-/4Tlimage-png.png)
La fenêtre suivante s'ouvre :

[![image.png](https://docs.labs404.fr/uploads/images/gallery/2026-07/scaled-1680-/dYwimage-png.png)](https://docs.labs404.fr/uploads/images/gallery/2026-07/scaled-1680-/dYwimage-png.png)
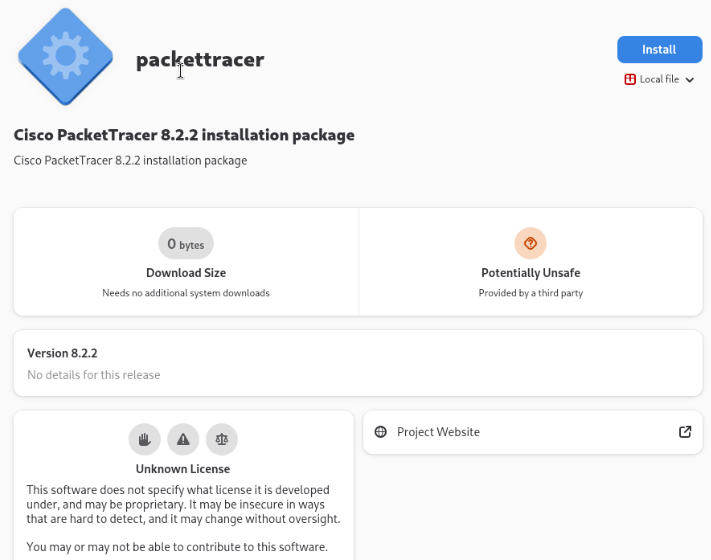
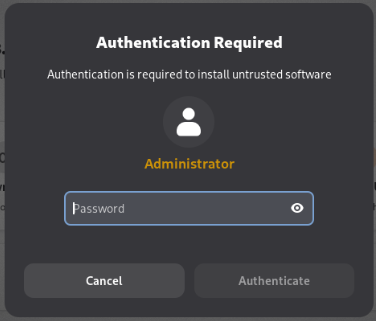
Cliquer sur "<span style="color: rgb(132,63,161);">***Install***</span>". Entrer le mot de passe sur compte root (su) et cliquer sur "<span style="color: rgb(132,63,161);">***authenticate***</span>".

[![image.png](https://docs.labs404.fr/uploads/images/gallery/2026-07/scaled-1680-/FGwimage-png.png)](https://docs.labs404.fr/uploads/images/gallery/2026-07/scaled-1680-/FGwimage-png.png)

<details id="bkmrk-en-cas-d%27%C3%A9chec-de-l%27"><summary>En cas d'échec de l'installation - Dépendances manquantes</summary>

Si lors de l'installation cela échoue et que le message suivant est dans les "<span style="color: rgb(132,63,161);">***error details***</span>" :

[![image.png](https://docs.labs404.fr/uploads/images/gallery/2026-07/scaled-1680-/yD1image-png.png)](https://docs.labs404.fr/uploads/images/gallery/2026-07/scaled-1680-/yD1image-png.png)

Il manque des dépendances.

Ouvrir un terminal (en su) et utiliser les commandes :

```bash
su
cd Downloads/
dpkg -i Packet_Tracer<version>_amd64_signed.deb

```

Vous aurez l'erreur suivante :

[![image.png](https://docs.labs404.fr/uploads/images/gallery/2026-07/scaled-1680-/sLLimage-png.png)](https://docs.labs404.fr/uploads/images/gallery/2026-07/scaled-1680-/sLLimage-png.png)

 Ajouter la variable suivante :

```bash
export PATH=/usr/local/sbin:/usr/local/bin:/usr/sbin:/usr/bin:/sbin:/bin
```

Relancer l'installation.

Faire OK

[![image.png](https://docs.labs404.fr/uploads/images/gallery/2026-07/scaled-1680-/ycLimage-png.png)](https://docs.labs404.fr/uploads/images/gallery/2026-07/scaled-1680-/ycLimage-png.png)

Accepter les termes de la licence :

[![image.png](https://docs.labs404.fr/uploads/images/gallery/2026-07/scaled-1680-/lEeimage-png.png)](https://docs.labs404.fr/uploads/images/gallery/2026-07/scaled-1680-/lEeimage-png.png)

L'erreur de dépendances manquantes se présente à nouveau :

[![image.png](https://docs.labs404.fr/uploads/images/gallery/2026-07/scaled-1680-/cucimage-png.png)](https://docs.labs404.fr/uploads/images/gallery/2026-07/scaled-1680-/cucimage-png.png)

Utiliser la commande suivante pour installer les dépendances et forcer une réinstallation :

```bash
apt install -f
```

[![image.png](https://docs.labs404.fr/uploads/images/gallery/2026-07/scaled-1680-/H9mimage-png.png)](https://docs.labs404.fr/uploads/images/gallery/2026-07/scaled-1680-/H9mimage-png.png)

</details>#####   


L'installation se déroule en arrière plan. Attendre la fin.

[![image.png](https://docs.labs404.fr/uploads/images/gallery/2026-07/scaled-1680-/fY7image-png.png)](https://docs.labs404.fr/uploads/images/gallery/2026-07/scaled-1680-/fY7image-png.png)

A la fin de l'installation, il est possible de lancer packet tracer avec la commande '<span style="color: rgb(132,63,161);">***packettracer***</span>'

Lors du premier lancement, le EULA se lance, faire '<span style="color: rgb(132,63,161);">***q***</span>'

[![image.png](https://docs.labs404.fr/uploads/images/gallery/2026-07/scaled-1680-/34kimage-png.png)](https://docs.labs404.fr/uploads/images/gallery/2026-07/scaled-1680-/34kimage-png.png)

Puis faire '<span style="color: rgb(132,63,161);">***2***</span>' pour accepter le contrat de licence.

[![image.png](https://docs.labs404.fr/uploads/images/gallery/2026-07/scaled-1680-/oiBimage-png.png)](https://docs.labs404.fr/uploads/images/gallery/2026-07/scaled-1680-/oiBimage-png.png)

Le programme demande si il doit être exécuté en mode multi-user, valider en cliquant sur '<span style="color: rgb(132,63,161);">***Yes***</span>'.

[![image.png](https://docs.labs404.fr/uploads/images/gallery/2026-07/scaled-1680-/K5Timage-png.png)](https://docs.labs404.fr/uploads/images/gallery/2026-07/scaled-1680-/K5Timage-png.png)

Pour utiliser le programme, il faudra préalablement se loguer avec un compte Netacad ou CiscoSkillForAll.

[![image.png](https://docs.labs404.fr/uploads/images/gallery/2026-07/scaled-1680-/KSximage-png.png)](https://docs.labs404.fr/uploads/images/gallery/2026-07/scaled-1680-/KSximage-png.png)

# Logiciel - OpenVPN Connect

# OpenVPN Connect - Importer un profil

<table id="bkmrk-difficult%C3%A9%2A-%3Cdescrip" style="border-collapse: collapse; width: 100%; height: 46.8px; border-width: 1px; border-style: hidden;"><colgroup><col style="width: 20%;"></col><col style="width: 80%;"></col></colgroup><tbody><tr style="height: 46.8px;"><td style="height: 46.8px; border: 1px groove rgb(52,73,94);">[![image.png](https://docs.labs404.fr/uploads/images/gallery/2026-07/scaled-1680-/debutant-png.png)](https://docs.labs404.fr/uploads/images/gallery/2026-07/scaled-1680-/debutant-png.png)  
</td><td style="height: 46.8px; border-width: 1px; background-color: rgb(236,202,250); vertical-align: top;">Difficulté : Débutant

Notions : Client VPN

</td></tr></tbody></table>

---

### <span style="color: rgb(52,73,94);">**<span style="text-decoration: underline;">I. Introduction</span>**</span>

Cette procédure vise à décrire le processus d'import des fichiers de profil openVPN.

---

### <span style="color: rgb(52,73,94);">**<span style="text-decoration: underline;">II. Import de profil.</span>**</span>

Ouvrir OpenVPN Connect.

[![image.png](https://docs.labs404.fr/uploads/images/gallery/2026-08/scaled-1680-/w4iimage.png)](https://docs.labs404.fr/uploads/images/gallery/2026-08/w4iimage.png)

Cliquer sur :

[![image.png](https://docs.labs404.fr/uploads/images/gallery/2026-08/scaled-1680-/0EAimage.png)](https://docs.labs404.fr/uploads/images/gallery/2026-08/0EAimage.png)

Puis sur '<span style="color: rgb(132, 63, 161);">***My Profile***</span>'.

[![image.png](https://docs.labs404.fr/uploads/images/gallery/2026-08/scaled-1680-/wPGimage.png)](https://docs.labs404.fr/uploads/images/gallery/2026-08/wPGimage.png)

En bas à droite de la page, cliquer sur :

[![image.png](https://docs.labs404.fr/uploads/images/gallery/2026-08/scaled-1680-/gtvimage.png)](https://docs.labs404.fr/uploads/images/gallery/2026-08/gtvimage.png)

Puis utiliser en bas :

[![image.png](https://docs.labs404.fr/uploads/images/gallery/2026-08/scaled-1680-/Wn6image.png)](https://docs.labs404.fr/uploads/images/gallery/2026-08/Wn6image.png)

Sélectionner le fichier à importer.

[![image.png](https://docs.labs404.fr/uploads/images/gallery/2026-08/scaled-1680-/9SLimage.png)](https://docs.labs404.fr/uploads/images/gallery/2026-08/9SLimage.png)

Après import, le profil est disponible :

[![image.png](https://docs.labs404.fr/uploads/images/gallery/2026-08/scaled-1680-/iwkimage.png)](https://docs.labs404.fr/uploads/images/gallery/2026-08/iwkimage.png)

Et il est possible de se connecter.

[![image.png](https://docs.labs404.fr/uploads/images/gallery/2026-08/scaled-1680-/d3Yimage.png)](https://docs.labs404.fr/uploads/images/gallery/2026-08/d3Yimage.png)