# Réseau - Cisco

Contient les procédures liées aux équipements cisco.

# Cisco - Initialisation (mode console)

<table id="bkmrk-difficult%C3%A9%2A-%3Cdescrip" style="border-collapse: collapse; width: 100%; height: 46.8px; border-width: 1px; border-style: hidden;"><colgroup><col style="width: 20%;"></col><col style="width: 80%;"></col></colgroup><tbody><tr style="height: 46.8px;"><td style="height: 46.8px; border: 1px groove rgb(52,73,94);">[![image.png](https://docs.labs404.fr/uploads/images/gallery/2026-07/scaled-1680-/4fDintermediaire-png.png)](https://docs.labs404.fr/uploads/images/gallery/2026-07/scaled-1680-/4fDintermediaire-png.png)  
</td><td style="height: 46.8px; border-width: 1px; background-color: rgb(236,202,250); vertical-align: top;">Difficulté : Intermédiaire.

Notions : connexion port console, CLI, cisco.

</td></tr></tbody></table>

---


### <span style="color: rgb(52, 73, 94);">**<span style="text-decoration: underline;">I. Introduction</span>**</span>

Le paramétrage initial peux se faire en mode web.

<p class="callout info">voir : [Cisco - Initialisation (mode web)](https://docs.labs404.fr/books/reseau-Vdy/page/cisco-initialisation-mode-web "Cisco - Initialisation (mode web)")</p>

Mais parfois, il peut être préférable de le faire en CLI pour poursuivre directement avec la suite de la configuration et gagner du temps.

<p class="callout info">voir : [Cisco - Se connecter au port console](https://docs.labs404.fr/books/reseau-Vdy/page/cisco-se-connecter-au-port-console "Cisco - Se connecter au port console")</p>

---

### <span style="color: rgb(52, 73, 94);">**<span style="text-decoration: underline;">II. Initialisation</span>**</span>

<p class="callout success">**Astuce** : les commandes sur cisco peuvent être abrégées. Par exemple la commande '*configure*' peut être écrite '*conf*'. Ou encore '*switchport trunk allowed vlan 10*' peut se noter '*sw tr all vlan 10*'.</p>

<p class="callout success">Sur le même mode, le nom des interfaces peux être abbrégé : '*GigabitEthernet 1*' deviens par exemple '*ge 1*'.</p>

<p class="callout warning">**Attention** : Il est à noter que tous les changement sont appliqués sur la configuration courrante. Pour les appliquer définitivement, il faut les sauvegarder avec la commande suivante. Sans cela, toutes les modifications seront perdues au redémarrage.</p>

```
copy running-config startup-config
```

####   


#### **<span style="color: rgb(35, 111, 161);">2.1 Entrer en mode configuration</span>** 

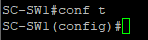
Pour passer en mode de configuration, entrer la commande :

```
configure terminal
```

ou

```
conf t
```

[![image.png](https://docs.labs404.fr/uploads/images/gallery/2026-07/scaled-1680-/zrUimage-png.png)](https://docs.labs404.fr/uploads/images/gallery/2026-07/scaled-1680-/zrUimage-png.png)
##### <span style="color: rgb(53, 152, 219);">*2.1.1 changer le nom du switch*</span>

Utiliser la commande suivante :

```
hostname <nomDuSwitch>
```

##### *<span style="color: rgb(53, 152, 219);">2.1.2 Activer le mot de passe pour l'authentification web et console</span>* 

Utiliser la commande suivante :

```
enable password <MotDePasse>
```

##### *<span style="color: rgb(53, 152, 219);">2.1.3 Définir le domaine</span>* 

Utiliser la commande suivante :

```
no ip domain lookup
ip domain name <Domain.Ext>
```

---

### **<span style="text-decoration: underline;"><span style="color: rgb(52, 73, 94); text-decoration: underline;">III. Paramétrage supplémentaire</span>  
</span>**

####   


#### **<span style="color: rgb(35, 111, 161);">3.1 Paramétrer le NTP</span>** 

Pour définir les paramètres NTP, utiliser les commandes suivantes :

```
clock timezone J +1
clock summer-time web recurring eu
no clock source sntp
sntp server <serveurDeTemps> poll
```

# Cisco - Initialisation (mode web)

<table id="bkmrk-difficult%C3%A9%2A-%3Cdescrip" style="border-collapse: collapse; width: 100%; height: 46.8px; border-width: 1px; border-style: hidden;"><colgroup><col style="width: 20%;"></col><col style="width: 80%;"></col></colgroup><tbody><tr style="height: 46.8px;"><td style="height: 46.8px; border: 1px groove rgb(52,73,94);">[![image.png](https://docs.labs404.fr/uploads/images/gallery/2026-07/scaled-1680-/Yyrnovice-png.png)](https://docs.labs404.fr/uploads/images/gallery/2026-07/scaled-1680-/Yyrnovice-png.png)  
</td><td style="height: 46.8px; border-width: 1px; background-color: rgb(236,202,250); vertical-align: top;">Difficulté : Novice.

Notions : cisco, switch, web.

</td></tr></tbody></table>

---

### <span style="color: rgb(52, 73, 94);">**<span style="text-decoration: underline;">I. Introduction</span>**</span>

Cette procédure à pour but de voir l'initialisation du switch cisco Small business en mode web à travers l'assistant d'initialisation.

<p class="callout danger">**Prérequis** : disposer d'un outil permettant de scanner les plages IP ou détecter le cisco.</p>

Il est aussi possible de récupérer l'adresse en mode console avec la commande :

```
show ip interface
```

---

### **<span style="text-decoration: underline;"><span style="color: rgb(52, 73, 94); text-decoration: underline;">II. Initialisation</span>  
</span>**

#### **<span style="color: rgb(35, 111, 161);">2.1 Se connecter en web</span>** 

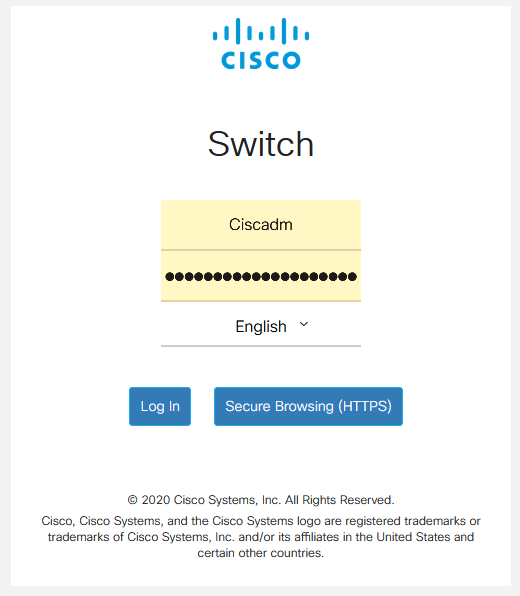
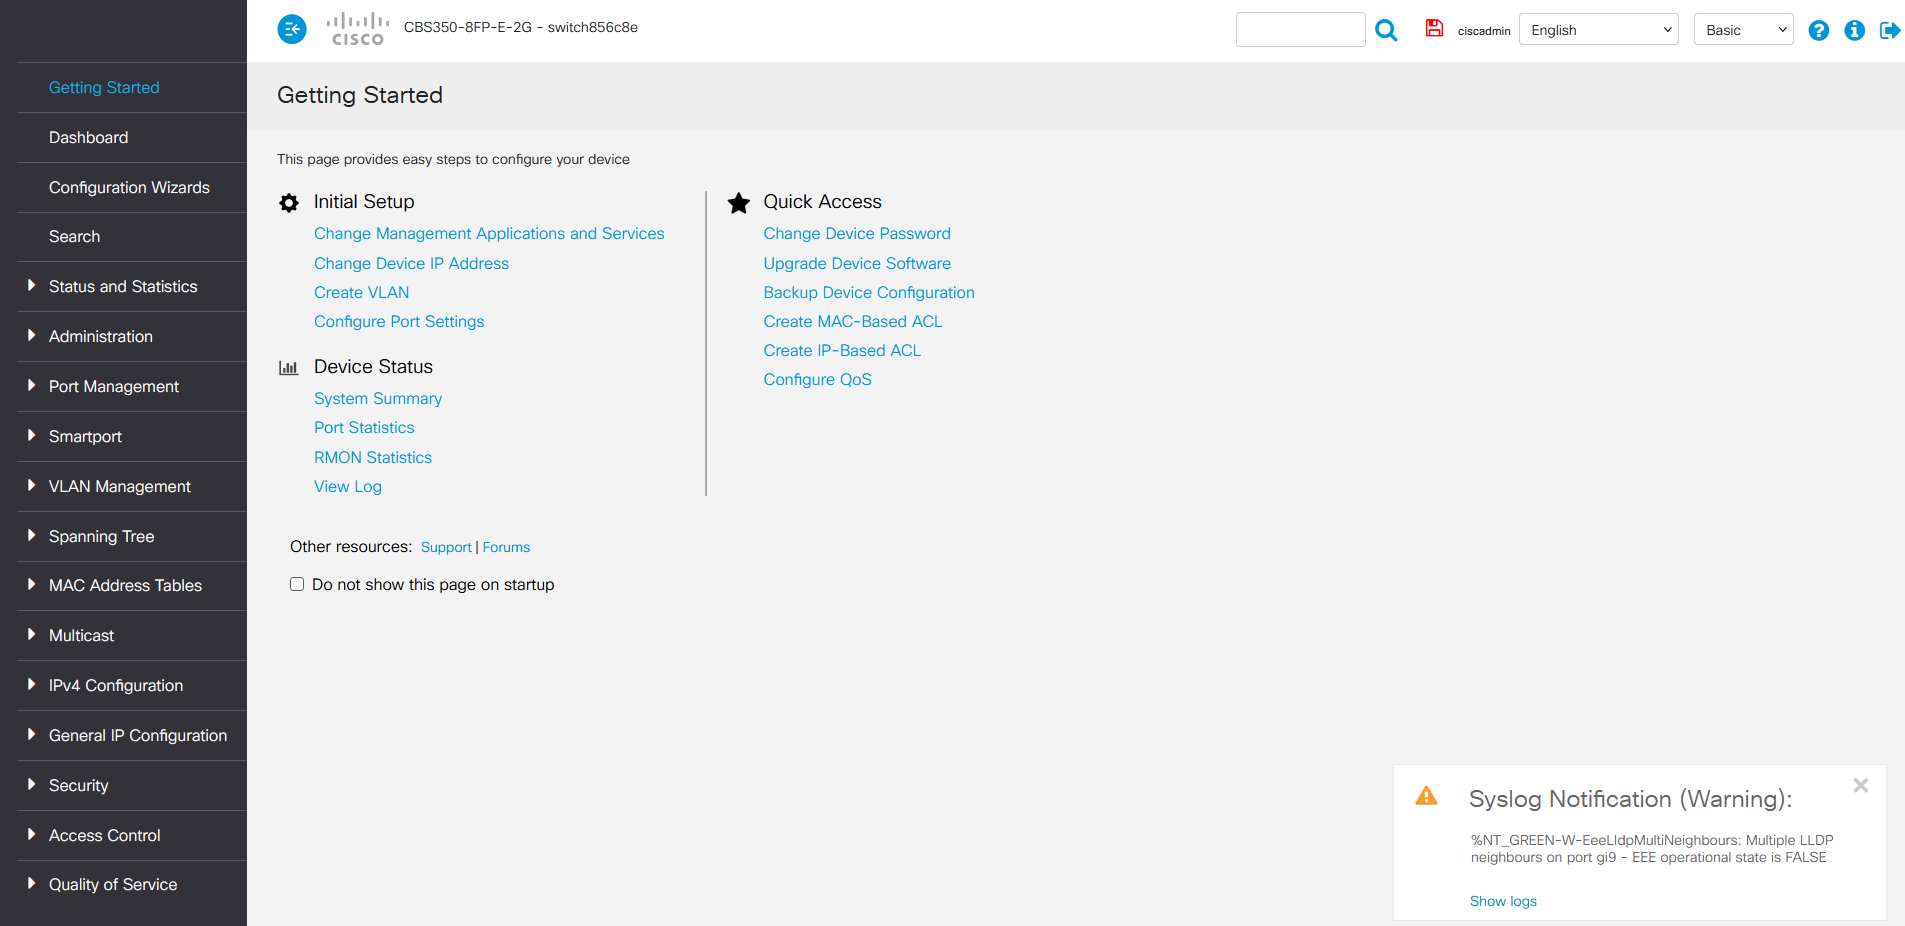
Se connecter sur le cisco via le navigateur web.

<p class="callout info">Par défaut, le username est '<span style="text-decoration: underline; color: rgb(132,63,161);">**cisco**</span>' et le mot de passe '<span style="text-decoration: underline; color: rgb(132,63,161);">**cisco**</span>'</p>

[![image.png](https://docs.labs404.fr/uploads/images/gallery/2026-07/scaled-1680-/yS0image-png.png)](https://docs.labs404.fr/uploads/images/gallery/2026-07/scaled-1680-/yS0image-png.png)

[![image.png](https://docs.labs404.fr/uploads/images/gallery/2026-07/scaled-1680-/3Nbimage-png.png)](https://docs.labs404.fr/uploads/images/gallery/2026-07/scaled-1680-/3Nbimage-png.png)
#### **<span style="color: rgb(35, 111, 161);">2.2 Lancer l'assistant</span>** 

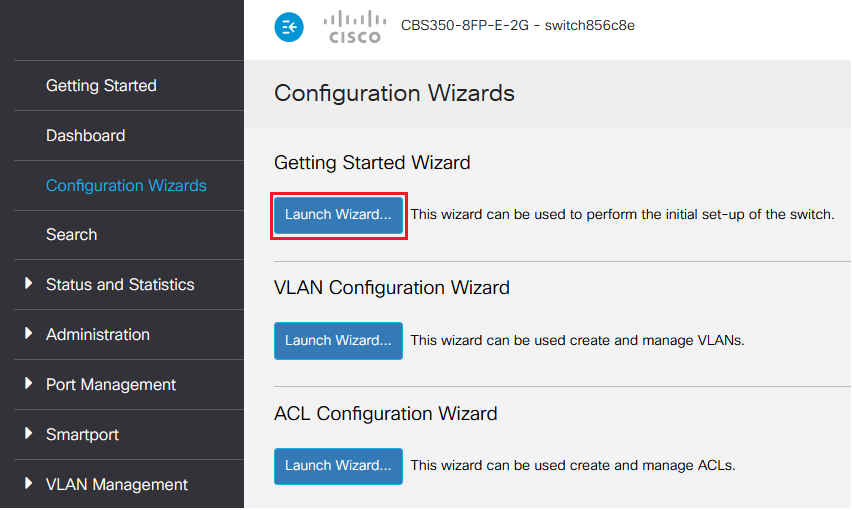
Aller dans le menu "<span style="color: rgb(132,63,161);">***Configuration wizards***</span>" et exécuter : <span style="color: rgb(132,63,161);">***Getting Started Wizard***</span>

[![image.png](https://docs.labs404.fr/uploads/images/gallery/2026-07/scaled-1680-/6Atimage-png.png)](https://docs.labs404.fr/uploads/images/gallery/2026-07/scaled-1680-/6Atimage-png.png)

Faire : [![image.png](https://docs.labs404.fr/uploads/images/gallery/2026-07/scaled-1680-/Ettimage-png.png)](https://docs.labs404.fr/uploads/images/gallery/2026-07/scaled-1680-/Ettimage-png.png)

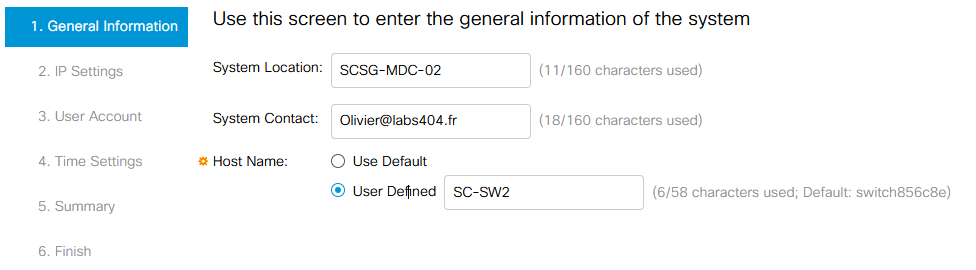
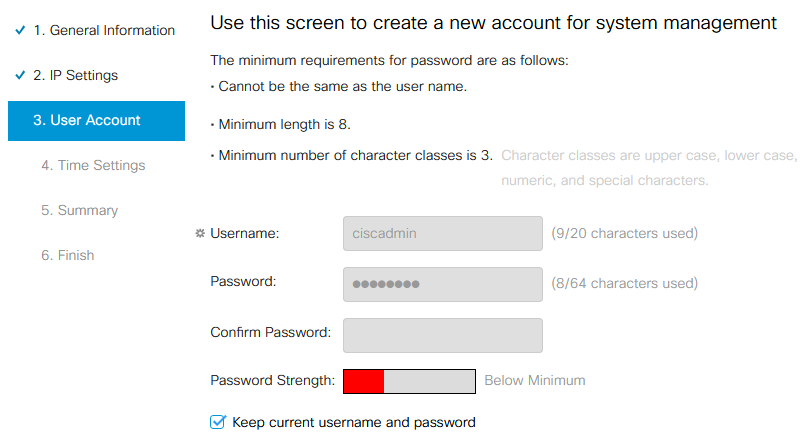
Remplir les champs demandés et faire '<span style="text-decoration: underline; color: rgb(132,63,161);">**Next**</span>'.

[![image.png](https://docs.labs404.fr/uploads/images/gallery/2026-07/scaled-1680-/6gIimage-png.png)](https://docs.labs404.fr/uploads/images/gallery/2026-07/scaled-1680-/6gIimage-png.png)

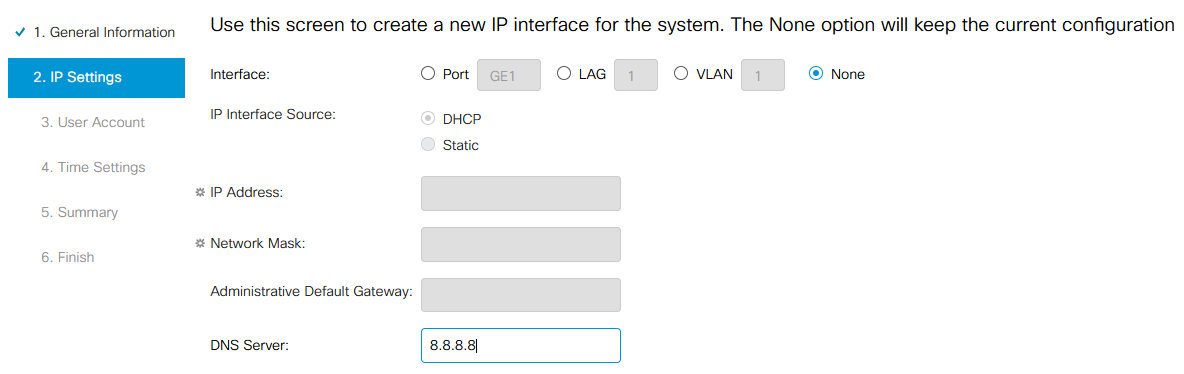
Remplir les champs demandés et faire '<span style="text-decoration: underline; color: rgb(132,63,161);">**Next**</span>'.

[![image.png](https://docs.labs404.fr/uploads/images/gallery/2026-07/scaled-1680-/n34image-png.png)](https://docs.labs404.fr/uploads/images/gallery/2026-07/scaled-1680-/n34image-png.png)

Laisser les choix par défaut et faire '<span style="color: rgb(132,63,161);">**Next**</span>'.

[![image.png](https://docs.labs404.fr/uploads/images/gallery/2026-07/scaled-1680-/Tuqimage-png.png)](https://docs.labs404.fr/uploads/images/gallery/2026-07/scaled-1680-/Tuqimage-png.png)

Cliquer sur : [![image.png](https://docs.labs404.fr/uploads/images/gallery/2026-07/scaled-1680-/p77image-png.png)](https://docs.labs404.fr/uploads/images/gallery/2026-07/scaled-1680-/p77image-png.png)

---

### **<span style="text-decoration: underline;"><span style="color: rgb(52, 73, 94); text-decoration: underline;">III. Paramétrage de base</span>  
</span>**

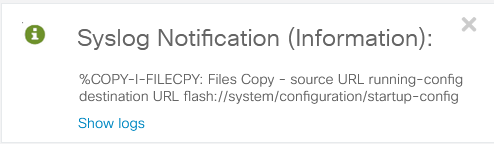
<p class="callout warning">**Attention** : Il est à noter que tous les changement sont appliqués sur la configuration courrante. Pour les appliquer définitivement, il faut les sauvegarder avec l'icône en haut à gauche. Sans cela, toutes les modifications seront perdues au redémarrage.</p>

[![image.png](https://docs.labs404.fr/uploads/images/gallery/2026-07/scaled-1680-/Pphimage-png.png)](https://docs.labs404.fr/uploads/images/gallery/2026-07/scaled-1680-/Pphimage-png.png)

[![image.png](https://docs.labs404.fr/uploads/images/gallery/2026-07/scaled-1680-/t2ximage-png.png)](https://docs.labs404.fr/uploads/images/gallery/2026-07/scaled-1680-/t2ximage-png.png)
####   


#### **<span style="color: rgb(35, 111, 161);">3.1 Régler le temps</span>** 

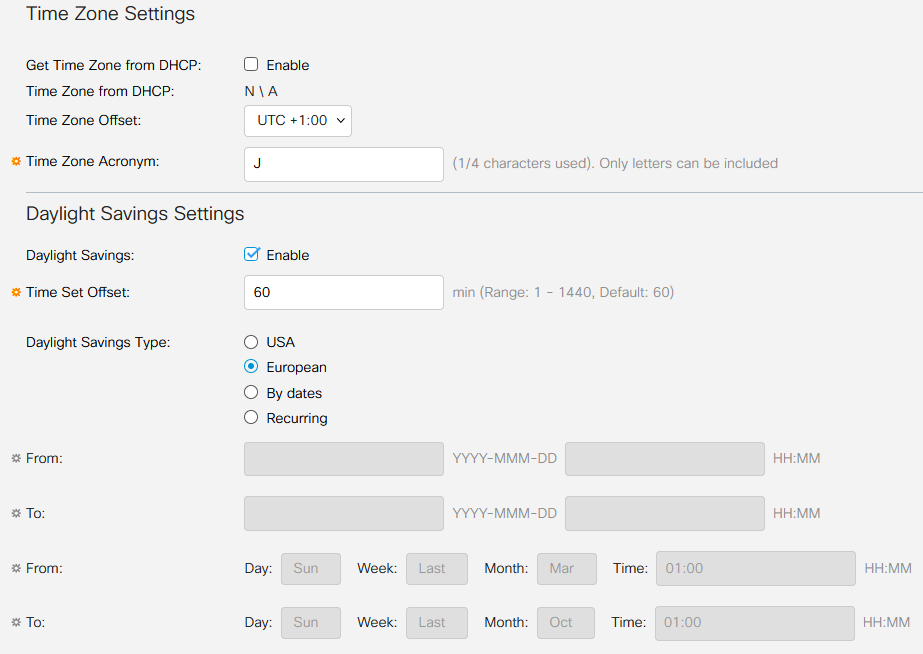
Dans le menu "<span style="text-decoration: underline; color: rgb(132,63,161);">**Administration --&gt; Time Settings --&gt; System Time**</span>",  
passer le '<span style="text-decoration: underline; color: rgb(132,63,161);">**Time Zone Offset**</span>' a '<span style="text-decoration: underline; color: rgb(132,63,161);">**UTC+1**</span>', cocher la case '<span style="text-decoration: underline; color: rgb(132,63,161);">**Daylight Savings**</span>' puis choisir le '<span style="text-decoration: underline; color: rgb(132,63,161);">**Daylight Saving Type**</span>' '<span style="text-decoration: underline; color: rgb(132,63,161);">**European**</span>'

[![image.png](https://docs.labs404.fr/uploads/images/gallery/2026-07/scaled-1680-/QoIimage-png.png)](https://docs.labs404.fr/uploads/images/gallery/2026-07/scaled-1680-/QoIimage-png.png)

cliquer sur : [![image.png](https://docs.labs404.fr/uploads/images/gallery/2026-07/scaled-1680-/ocdimage-png.png)](https://docs.labs404.fr/uploads/images/gallery/2026-07/scaled-1680-/ocdimage-png.png)

# Cisco - Mise à jour de firmware

<table id="bkmrk-difficult%C3%A9%2A-%3Cdescrip" style="border-collapse: collapse; width: 100%; height: 46.8px; border-width: 1px; border-style: hidden;"><colgroup><col style="width: 20%;"></col><col style="width: 80%;"></col></colgroup><tbody><tr style="height: 46.8px;"><td style="height: 46.8px; border: 1px groove rgb(52,73,94);">[![image.png](https://docs.labs404.fr/uploads/images/gallery/2026-07/scaled-1680-/4fDintermediaire-png.png)](https://docs.labs404.fr/uploads/images/gallery/2026-07/scaled-1680-/4fDintermediaire-png.png)</td><td style="height: 46.8px; border-width: 1px; background-color: rgb(236,202,250); vertical-align: top;">Difficulté : Intermédiaire

Notions : Firmware, switch, cisco

</td></tr></tbody></table>

---

### <span style="color: rgb(52, 73, 94);">**<span style="text-decoration: underline;">I. Introduction</span>**</span>

Cette procédure vise à expliquer le déroulement d'une mise à jour de firmware cisco small business en mode console et en mode web.

---

### <span style="color: rgb(52, 73, 94);">**<span style="text-decoration: underline;">II. Préparation</span>**</span>

<p class="callout info">Le firmware peut être téléchargé ici : [https://www.cisco.com/c/en/us/support/index.html](https://www.cisco.com/c/en/us/support/index.html)</p>

<p class="callout success">Pour se connecter en mode console, voir : [Cisco - Se connecter au port console](https://docs.labs404.fr/books/reseau-Vdy/page/cisco-se-connecter-au-port-console "Cisco - Se connecter au port console")</p>

---

### <span style="text-decoration: underline; color: rgb(52, 73, 94);">**III. Mettre à jour le firmware**</span>

<details id="bkmrk-en-mode-console-%C2%A0"><summary>En mode console / ssh</summary>

<p class="callout danger">Prérequis : un serveur TFTP accessible par le switch. voir : [Logiciel - tftpd64](https://docs.labs404.fr/books/11-logiciels/page/tftpd64-utilisation "Logiciel - tftpd64")  
</p>

Se connecter à la console.

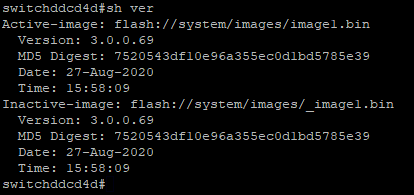
Vérifier la version existante avec la commande :

```
sh ver
```

[![image.png](https://docs.labs404.fr/uploads/images/gallery/2026-07/scaled-1680-/nJTimage-png.png)](https://docs.labs404.fr/uploads/images/gallery/2026-07/scaled-1680-/nJTimage-png.png)
Télécharger l'image présente sur le serveur TFTP.

```
boot system tftp://<ip>/<rep>/<imageName>.bin
```

[![image.png](https://docs.labs404.fr/uploads/images/gallery/2026-07/scaled-1680-/pUOimage-png.png)](https://docs.labs404.fr/uploads/images/gallery/2026-07/scaled-1680-/pUOimage-png.png)

Attendre la fin du téléchargement.

[![image.png](https://docs.labs404.fr/uploads/images/gallery/2026-07/scaled-1680-/D8wimage-png.png)](https://docs.labs404.fr/uploads/images/gallery/2026-07/scaled-1680-/D8wimage-png.png)

[![image.png](https://docs.labs404.fr/uploads/images/gallery/2026-07/scaled-1680-/E0Ximage-png.png)](https://docs.labs404.fr/uploads/images/gallery/2026-07/scaled-1680-/E0Ximage-png.png)

redémarrer le switch avec :

```
reload
```

[![image.png](https://docs.labs404.fr/uploads/images/gallery/2026-07/scaled-1680-/ZjLimage-png.png)](https://docs.labs404.fr/uploads/images/gallery/2026-07/scaled-1680-/ZjLimage-png.png)

[![image.png](https://docs.labs404.fr/uploads/images/gallery/2026-07/scaled-1680-/Y5bimage-png.png)](https://docs.labs404.fr/uploads/images/gallery/2026-07/scaled-1680-/Y5bimage-png.png)

[![image.png](https://docs.labs404.fr/uploads/images/gallery/2026-07/scaled-1680-/PITimage-png.png)](https://docs.labs404.fr/uploads/images/gallery/2026-07/scaled-1680-/PITimage-png.png)

revérifier la version de l'image active après le redémarrage.

```
sh ver
```

[![image.png](https://docs.labs404.fr/uploads/images/gallery/2026-07/scaled-1680-/aZWimage-png.png)](https://docs.labs404.fr/uploads/images/gallery/2026-07/scaled-1680-/aZWimage-png.png)

</details><details id="bkmrk-en-mode-web-%C2%A0"><summary>En mode web</summary>

Aller dans '<span style="color: rgb(132,63,161);">***Administration --&gt; File management --&gt; Firmware Operations***</span>'

[![image.png](https://docs.labs404.fr/uploads/images/gallery/2026-07/scaled-1680-/KMBimage-png.png)](https://docs.labs404.fr/uploads/images/gallery/2026-07/scaled-1680-/KMBimage-png.png)

La version actuelle du firmware est affichée sur la page.

[![image.png](https://docs.labs404.fr/uploads/images/gallery/2026-07/scaled-1680-/Deuimage-png.png)](https://docs.labs404.fr/uploads/images/gallery/2026-07/scaled-1680-/Deuimage-png.png)

Pour mettre à jour, le plus rapide est de Parcourir le pc et sélectionner le firmware.

[![image.png](https://docs.labs404.fr/uploads/images/gallery/2026-07/scaled-1680-/dTBimage-png.png)](https://docs.labs404.fr/uploads/images/gallery/2026-07/scaled-1680-/dTBimage-png.png)

Puis faire :

[![image.png](https://docs.labs404.fr/uploads/images/gallery/2026-07/scaled-1680-/gWNimage-png.png)](https://docs.labs404.fr/uploads/images/gallery/2026-07/scaled-1680-/gWNimage-png.png)

Attendre la fin du transfert

[![image.png](https://docs.labs404.fr/uploads/images/gallery/2026-07/scaled-1680-/HLeimage-png.png)](https://docs.labs404.fr/uploads/images/gallery/2026-07/scaled-1680-/HLeimage-png.png)

Après un moment d'attente :

[![image.png](https://docs.labs404.fr/uploads/images/gallery/2026-07/scaled-1680-/sB9image-png.png)](https://docs.labs404.fr/uploads/images/gallery/2026-07/scaled-1680-/sB9image-png.png)

Ensuite, cocher '<span style="color: rgb(132,63,161);">***Swap Image***</span>', sélectionner la version de l'image.

[![image.png](https://docs.labs404.fr/uploads/images/gallery/2026-07/scaled-1680-/Xcqimage-png.png)](https://docs.labs404.fr/uploads/images/gallery/2026-07/scaled-1680-/Xcqimage-png.png)

Cliquer sur :

[![image.png](https://docs.labs404.fr/uploads/images/gallery/2026-07/scaled-1680-/gWNimage-png.png)](https://docs.labs404.fr/uploads/images/gallery/2026-07/scaled-1680-/gWNimage-png.png)

Puis sur '<span style="color: rgb(132,63,161);">***reboot***</span>'.

Choisir '<span style="color: rgb(132,63,161);">***immediate***</span>' puis '<span style="color: rgb(132,63,161);">***reboot***</span>'.

[![image.png](https://docs.labs404.fr/uploads/images/gallery/2026-07/scaled-1680-/QCDimage-png.png)](https://docs.labs404.fr/uploads/images/gallery/2026-07/scaled-1680-/QCDimage-png.png)

[![image.png](https://docs.labs404.fr/uploads/images/gallery/2026-07/scaled-1680-/PnCimage-png.png)](https://docs.labs404.fr/uploads/images/gallery/2026-07/scaled-1680-/PnCimage-png.png)

[![image.png](https://docs.labs404.fr/uploads/images/gallery/2026-07/scaled-1680-/fWeimage-png.png)](https://docs.labs404.fr/uploads/images/gallery/2026-07/scaled-1680-/fWeimage-png.png)

</details>

# Cisco - Port mirroring

<table id="bkmrk-difficult%C3%A9%2A-%3Cdescrip" style="border-collapse: collapse; width: 100%; height: 46.8px; border-width: 1px; border-style: hidden;"><colgroup><col style="width: 20%;"></col><col style="width: 80%;"></col></colgroup><tbody><tr style="height: 46.8px;"><td style="height: 46.8px; border: 1px groove rgb(52,73,94);">[![intermédiaire.png](https://docs.labs404.fr/uploads/images/gallery/2026-07/scaled-1680-/4fDintermediaire-png.png)](https://docs.labs404.fr/uploads/images/gallery/2026-07/scaled-1680-/4fDintermediaire-png.png)</td><td style="height: 46.8px; border-width: 1px; background-color: rgb(236,202,250); vertical-align: top;">Difficulté : Intermédiaire

Notions : connexion ssh, console, CLI, Putty, wireshark.

</td></tr></tbody></table>

---

### <span style="color: rgb(52, 73, 94);">**<span style="text-decoration: underline;">I. Introduction</span>**</span>

**<span style="color: rgb(23,43,77); font-family: '-apple-system', BlinkMacSystemFont, 'Segoe UI', Roboto, Oxygen, Ubuntu, 'Fira Sans', 'Droid Sans', 'Helvetica Neue', sans-serif; font-size: 16px; font-style: normal; font-weight: 400; letter-spacing: -0.08px; text-indent: 0px; text-transform: none; white-space: pre-wrap; word-spacing: 0px; text-decoration-thickness: initial; text-decoration-style: initial; text-decoration-color: initial; display: inline; float: none;">Cette procédure à pour but d’expliquer comment mettre en place un mirroring de port. Cela peut être utile à des fins de diagnostic.</span>**

<p class="callout info">**<span style="color: rgb(23,43,77); font-family: '-apple-system', BlinkMacSystemFont, 'Segoe UI', Roboto, Oxygen, Ubuntu, 'Fira Sans', 'Droid Sans', 'Helvetica Neue', sans-serif; font-size: 16px; font-style: normal; font-weight: 400; letter-spacing: -0.08px; text-indent: 0px; text-transform: none; white-space: pre-wrap; word-spacing: 0px; text-decoration-thickness: initial; text-decoration-style: initial; text-decoration-color: initial; display: inline; float: none;">Télécharger putty : [Download PuTTY - Latest](https://www.chiark.greenend.org.uk/~sgtatham/putty/latest.html "Download PuTTY - Latest")</span>**</p>

<p class="callout info">**<span style="color: rgb(23,43,77); font-family: '-apple-system', BlinkMacSystemFont, 'Segoe UI', Roboto, Oxygen, Ubuntu, 'Fira Sans', 'Droid Sans', 'Helvetica Neue', sans-serif; font-size: 16px; font-style: normal; font-weight: 400; letter-spacing: -0.08px; text-indent: 0px; text-transform: none; white-space: pre-wrap; word-spacing: 0px; text-decoration-thickness: initial; text-decoration-style: initial; text-decoration-color: initial; display: inline; float: none;">Télécharger wireshark : [Download Wireshark](https://www.wireshark.org/download.html)</span>**</p>

---

### **<span style="text-decoration: underline;"><span style="color: rgb(52, 73, 94); text-decoration: underline;">II. Paramétrage en CLI</span>  
</span>**

####   


#### **<span style="color: rgb(35, 111, 161);">2.1 Création du port mirrorring</span>** 

<p class="callout danger">**Prérequis** : un pc avec putty et un câble console.</p>

<p class="callout info">**Plus d'informations** : [Cisco - Se connecter au port console](https://docs.labs404.fr/books/reseau-Vdy/page/cisco-se-connecter-au-port-console "Cisco - Se connecter au port console")</p>

<p class="callout warning">**Attention** : utiliser un port libre pour la destination du mirrorring car celui-ci va perdre sa configuration.</p>

Se connecter au switch en SSH ou en console.

Entrer les commandes suivantes :

```
Configure terminal
Monitor session <id> source <interface|vlan> <GE|lagg> <number> <tx|rx|both>
monitor session <id> destination interface GE <number>
```

*Exemple1 : mirrorer le trafic entrant et sortant du port 21 (source) sur le port 23 (destination) dans la session 1.*

- monitor session 1 source interface GE 21 both
- monitor session 1 destination interface GE 23

*Exemple2 : mirrorer le traffic entrant sur le vlan 10 (source) sur le port 23 (destination) dans la session 1.*

- monitor session 1 source vlan 10 rx
- monitor session 1 destination interface GE 23

#### <span style="color: rgb(35, 111, 161);">**2.2 Utilisation du port mirrorring**</span>

Connecter un PC équipé de Wireshark sur le port de destination (dans l’exemple, le 23).

Lancer Wireshark et effectuer l’analyse.

<p class="callout info">**Plus d'informations** : [Wireshark - Installation et utilisation](https://docs.labs404.fr/books/11-logiciels/page/wireshark-installation-et-utilisation "Wireshark - Installation et utilisation")</p>

Pour voir les sessions actives :

```
show monitor session
```

#### <span style="color: rgb(35, 111, 161);">**2.3 Terminer le port mirrorring**</span>

Pour mettre fin à la session de port mirrorring, utiliser les commandes suivantes :

```
configure terminal
no monitor session <id> source <interface|vlan> <GE|lagg> <number> <tx|rx|both>
no monitor session <id> destination interface GE <number>
```

*Exemple1 : cesser de mirrorer le trafic entrant et sortant du port 21 (source) sur le port 23 (destination) dans la session 1.*

- no monitor session 1 source interface GE 21 both
- no monitor session 1 destination interface GE 23

*Exemple2 : cesser de mirrorer le traffic entrant sur le vlan 10 (source) sur le port 23 (destination) dans la session 1.*

- no monitor session 1 source vlan 10 rx
- no monitor session 1 destination interface GE 23

# Cisco - Réinitialiser en mode usine

<table id="bkmrk-difficult%C3%A9%2A-%3Cdescrip" style="border-collapse: collapse; width: 100%; height: 46.8px; border-width: 1px; border-style: hidden;"><colgroup><col style="width: 20%;"></col><col style="width: 80%;"></col></colgroup><tbody><tr style="height: 46.8px;"><td style="height: 46.8px; border: 1px groove rgb(52,73,94);">[![Novice.png](https://docs.labs404.fr/uploads/images/gallery/2026-07/scaled-1680-/Yyrnovice-png.png)](https://docs.labs404.fr/uploads/images/gallery/2026-07/scaled-1680-/Yyrnovice-png.png)</td><td style="height: 46.8px; border-width: 1px; background-color: rgb(236,202,250); vertical-align: top;">Difficulté : Novice

Notions : harware, cisco, réinitialisation, http, ssh, console, putty.

</td></tr></tbody></table>

### <span style="color: rgb(52, 73, 94);">**<span style="text-decoration: underline;">I. Introduction</span>**</span>

<span style="color: rgb(23,43,77); font-family: '-apple-system', BlinkMacSystemFont, 'Segoe UI', Roboto, Oxygen, Ubuntu, 'Fira Sans', 'Droid Sans', 'Helvetica Neue', sans-serif; font-size: 16px; font-style: normal; font-weight: 400; letter-spacing: -0.08px; text-indent: 0px; text-transform: none; white-space: pre-wrap; word-spacing: 0px; text-decoration-thickness: initial; text-decoration-style: initial; text-decoration-color: initial; display: inline; float: none;">Cette procédure à pour but d’expliquer comment réinitialiser un switch cisco en mode usine. Aussi appelé Factory reset.</span>

<p class="callout info"><span style="color: rgb(23,43,77); font-family: '-apple-system', BlinkMacSystemFont, 'Segoe UI', Roboto, Oxygen, Ubuntu, 'Fira Sans', 'Droid Sans', 'Helvetica Neue', sans-serif; font-size: 16px; font-style: normal; font-weight: 400; letter-spacing: -0.08px; text-indent: 0px; text-transform: none; white-space: pre-wrap; word-spacing: 0px; text-decoration-thickness: initial; text-decoration-style: initial; text-decoration-color: initial; display: inline; float: none;">Télécharger Putty : [Download PuTTY - Latest](https://www.chiark.greenend.org.uk/~sgtatham/putty/latest.html "Download PuTTY - Latest")</span></p>

---

### <span style="color: rgb(52, 73, 94);">**<span style="text-decoration: underline;">II. Réinitialisation</span>**</span>

####   


#### <span style="color: rgb(35, 111, 161);">**2.1 En mode web**</span>

<p class="callout danger">**Prérequis** : Un PC avec un navigateur web.</p>

<p class="callout warning">**Attention** : selon le modèle ou la marque, les informations ci-dessous peuvent varier. Consulter le manuel utilisateur de l'équipement pour avoir les paramètres correspondant.</p>

Se connecter à l’interface web du switch.

[![image.png](https://docs.labs404.fr/uploads/images/gallery/2026-07/scaled-1680-/lw5image-png.png)](https://docs.labs404.fr/uploads/images/gallery/2026-07/scaled-1680-/lw5image-png.png)
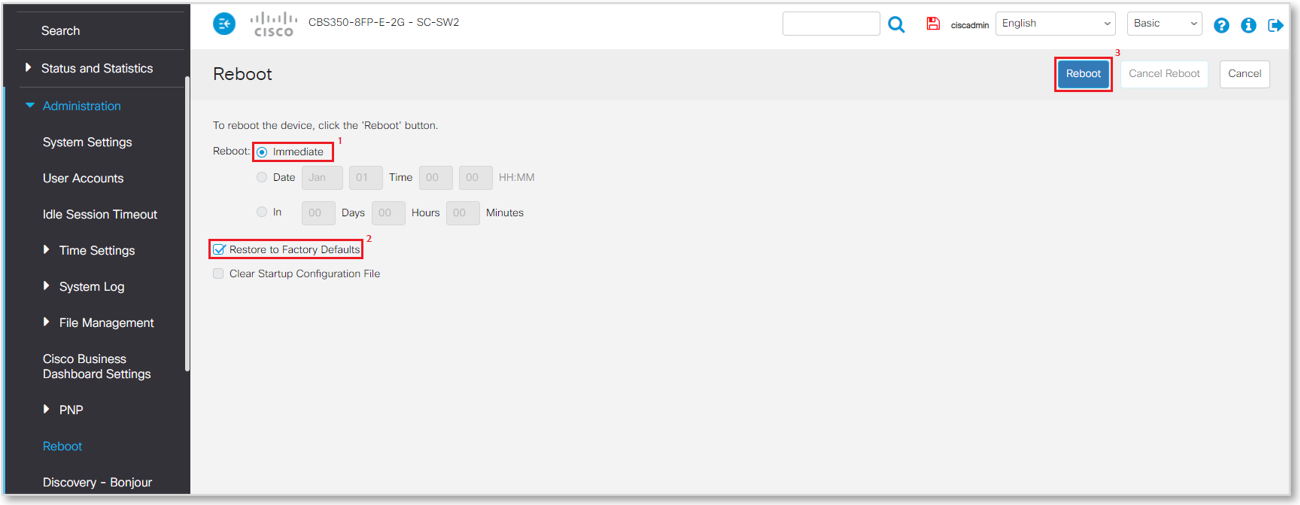
<span style="color: rgb(23,43,77); font-family: '-apple-system', BlinkMacSystemFont, 'Segoe UI', Roboto, Oxygen, Ubuntu, 'Fira Sans', 'Droid Sans', 'Helvetica Neue', sans-serif; font-size: 16px; font-style: normal; font-weight: 400; letter-spacing: -0.08px; text-indent: 0px; text-transform: none; white-space: pre-wrap; word-spacing: 0px; background-color: rgb(255,255,255); text-decoration-thickness: initial; text-decoration-style: initial; text-decoration-color: initial; display: inline; float: none;">Dans le menu “</span><span style="color: rgb(132, 63, 161);">***<span class="fabric-text-color-mark">Administration → Reboot</span>***</span><span style="color: rgb(23,43,77); font-family: '-apple-system', BlinkMacSystemFont, 'Segoe UI', Roboto, Oxygen, Ubuntu, 'Fira Sans', 'Droid Sans', 'Helvetica Neue', sans-serif; font-size: 16px; font-style: normal; font-weight: 400; letter-spacing: -0.08px; text-indent: 0px; text-transform: none; white-space: pre-wrap; word-spacing: 0px; background-color: rgb(255,255,255); text-decoration-thickness: initial; text-decoration-style: initial; text-decoration-color: initial; display: inline; float: none;">”, cocher la case ‘</span><span style="color: rgb(132, 63, 161);">***<span class="fabric-text-color-mark">Restore to factory defaults</span>***</span><span style="color: rgb(23,43,77); font-family: '-apple-system', BlinkMacSystemFont, 'Segoe UI', Roboto, Oxygen, Ubuntu, 'Fira Sans', 'Droid Sans', 'Helvetica Neue', sans-serif; font-size: 16px; font-style: normal; font-weight: 400; letter-spacing: -0.08px; text-indent: 0px; text-transform: none; white-space: pre-wrap; word-spacing: 0px; background-color: rgb(255,255,255); text-decoration-thickness: initial; text-decoration-style: initial; text-decoration-color: initial; display: inline; float: none;">' et choisir l’option ‘</span><span style="color: rgb(132, 63, 161);">***<span class="fabric-text-color-mark">Immediate</span>***</span><span style="color: rgb(23,43,77); font-family: '-apple-system', BlinkMacSystemFont, 'Segoe UI', Roboto, Oxygen, Ubuntu, 'Fira Sans', 'Droid Sans', 'Helvetica Neue', sans-serif; font-size: 16px; font-style: normal; font-weight: 400; letter-spacing: -0.08px; text-indent: 0px; text-transform: none; white-space: pre-wrap; word-spacing: 0px; background-color: rgb(255,255,255); text-decoration-thickness: initial; text-decoration-style: initial; text-decoration-color: initial; display: inline; float: none;">’ pour le redémarrage. Puis cliquer sur ‘</span><span style="color: rgb(132, 63, 161);">***<span class="fabric-text-color-mark">Reboot</span>***</span><span style="color: rgb(23,43,77); font-family: '-apple-system', BlinkMacSystemFont, 'Segoe UI', Roboto, Oxygen, Ubuntu, 'Fira Sans', 'Droid Sans', 'Helvetica Neue', sans-serif; font-size: 16px; font-style: normal; font-weight: 400; letter-spacing: -0.08px; text-indent: 0px; text-transform: none; white-space: pre-wrap; word-spacing: 0px; background-color: rgb(255,255,255); text-decoration-thickness: initial; text-decoration-style: initial; text-decoration-color: initial; display: inline; float: none;">’.</span>

[![image.png](https://docs.labs404.fr/uploads/images/gallery/2026-07/scaled-1680-/W5iimage-png.png)](https://docs.labs404.fr/uploads/images/gallery/2026-07/scaled-1680-/W5iimage-png.png)

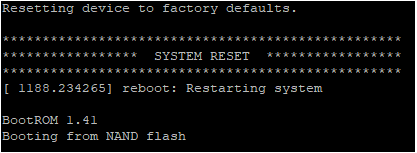
<span style="color: rgb(23,43,77); font-family: '-apple-system', BlinkMacSystemFont, 'Segoe UI', Roboto, Oxygen, Ubuntu, 'Fira Sans', 'Droid Sans', 'Helvetica Neue', sans-serif; font-size: 16px; font-style: normal; font-weight: 400; letter-spacing: -0.08px; text-indent: 0px; text-transform: none; white-space: pre-wrap; word-spacing: 0px; background-color: rgb(255,255,255); text-decoration-thickness: initial; text-decoration-style: initial; text-decoration-color: initial; display: inline; float: none;">Le switch redémarre et si l’on est connecté, le message suivant est visible.</span>

[![image.png](https://docs.labs404.fr/uploads/images/gallery/2026-07/scaled-1680-/iz5image-png.png)](https://docs.labs404.fr/uploads/images/gallery/2026-07/scaled-1680-/iz5image-png.png)

<div class="rich-media-item mediaSingleView-content-wrap image-center css-ve6013" id="bkmrk--6" style="margin: 24px auto; padding: 0px; width: 480px; max-width: 100%; float: none; clear: both; color: rgb(23,43,77); font-family: '-apple-system', BlinkMacSystemFont, 'Segoe UI', Roboto, Oxygen, Ubuntu, 'Fira Sans', 'Droid Sans', 'Helvetica Neue', sans-serif; font-size: 16px; font-style: normal; font-weight: 400; letter-spacing: normal; text-indent: 0px; text-transform: none; white-space: pre-wrap; word-spacing: 0px; background-color: rgb(255,255,255); text-decoration-thickness: initial; text-decoration-style: initial; text-decoration-color: initial;"><div class="css-1apxplf" style="margin: 0px; padding: 0px;"><div style="margin: 0px; padding: 0px; height: 0px; width: 480px;"><div class="new-file-experience-wrapper css-dcw6dw" id="bkmrk--10" style="margin: 0px; padding: 0px; font-family: '-apple-system', BlinkMacSystemFont, 'Segoe UI', Roboto, Oxygen, Ubuntu, 'Fira Sans', 'Droid Sans', 'Helvetica Neue', sans-serif; width: 2837px; max-width: 100%; height: 600.984px; max-height: 100%; font-size: 14px; line-height: 22px;"><div class="media-file-card-view css-1yn77bd" style="margin: 0px; padding: 0px; max-width: 100%; width: 480px; height: 600.984px; max-height: 100%; overflow: hidden;">  
</div></div></div></div></div>#### <span style="color: rgb(35, 111, 161);">**2.2 En mode console ou SSH**</span>

<p class="callout danger">**Prérequis** : Putty et un câble console cisco. voir : [Cisco - Se connecter au port console](https://docs.labs404.fr/books/reseau-Vdy/page/cisco-se-connecter-au-port-console "Cisco - Se connecter au port console")  
</p>

Se connecter en SSH ou au port console et s’authentifier.

Entrer les commandes suivantes :

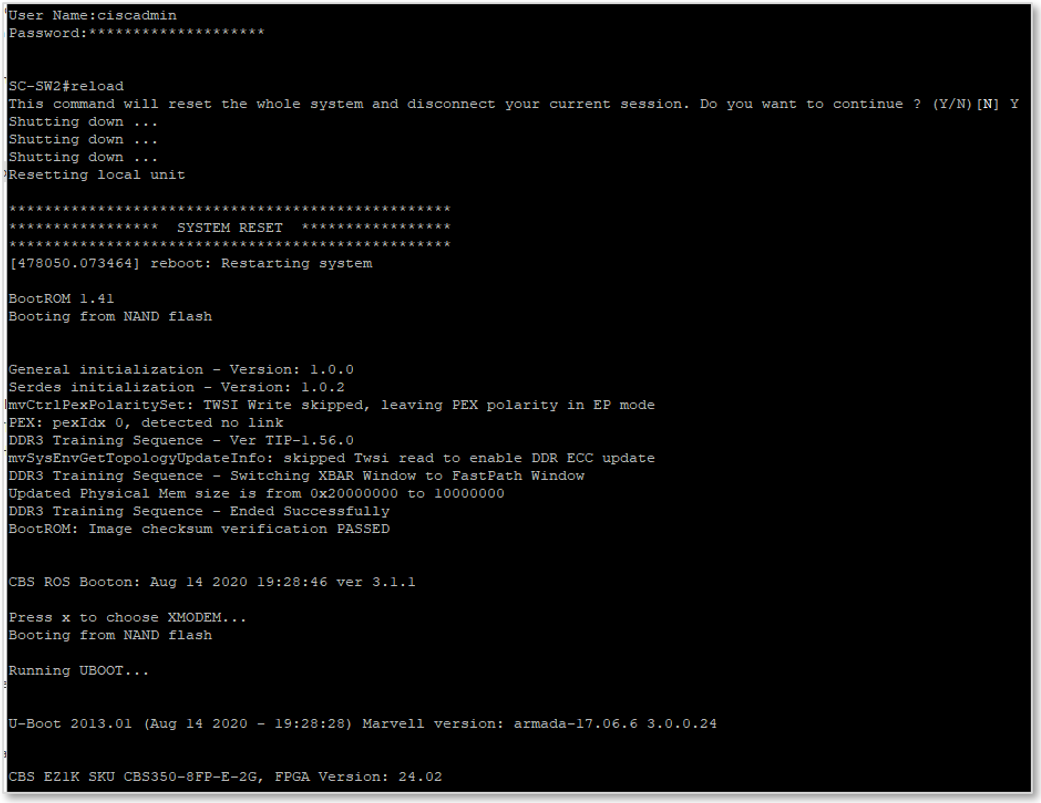
```
Delete startup-config
reload
```

Puis valider avec '***<span class="fabric-text-color-mark">Y</span>***'.

Le processus s’enclenche.

[![image.png](https://docs.labs404.fr/uploads/images/gallery/2026-07/scaled-1680-/bUeimage-png.png)](https://docs.labs404.fr/uploads/images/gallery/2026-07/scaled-1680-/bUeimage-png.png)

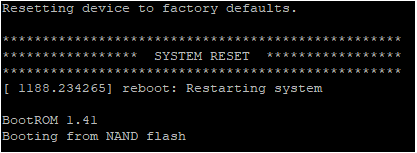
<span style="color: rgb(23,43,77); font-family: '-apple-system', BlinkMacSystemFont, 'Segoe UI', Roboto, Oxygen, Ubuntu, 'Fira Sans', 'Droid Sans', 'Helvetica Neue', sans-serif; font-size: 16px; font-style: normal; font-weight: 400; letter-spacing: -0.08px; text-indent: 0px; text-transform: none; white-space: pre-wrap; word-spacing: 0px; background-color: rgb(255,255,255); text-decoration-thickness: initial; text-decoration-style: initial; text-decoration-color: initial; display: inline; float: none;">Le switch redémarre et si l’on est connecté, le message suivant est visible.</span>

[![image.png](https://docs.labs404.fr/uploads/images/gallery/2026-07/scaled-1680-/T9dimage-png.png)](https://docs.labs404.fr/uploads/images/gallery/2026-07/scaled-1680-/T9dimage-png.png)

#### <span style="color: rgb(35, 111, 161);">**2.3 En mode matériel**</span>

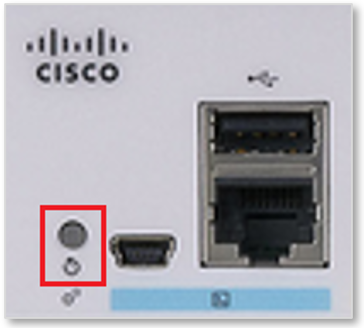
<span style="color: rgb(23,43,77); font-family: '-apple-system', BlinkMacSystemFont, 'Segoe UI', Roboto, Oxygen, Ubuntu, 'Fira Sans', 'Droid Sans', 'Helvetica Neue', sans-serif; font-size: 16px; font-style: normal; font-weight: 400; letter-spacing: -0.08px; text-indent: 0px; text-transform: none; white-space: pre-wrap; word-spacing: 0px; background-color: rgb(255,255,255); text-decoration-thickness: initial; text-decoration-style: initial; text-decoration-color: initial; display: inline; float: none;">Presser le bouton reset pendant 10 secondes</span>

[![image.png](https://docs.labs404.fr/uploads/images/gallery/2026-07/scaled-1680-/Gt6image-png.png)](https://docs.labs404.fr/uploads/images/gallery/2026-07/scaled-1680-/Gt6image-png.png)

<span style="color: rgb(23,43,77); font-family: '-apple-system', BlinkMacSystemFont, 'Segoe UI', Roboto, Oxygen, Ubuntu, 'Fira Sans', 'Droid Sans', 'Helvetica Neue', sans-serif; font-size: 16px; font-style: normal; font-weight: 400; letter-spacing: -0.08px; text-indent: 0px; text-transform: none; white-space: pre-wrap; word-spacing: 0px; background-color: rgb(255,255,255); text-decoration-thickness: initial; text-decoration-style: initial; text-decoration-color: initial; display: inline; float: none;">Si l’on est connecté, le message suivant s’affiche.</span>

[![image.png](https://docs.labs404.fr/uploads/images/gallery/2026-07/scaled-1680-/rEoimage-png.png)](https://docs.labs404.fr/uploads/images/gallery/2026-07/scaled-1680-/rEoimage-png.png)

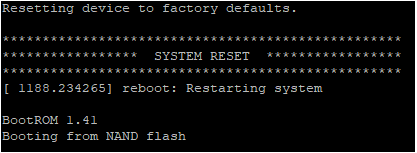
<span style="color: rgb(23,43,77); font-family: '-apple-system', BlinkMacSystemFont, 'Segoe UI', Roboto, Oxygen, Ubuntu, 'Fira Sans', 'Droid Sans', 'Helvetica Neue', sans-serif; font-size: 16px; font-style: normal; font-weight: 400; letter-spacing: -0.08px; text-indent: 0px; text-transform: none; white-space: pre-wrap; word-spacing: 0px; background-color: rgb(255,255,255); text-decoration-thickness: initial; text-decoration-style: initial; text-decoration-color: initial; display: inline; float: none;">Le switch redémarre et si l’on est connecté, le message suivant est visible.</span>

[![image.png](https://docs.labs404.fr/uploads/images/gallery/2026-07/scaled-1680-/h8dimage-png.png)](https://docs.labs404.fr/uploads/images/gallery/2026-07/scaled-1680-/h8dimage-png.png)

# Cisco - Se connecter au port console

<table id="bkmrk-difficult%C3%A9%2A-%3Cdescrip" style="border-collapse: collapse; width: 100%; height: 46.8px; border-width: 1px; border-style: hidden;"><colgroup><col style="width: 15.5556%;"></col><col style="width: 84.4444%;"></col></colgroup><tbody><tr style="height: 46.8px;"><td style="height: 46.8px; border: 1px groove rgb(52,73,94);">[![Novice.png](https://docs.labs404.fr/uploads/images/gallery/2026-07/scaled-1680-/Yyrnovice-png.png)](https://docs.labs404.fr/uploads/images/gallery/2026-07/scaled-1680-/Yyrnovice-png.png)</td><td style="height: 46.8px; border-width: 1px; background-color: rgb(236,202,250); vertical-align: top;">Difficulté : Novice

Notions : Connectique port console, Paramétrage port série, Gestionnaire de périphérique.

</td></tr></tbody></table>

---

### <span style="color: rgb(52, 73, 94);">**<span style="text-decoration: underline;">I.Introduction</span>**</span>

Cette procédure à pour but de décrire la connexion en port console sur un switch Cisco. Que cela soit pour faire une initialisation ou une manipulation directement sur l’équipement.

<p class="callout danger">**Prérequis** : le logiciel Putty, un câble console compatible cisco.</p>

<p class="callout info">Télécharger Putty : [Download PuTTY - Latest](https://www.chiark.greenend.org.uk/~sgtatham/putty/latest.html "Download PuTTY - Latest")  
</p>

---

### **<span style="text-decoration: underline;"><span style="color: rgb(52, 73, 94); text-decoration: underline;">II. Connexion en port console</span>  
</span>**


Brancher le câble console sur le port console correspondant du switch puis sur le PC.

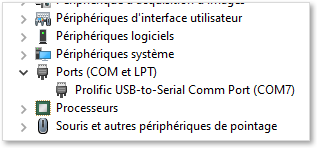
Après la détection de celui-ci, il faut se rendre dans le gestionnaire de périphérique pour savoir quel port COM a été attribué.

<table id="bkmrk-ici%2C-port-com7" style="border-collapse: collapse; width: 100%;"><colgroup><col style="width: 99.8765%;"></col></colgroup><tbody><tr><td style="border-style: hidden;">[![image.png](https://docs.labs404.fr/uploads/images/gallery/2026-07/scaled-1680-/lw5image-png.png)](https://docs.labs404.fr/uploads/images/gallery/2026-07/scaled-1680-/lw5image-png.png)

</td></tr><tr><td class="align-center" style="border-style: hidden;">*ici, port COM7*</td></tr></tbody></table>

Lancer Putty et établir la connexion avec les paramètres suivants :

- Port : COM7
- Speed : 115200
- Data bits : 8
- Stop Bits : 1
- Parity : none
- Flow Control : Xon / Xoff

[![image.png](https://docs.labs404.fr/uploads/images/gallery/2026-07/scaled-1680-/RaWimage-png.png)](https://docs.labs404.fr/uploads/images/gallery/2026-07/scaled-1680-/RaWimage-png.png)

<p class="callout warning">**Attention** : Selon le modèle ou la marque, les informations ci-dessus peuvent varier. Consulter le manuel utilisateur de l'équipement pour avoir les paramètres correspondant.</p>

Établir la connexion.

[![image.png](https://docs.labs404.fr/uploads/images/gallery/2026-07/scaled-1680-/eJYimage-png.png)](https://docs.labs404.fr/uploads/images/gallery/2026-07/scaled-1680-/eJYimage-png.png)

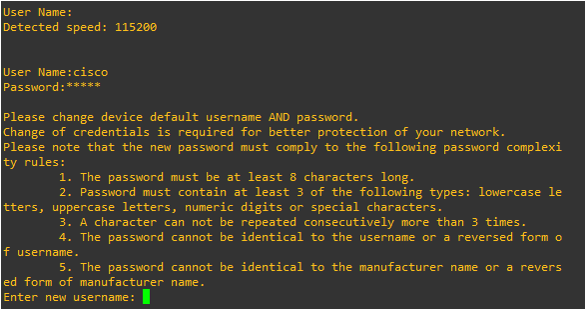
<p class="callout info">Le login et mot de passe par défaut est : cisco / cisco</p>

Entrer ensuite le nouveau username et changer le mot de passe.

[![image.png](https://docs.labs404.fr/uploads/images/gallery/2026-07/scaled-1680-/Gqgimage-png.png)](https://docs.labs404.fr/uploads/images/gallery/2026-07/scaled-1680-/Gqgimage-png.png)
Le switch est prêt à être utilisé.

[![image.png](https://docs.labs404.fr/uploads/images/gallery/2026-07/scaled-1680-/Nrrimage-png.png)](https://docs.labs404.fr/uploads/images/gallery/2026-07/scaled-1680-/Nrrimage-png.png)