# DHCP - Installation (GUI)

<table id="bkmrk-difficult%C3%A9%2A-%3Cdescrip" style="border-collapse: collapse; width: 100%; height: 46.8px; border-width: 1px; border-style: hidden;"><colgroup><col style="width: 20%;"></col><col style="width: 80%;"></col></colgroup><tbody><tr style="height: 46.8px;"><td style="height: 46.8px; border: 1px groove rgb(52,73,94);">[![image.png](https://docs.labs404.fr/uploads/images/gallery/2026-07/scaled-1680-/KcBnovice-png.png)](https://docs.labs404.fr/uploads/images/gallery/2026-07/scaled-1680-/KcBnovice-png.png)</td><td style="height: 46.8px; border-width: 1px; background-color: rgb(236,202,250); vertical-align: top;">Difficulté : Novice

Notions : DHCP, rôle windows, réseau.

</td></tr></tbody></table>

---

### <span style="color: rgb(52,73,94);">**<span style="text-decoration: underline;">I. Introduction</span>**</span>

Cette procédure à pour but de décrire la mise en place d'un serveur DHCP sous windows.

<p class="callout info">**Info** : Pour les notions théoriques sur le DHCP, se référer à [Réseau - Protocole DHCP](https://docs.labs404.fr/books/cours-it-bts/page/reseau-protocole-dhcp "Réseau - Protocole DHCP")</p>

<table id="bkmrk-pr%C3%A9requis-mat%C3%A9riels-" style="border-collapse: collapse; width: 100%;"><colgroup><col style="width: 50.0596%;"></col><col style="width: 50.0596%;"></col></colgroup><tbody><tr><td class="align-center" colspan="2" style="background-color: rgb(248,202,198);">**Prérequis matériels**  
</td></tr><tr><td class="align-center" style="background-color: rgb(194,224,244);">Core</td><td class="align-center" style="background-color: rgb(194,224,244);">GUI</td></tr><tr><td>- 1 vcpu
- 2Gb RAM
- 25Gb dd
- 1 IP Fixe

</td><td>- 1 à 2 vcpu
- 2 à 4Gb RAM
- 60Gb dd
- 1 IP Fixe

</td></tr></tbody></table>

---

### <span style="color: rgb(52,73,94);">**<span style="text-decoration: underline;">II. Installation</span>**</span>

Lancer le server manager

[![image.png](https://docs.labs404.fr/uploads/images/gallery/2026-07/scaled-1680-/LwZimage-png.png)](https://docs.labs404.fr/uploads/images/gallery/2026-07/scaled-1680-/LwZimage-png.png)

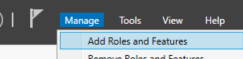
Cliquer sur '<span style="color: rgb(132,63,161);">***Manage --&gt; Add Roles and Features***</span>'

[![image.png](https://docs.labs404.fr/uploads/images/gallery/2026-07/scaled-1680-/KwGimage-png.png)](https://docs.labs404.fr/uploads/images/gallery/2026-07/scaled-1680-/KwGimage-png.png)

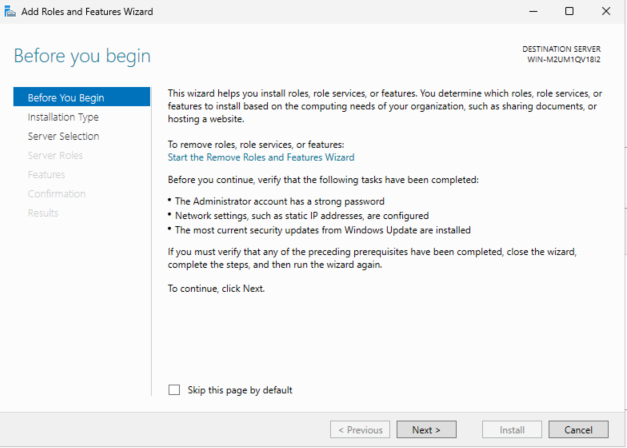
Sur la première page, faire '<span style="color: rgb(132,63,161);">***Next***'</span>.

[![image.png](https://docs.labs404.fr/uploads/images/gallery/2026-07/scaled-1680-/m0cimage-png.png)](https://docs.labs404.fr/uploads/images/gallery/2026-07/scaled-1680-/m0cimage-png.png)

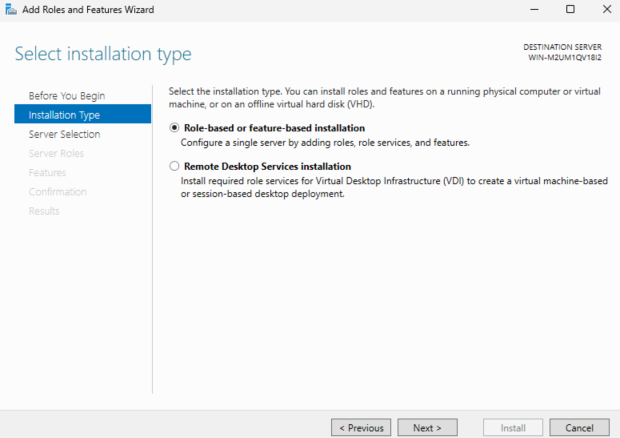
Sélectionner '<span style="color: rgb(132,63,161);">***Role-based or feature-based installation***</span>' puis faire '<span style="color: rgb(132,63,161);">***Next***</span>'.

[![image.png](https://docs.labs404.fr/uploads/images/gallery/2026-07/scaled-1680-/KLQimage-png.png)](https://docs.labs404.fr/uploads/images/gallery/2026-07/scaled-1680-/KLQimage-png.png)

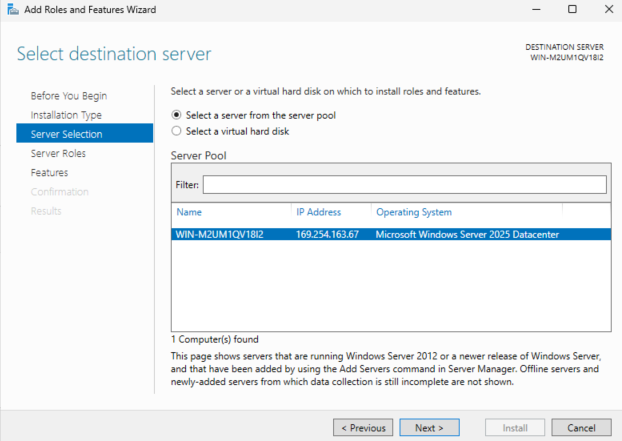
Sélectionner le serveur sur lequel installer le rôle puis faire '<span style="color: rgb(132,63,161);">***Next***</span>'.

[![image.png](https://docs.labs404.fr/uploads/images/gallery/2026-07/scaled-1680-/0n5image-png.png)](https://docs.labs404.fr/uploads/images/gallery/2026-07/scaled-1680-/0n5image-png.png)

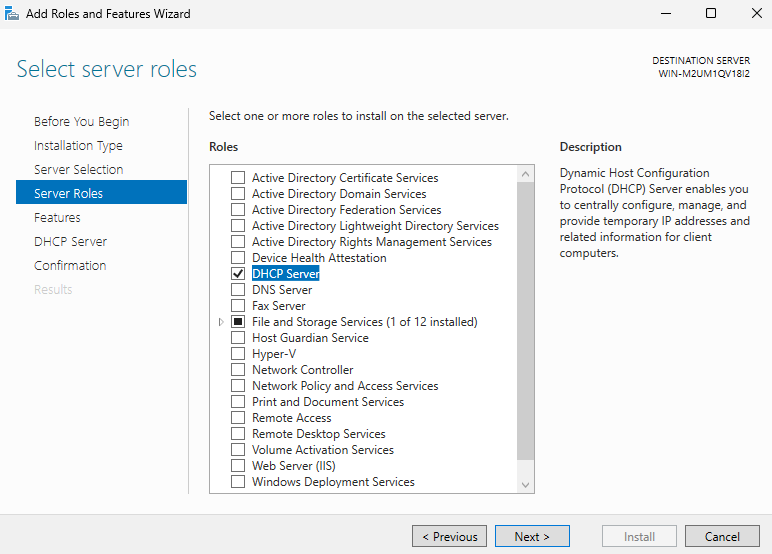
Cocher le rôle DHCP puis faire '<span style="color: rgb(132,63,161);">***Next***</span>'.

[![image.png](https://docs.labs404.fr/uploads/images/gallery/2026-07/scaled-1680-/4hJimage-png.png)](https://docs.labs404.fr/uploads/images/gallery/2026-07/scaled-1680-/4hJimage-png.png)

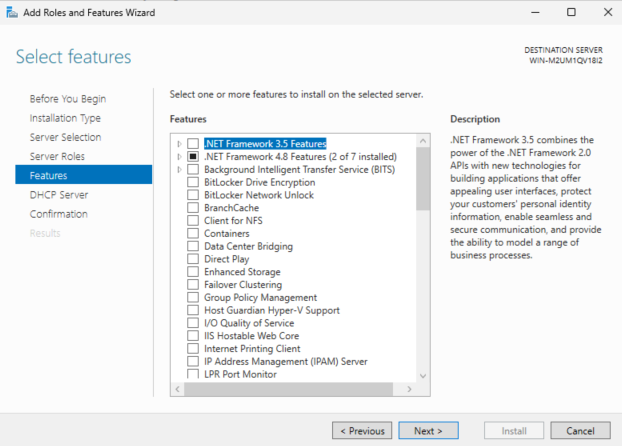
Pas de feature nécessaire, ignorer cette étape et faire '<span style="color: rgb(132,63,161);">***Next***</span>'.

[![image.png](https://docs.labs404.fr/uploads/images/gallery/2026-07/scaled-1680-/tZbimage-png.png)](https://docs.labs404.fr/uploads/images/gallery/2026-07/scaled-1680-/tZbimage-png.png)

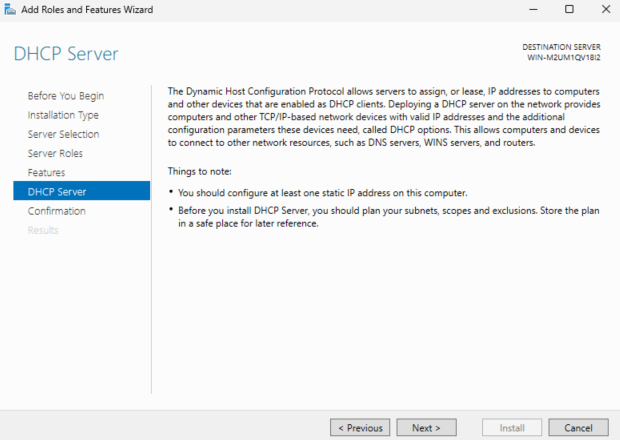
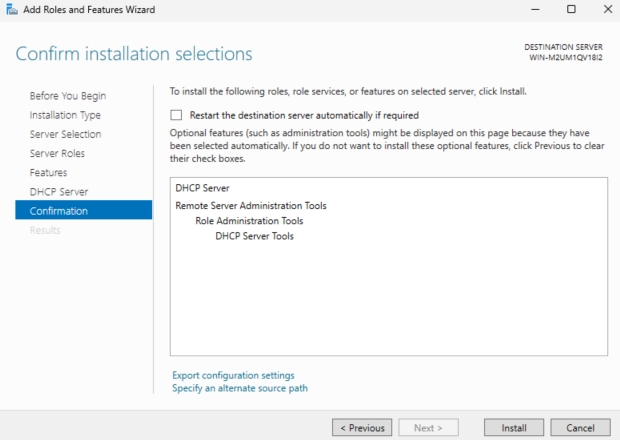
Les étapes suivantes sont juste un récapitulatif, faire '<span style="color: rgb(132,63,161);">***Next***</span>'. Puis '<span style="color: rgb(132,63,161);">***Install***</span>'.

<table id="bkmrk--11" style="border-collapse: collapse; width: 100%;"><colgroup><col style="width: 50%;"></col><col style="width: 50%;"></col></colgroup><tbody><tr><td style="border-style: none;">[![image.png](https://docs.labs404.fr/uploads/images/gallery/2026-07/scaled-1680-/C7cimage-png.png)](https://docs.labs404.fr/uploads/images/gallery/2026-07/scaled-1680-/C7cimage-png.png)  
</td><td style="border-style: none;">[![image.png](https://docs.labs404.fr/uploads/images/gallery/2026-07/scaled-1680-/scwimage-png.png)](https://docs.labs404.fr/uploads/images/gallery/2026-07/scaled-1680-/scwimage-png.png)  
</td></tr></tbody></table>

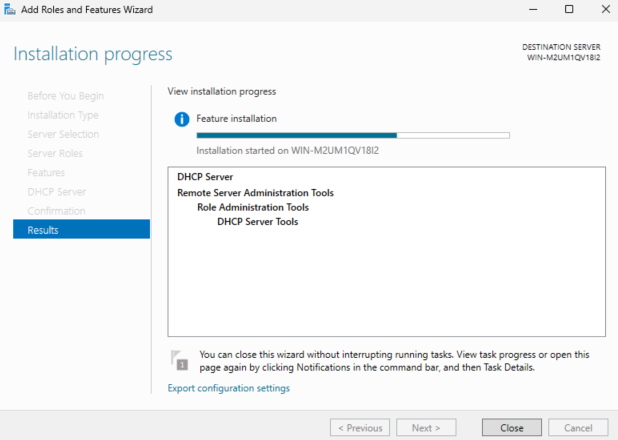
Attendre la fin de l'installation.

[![image.png](https://docs.labs404.fr/uploads/images/gallery/2026-07/scaled-1680-/cTlimage-png.png)](https://docs.labs404.fr/uploads/images/gallery/2026-07/scaled-1680-/cTlimage-png.png)

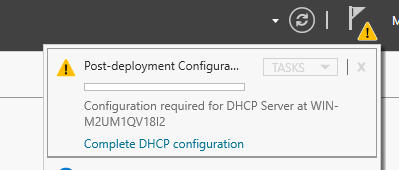
A la fin du processus, il faudra activer le serveur DHCP.

Dans le serveur manager, cliquer le le drapeau en haut à droite et lancer l'assistant en cliquant sur '<span style="color: rgb(132,63,161);">***Complete DHCP configuration***</span>'.

[![image.png](https://docs.labs404.fr/uploads/images/gallery/2026-07/scaled-1680-/fmiimage-png.png)](https://docs.labs404.fr/uploads/images/gallery/2026-07/scaled-1680-/fmiimage-png.png)

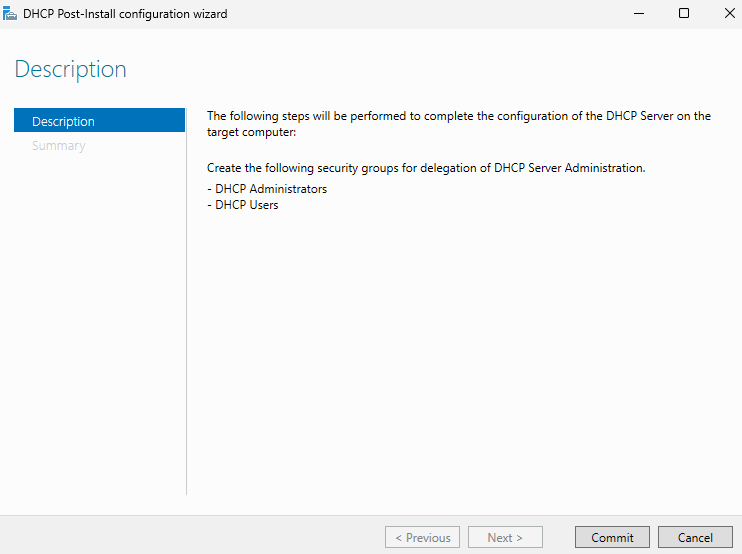
Sur l'assistant, cliquer simplement sur '<span style="color: rgb(132,63,161);">***commit***</span>'.

[![image.png](https://docs.labs404.fr/uploads/images/gallery/2026-07/scaled-1680-/vwaimage-png.png)](https://docs.labs404.fr/uploads/images/gallery/2026-07/scaled-1680-/vwaimage-png.png)

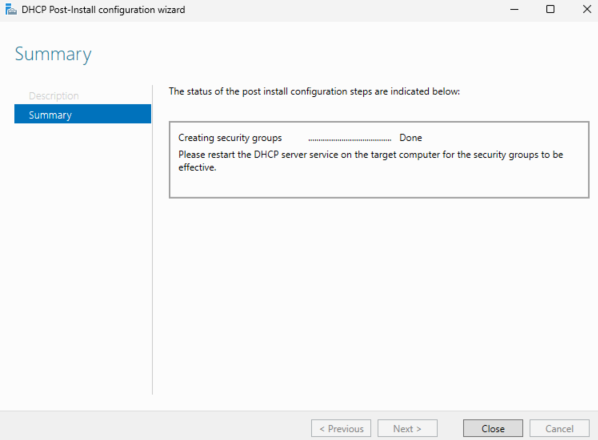
Puis faire '<span style="color: rgb(132,63,161);">***Close***</span>'.

[![image.png](https://docs.labs404.fr/uploads/images/gallery/2026-07/scaled-1680-/rxximage-png.png)](https://docs.labs404.fr/uploads/images/gallery/2026-07/scaled-1680-/rxximage-png.png)

---

### <span style="color: rgb(52,73,94);">**<span style="text-decoration: underline;">IV. Configuration</span>**</span>

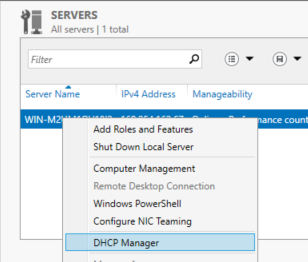
Pour configurer le serveur DHCP, lancer la console d'administration depuis le serveur manager.

[![image.png](https://docs.labs404.fr/uploads/images/gallery/2026-07/scaled-1680-/2J1image-png.png)](https://docs.labs404.fr/uploads/images/gallery/2026-07/scaled-1680-/2J1image-png.png)
<details id="bkmrk-optionnel---bonne-pr"><summary>Optionnel - Bonne pratique</summary>

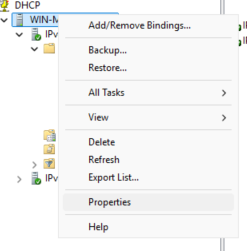
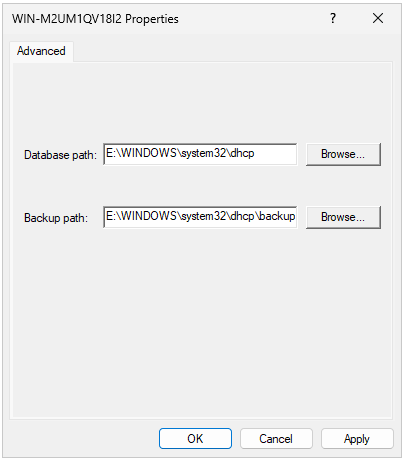
Comme tout rôle, il est conseillé de séparer le système des data du rôle.

Pour cela, faire un clic droit sur le serveur, puis '<span style="color: rgb(132,63,161);">***Properties***</span>'.

[![image.png](https://docs.labs404.fr/uploads/images/gallery/2026-07/scaled-1680-/IiPimage-png.png)](https://docs.labs404.fr/uploads/images/gallery/2026-07/scaled-1680-/IiPimage-png.png)

Sélectionner le chemin ou seront stockés la base de donnée des adresses et les sauvegardes. Puis faire '<span style="color: rgb(132,63,161);">***Apply***</span>' et '<span style="color: rgb(132,63,161);">***OK***</span>'.

[![image.png](https://docs.labs404.fr/uploads/images/gallery/2026-07/scaled-1680-/Jagimage-png.png)](https://docs.labs404.fr/uploads/images/gallery/2026-07/scaled-1680-/Jagimage-png.png)

</details>Déplier la section du serveur puis faire un clic droit sur '<span style="color: rgb(132,63,161);">***IPv4***</span>' et '<span style="color: rgb(132,63,161);">***New scope***</span>'

[![image.png](https://docs.labs404.fr/uploads/images/gallery/2026-07/scaled-1680-/DNgimage-png.png)](https://docs.labs404.fr/uploads/images/gallery/2026-07/scaled-1680-/DNgimage-png.png)

l'assistant de création d'étendue démarre, faire '<span style="color: rgb(132,63,161);">***Next***</span>'.

[![image.png](https://docs.labs404.fr/uploads/images/gallery/2026-07/scaled-1680-/cWximage-png.png)](https://docs.labs404.fr/uploads/images/gallery/2026-07/scaled-1680-/cWximage-png.png)

Entrer un nom et une description pour le scope. Puis faire '<span style="color: rgb(132,63,161);">***Next***</span>'.

[![image.png](https://docs.labs404.fr/uploads/images/gallery/2026-07/scaled-1680-/cwvimage-png.png)](https://docs.labs404.fr/uploads/images/gallery/2026-07/scaled-1680-/cwvimage-png.png)

Entrer l'ip de début de plage et l'ip de fin de plage, le masque, faire '<span style="color: rgb(132,63,161);">***Next***</span>'.

Si l'on souhaite ajouter des plages d'exclusions, il est possible de les ajouter ici.

Sinon, faire '<span style="color: rgb(132,63,161);">***Next***</span>'.[![image.png](https://docs.labs404.fr/uploads/images/gallery/2026-07/scaled-1680-/h6pimage-png.png)](https://docs.labs404.fr/uploads/images/gallery/2026-07/scaled-1680-/h6pimage-png.png)

[![image.png](https://docs.labs404.fr/uploads/images/gallery/2026-07/scaled-1680-/GBZimage-png.png)](https://docs.labs404.fr/uploads/images/gallery/2026-07/scaled-1680-/GBZimage-png.png)

Sélectionner la durée du lease. Puis faire '<span style="color: rgb(132,63,161);">***Next***</span>'.

[![image.png](https://docs.labs404.fr/uploads/images/gallery/2026-07/scaled-1680-/4nOimage-png.png)](https://docs.labs404.fr/uploads/images/gallery/2026-07/scaled-1680-/4nOimage-png.png)

Comme il va falloir configurer les autres options de toute façon, laisser le choix par défaut et faire '<span style="color: rgb(132,63,161);">***Next***</span>'.

[![image.png](https://docs.labs404.fr/uploads/images/gallery/2026-07/scaled-1680-/g66image-png.png)](https://docs.labs404.fr/uploads/images/gallery/2026-07/scaled-1680-/g66image-png.png)

Entrer l'adresse du ou des routeurs puis cliquer sur '<span style="color: rgb(132,63,161);">***Add***</span>' pour les ajouter à la liste. Une fois terminé, cliquer sur '<span style="color: rgb(132,63,161);">***Next***</span>'.

[![image.png](https://docs.labs404.fr/uploads/images/gallery/2026-07/scaled-1680-/LDtimage-png.png)](https://docs.labs404.fr/uploads/images/gallery/2026-07/scaled-1680-/LDtimage-png.png)

De la même manière, entrer le domaine et les serveurs DNS et faire '<span style="color: rgb(132,63,161);">***Next***</span>'.

[![image.png](https://docs.labs404.fr/uploads/images/gallery/2026-07/scaled-1680-/7piimage-png.png)](https://docs.labs404.fr/uploads/images/gallery/2026-07/scaled-1680-/7piimage-png.png)

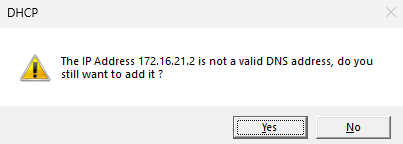
<p class="callout info">**Note** : Le message suivant peut apparaître, si vous êtes certains de ce que vous faites, vous pouvez l'ignorer.</p>

[![image.png](https://docs.labs404.fr/uploads/images/gallery/2026-07/scaled-1680-/sdVimage-png.png)](https://docs.labs404.fr/uploads/images/gallery/2026-07/scaled-1680-/sdVimage-png.png)

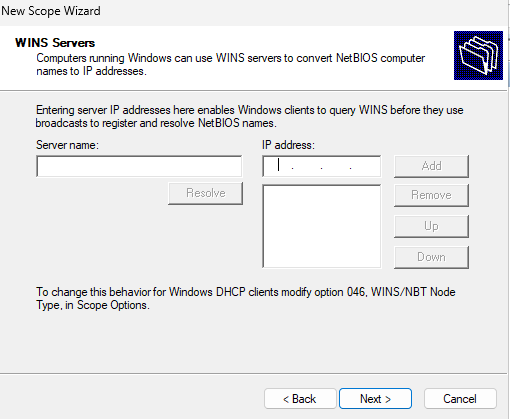
(optionnel) Si il faut ajouter des serveurs WINS, il est possibles de les ajouter à cette étape, puis faire '<span style="color: rgb(132,63,161);">***Next***</span>'.

[![image.png](https://docs.labs404.fr/uploads/images/gallery/2026-07/scaled-1680-/wvgimage-png.png)](https://docs.labs404.fr/uploads/images/gallery/2026-07/scaled-1680-/wvgimage-png.png)

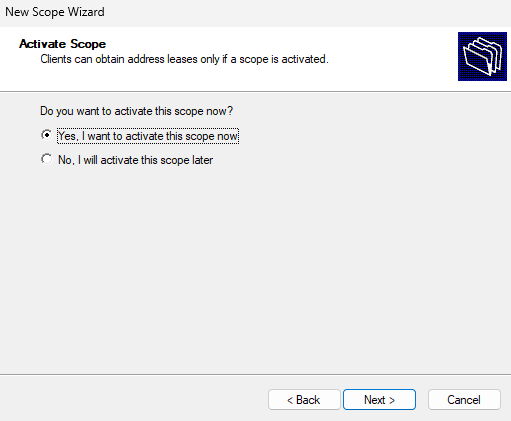
Laisser le bouton radio '<span style="color: rgb(132,63,161);">***Yes, I want to activate this scope now***</span>' coché et faire '<span style="color: rgb(132,63,161);">***Next***</span>'.

[![image.png](https://docs.labs404.fr/uploads/images/gallery/2026-07/scaled-1680-/JMVimage-png.png)](https://docs.labs404.fr/uploads/images/gallery/2026-07/scaled-1680-/JMVimage-png.png)

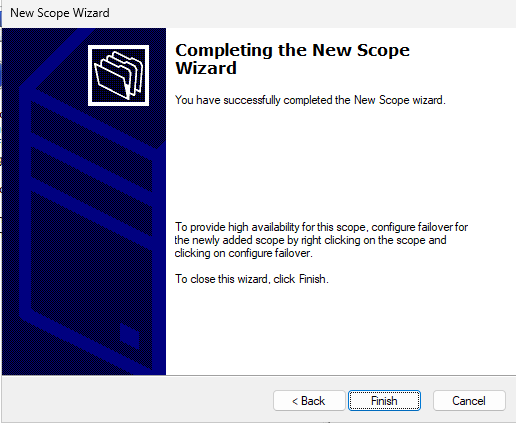
Cliquer sur '<span style="color: rgb(132,63,161);">***Finish***</span>'.

[![image.png](https://docs.labs404.fr/uploads/images/gallery/2026-07/scaled-1680-/JGJimage-png.png)](https://docs.labs404.fr/uploads/images/gallery/2026-07/scaled-1680-/JGJimage-png.png)

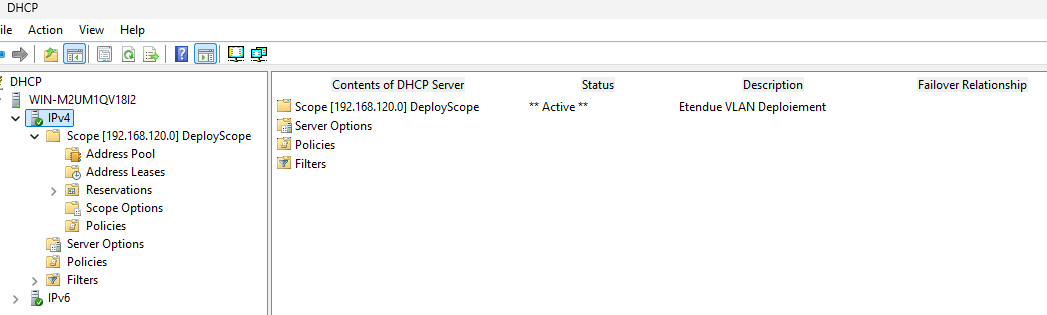
Pour terminer, vérifier que le scope est bien créé et que les options sont correctes.

[![image.png](https://docs.labs404.fr/uploads/images/gallery/2026-07/scaled-1680-/kRUimage-png.png)](https://docs.labs404.fr/uploads/images/gallery/2026-07/scaled-1680-/kRUimage-png.png)